HowTo
- Git Usage in Ubuntu
- Ansible
- Deploy a DotNet Service with Ansible
- Ansible Generic Commands
- Ansible Command References
- Debugging Ansible Playbook
- Ansible Commands Cheat Sheet
- Target Host Errors
- Cleaning up Ansible Temp Folders
- Windows .SSH Config File Syntax
- DotNet Startup Remote Debugging Hook
- Allow Remote Debugging of Docker Containers
- GitHub SSH Key Updates
- TortoiseGit Setting the SSH Key
- Install DotNet 6 on Ubuntu 24.04
- C# Dealing with Sudo
- Arch Linux VM Setup
- Ubuntu: Converting a System Account to Interactive
- HowTo Install Windows 11 with Local Account
- OGA.PostGres.Lib Usage
- How to Stop Cell HotSpot Throttling
- GitHub Personal Access Tokens
- Old NET Core Setup on Ubuntu 22
Git Usage in Ubuntu
Here’s some commands and such for accessing git from Ubuntu:
Use this to mount the bliss.git repository from 192.168.1.211, to /mnt/oga:sudo mount -t cifs //192.168.1.211/oga/bliss.git /mnt/oga -o username=glwhite,noexec
This command will clone the above repository to a working folder, /mnt/blissgit clone /mnt/oga /mnt/bliss
This command will update the working copy with updates from the git server:git pull origin main
NOTE: for older, non-PC, repositories, use master instead of main.
This command will commit changes to the local working copy:
git add -A; git commit -m "some comment"
This command will push the commit local changes to the remote repository:
git push origin main
If you ever see an error like this: GitHub · Build and ship software on a single, collaborative
The authenticity of host '(140.82.112.3)' can't be established. ED25519 key fingerprint is SHA256:+DiY3wvvV6TuJJhbpZisF/zLDA0zPMSvHdkr4UvCOqU.
Execute this command to clean up the hosts file for github.com entries:
sudo ssh-keyscan github.com >> ~/.ssh/known_hostsProblems that come up…
When you see:
Updates were rejected because the tip of your current branch is behind its remote counterpart
Do this:git pull --rebase
To revert the checkout folder to the latest, do this:git reset --hard HEAD
Cloning a GitHub Repository over SSH
See this: A quick GitHub SSH clone example
Ansible
Deploy a DotNet Service with Ansible
The following shell command will deploy the binaries and appropriate configuration for a service, to an inventoried host:
ansible-playbook deploy-service.yml \
-e "var_host=blissdev" \
-e "var_binrepo=oga-built-dev" \
-e "var_servicename=OGA.HostControl.Service" \
-e "var_description=OGA.HostControl.Service" \
-e "var_company=bliss" \
-e "var_envname=dev" \
-e "var_hasnotification=true" \
-e "var_ipaddress=192.168.1.201" \
-e "var_port=4180" \
--ask-vault-pass
NOTE: The hasnotification variable is only required for the service that needs a firebase configuration.
Currently, this is the cloud service test.
NOTE: Set the Jenkins user password in the “userpass” argument.
Set the service name argument to the name of the service to deploy:
Bliss.SignupService.APIcloudservice_test1
Set the var_host to the inventoried host that will receive the service install.
These are listed in the host inventory file in Ansible.
Set the environment name to specify which set of configuration data will be included with the service.
This can be set to dev or prod.
Ansible Generic Commands
To list hosts in inventory:
ansible-inventory --list -y
To ping all hosts:
ansible all -m ping -u glwhite
To scan a playbook for tasks without making changes:
ansible-playbook myplaybook.yml --list-tasks
To get a list of hosts affected by a playbook:
ansible-playbook myplaybook.yml --list-hosts --ask-vault-pass
To run a playbook:
ansible-playbook playbook.yml --ask-vault-pass
Adding the “--ask-become-pass" argument, tells Ansible to ask for the user password for the account it uses.
Adding the “--ask-vault-pass" argument, tells Ansible to ask for the vault password that it can use to decrypt the vars file that contains the become sudo password.
Ad-hoc command t list NFS shares:
ansible testservers -m shell -a 'df -h -T|grep -i nfs' -i ansible_hosts
Ansible Command References
Here’s a large list of possible ansible commands:
Ansible AD HOC Command Examples - Ansible Cheat Sheet | Devops Junction
Introduction to ad hoc commands — Ansible Community Documentation
Ansible Playbook Examples - Sample Ansible Playbooks | Devops Junction
Ansible apt module Examples - install packages with apt | Devops Junction
Ansible Playbook Examples - Sample Ansible Playbooks | Devops Junction
Debugging Ansible Playbook
Here are command line switches to enable debug logging of an ansible playbook:
#Specify the location for the log file
export ANSIBLE_LOG_PATH=~/ansible.log
#Enable Debug
export ANSIBLE_DEBUG=True
#Run with 4*v for connection level verbosity
ansible-playbook -vvvv ...
Ansible Commands Cheat Sheet
Here’s a list of common ansible commands…
Read through this DevOps book pdf for getting Docker and Ansible to work together: https://bjpcjp.github.io/pdfs/devops/ansible-docker.pdf
Host Setup
Host Setup Playbook
This playbook will do basic setup of common packages and config that each host requires, such as ssl certs, permissions, and base packages.
It is run for each host by specifying the hostname in arguments.
ansible-playbook host-setup.yml -e "variable_host=wshost1" --ask-vault-passLocal Build Server Setup
These are playbook calls to set up the build server VM.
ansible-playbook buildserver.yml --ask-vault-passLocal Dev Host Setup
These are playbook calls to set up each development host with their particular build of services and config.
ansible-playbook dev-host1.yml --ask-vault-pass
ansible-playbook dev-host2.yml --ask-vault-pass
ansible-playbook dev-host3.yml --ask-vault-pass
Cloud Dev Host Setup
These are playbook calls to set up each cloud development host with their particular build of services and config.
ansible-playbook dev-cldev1.yml --ask-vault-pass
ansible-playbook dev-cldev2.yml --ask-vault-pass
Prod Host Setup
These are playbook calls to set up each production host with their particular build of services and config.
ansible-playbook prod-host1.yml --ask-vault-pass
ansible-playbook prod-host2.yml --ask-vault-pass
ansible-playbook prod-host3.yml --ask-vault-pass
ansible-playbook prod-host4.yml --ask-vault-pass
ansible-playbook prod-host5.yml --ask-vault-pass
ansible-playbook prod-host6.yml --ask-vault-pass
Personal Host Cluster Setup
Here is how to run commands on the PHC.
ansible-playbook phc-admin01-rundk-admin-webui.yml --extra-vars "ansible_become_pass=password" --extra-vars "jenkins_password=password"
ansible-playbook phc-backups01-rundk-backups-webui.yml --extra-vars "ansible_become_pass=password" --extra-vars "jenkins_password=password"
Target Host Errors
Missing Python Libraries
If you have an Ansible playbook that is failing on a target host, it's likely that the Python libraries on the target host, are incompatible with the version of Ansible.
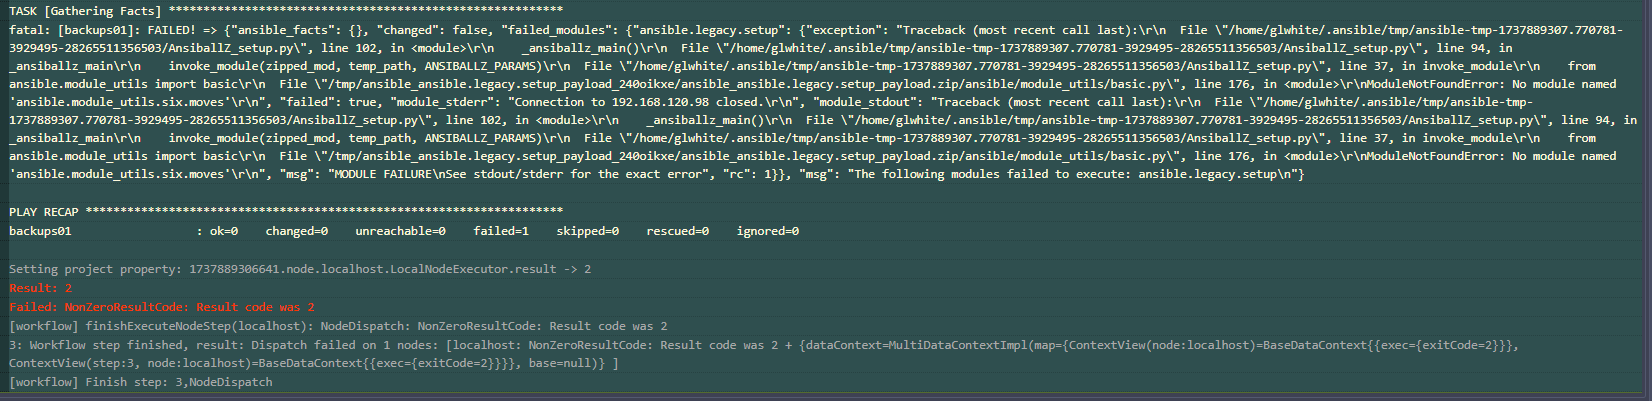
This would present with an error message starting with:
An exception occurred during task execution. To see the full traceback, use -vvv. The error was: ModuleNotFoundError: No module named 'ansible.module_utils.six.moves'Here's what it would look like when running the playbook from the command line:

Here's what it would look like when running from RunDeck:
You can either downgrade the python library to a compatible version.
Or, upgrade Ansible to a version that is compatible with the Python library on the target host.
See this page for the Python version range that each version of Ansible supports: https://docs.ansible.com/ansible/latest/reference_appendices/release_and_maintenance.html
Cleaning up Ansible Temp Folders
As Ansible playbooks run, some will fail to cleanup temp folders on the Ansible server.
Since the temp folder for most Ansible jobs is configured as '/home/glwhite/Desktop', this will cause an accumulation of folders in that user's Desktop.
The folders are named with a unix timestamp.
So, the following command will delete them:
find ~/Desktop -maxdepth 1 -type d -name '[0-9]*' -exec rm -r {} +You can preview the list of files to delete with this:
find ~/Desktop -maxdepth 1 -type d -name '[0-9]*'
Windows .SSH Config File Syntax
Here are use cases that require editing the SSH config file in your Windows user profile.
References
Syntax reference for the SSH config file is here: https://www.ssh.com/academy/ssh/config
Tutorial for creating them: https://betterprogramming.pub/a-step-by-step-walkthrough-to-create-your-first-ssh-config-file-f01267b4eacb
General
In Windows, the SSH config file is located, here: c:\<user>\.ssh\config.
In Linux, it would be here: ~/.ssh/config
An SSH config file will look something like this:
# Read more about SSH config files: https://linux.die.net/man/5/ssh_config
Host 192.168.1.89
    HostName 192.168.1.89
    User glwhite

Host updateserver
    HostName 192.168.1.160
    User glwhite
    IdentityFile K:\keys\ecdsa-key-glwhite-desktop-20221115\ecdsa-key-glwhite-desktop-20221115.key

# Added this block to allow git to use the correct ssh key when authenticating to github.com
Host github.com
    HostName github.com
    User git
    IdentityFile ~/.ssh/ecdsa-glwhite-DesktopJ60PCHC-github-20230118

# linux debug test vm
Host 192.168.1.90
    HostName 192.168.1.90
    User glwhite
The above example shows several host entries.
Some of the entries are added automatically, when accepting the public SSH key of a host on new connection.
Others, can be manually added by following the above as examples.
Note that some entries specify an SSH key, via 'IdentityFile'.
This is how you can assign a non-default SSH key pair to a particular connection.
If an IdentityFile entry is not specified, SSH will use the default key at:
The default for protocol version 1 is ~/.ssh/identity.
For protocol version 2, it is ~/.ssh/id_rsa or ~/.ssh/id_dsa.
VSCode Remote Explorer via SSH
When using the Remote Explorer plugin in VSCode, you will likely need to setup an SSH key for access.
Follow the normal methods to setup the key pair.
NOTE: Modern Ubuntu hosts will disallow RSA keys. So, create keys with ECDSA.
Be sure to add the public key to the Authorized_keys file on the target host.
If you created the private key with PuttyGen, make sure to save a key in the OpenSSH key format, by using this:
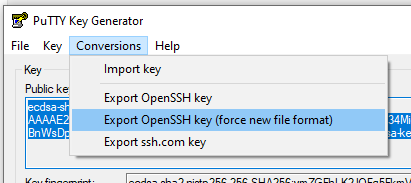
Now, open your SSH config file at: C:\<user>\.ssh\config.
Create a host entry in the config file, that has this form:
Host updateserver
    HostName 192.168.1.160
    User <username>
    IdentityFile <Filepath to key file>
    Port 22
Here’s what each field means:
-
Host - is the friendly name of the target
-
HostName - is the IP address or FQDN
-
User - is the username that your session will login as. This is also the user, who’s Authorized_keys file contains the matching public key to the private key at the IdentityFile path
-
IdentityFile - This is the Windows-formatted filepath to the private key.
-
Port - optional parameter, if the SSH server doesn’t listen on 22.
Here’s an example of what a host entry would look like for accessing an Ubuntu VM with a private key:
Host updateserver
    HostName 192.168.1.160
    User glwhite
    IdentityFile K:\keys\ecdsa-key-glwhite-desktop-20221115.key
Committing to Github from Visual Studio
By default, Visual Studio will only use the ssh keys in your ssh folder that have the recognized default names.
So, if your existing key has a non-default name, you’ll need to create a host entry to pair the key with the target host (github.com in our case).
Open your ssh config file, located here: C:\Users\<username>\.ssh\config
The following example is what a host entry would look like that assigns a particular key to a host:
# Added this block to allow git to use the correct ssh key when authenticating to github.com
Host github.com
	HostName github.com
	User git
	IdentityFile ~/.ssh/LeeWhite187-github-usl084805-20220815
It may be necessary to restart the openssh service, after making changes to the config file.
Once updated, you can now test if Visual Studio lets you push and pull from a Github repository.
DotNet Startup Remote Debugging Hook
When performing remote debugging of an application or service, it may be necessary to see what is happening during early startup.
Adapted from this article: I Wish I Knew About Debugger.Launch Earlier
Normally. By the time you have started the remote process and are in a position to attach a remote debugger, the target process is long past any startup logic that you might need to see, and has finished or crashed.
Here's a way to force a starting process to pause and wait for your remote debugging session to attach.
There is no negative benefit to including a startup debug hook like below in any application or service that you develop.
Having one, ensure that you can remotely troubleshoot early startup activity that is preventing operation.
This is especially helpful when seeing startup failures, after deploying a new service, or to a new environment.
Especially, when early startup activities may not show up in logs (or may occur before logging starts).
This technique involves adding a block of code to the application/service, and using a command line switch to tell it to pause for you.
Implementation
To implement this technique, add something like the below block, to the top of main, in your Program.cs:
// Look to see if we are to wait for the debugger...
// NOTE: To leverage this wait, add this command line argument:
//    -waitfordebugger=yes
{
    bool waitfordebugguer = false;
    // Get the command line arguments, so we can quickly parse them for a debugger wait signal...
    string[] arguments = Environment.GetCommandLineArgs();
    foreach(var f in arguments)
    {
        if(f.ToLower().Contains("waitfordebugger=yes"))
        {
            waitfordebugguer = true;
            break;
        }
    }

    // We are to wait for the debugger.
    if(waitfordebugguer)
    {
        //Spin our wheels waiting for a debugger to be attached....
        while (!System.Diagnostics.Debugger.IsAttached)
        {
            System.Threading.Thread.Sleep(100); //Or Task.Delay()
        }

        // We will stop here, once the debugger is attached, so no explicit breakpoint is required.
        System.Diagnostics.Debugger.Break();

        Console.WriteLine("Debugger is attached!");
    }
}
The above block makes use of a couple concepts. We'll explain each, below:
First, it checks for a command line argument to wait for a debugger to attach: 'waitfordebugger=yes'.
If not present, the application will startup as normal.
Next. If the waitfordebugger argument is set, the starting process will spin-wait in the WHILE loop until your remote debugger has attached.
BEWARE: The above logic will wait FOREVER, in the WHILE loop, until a debugger is attached, if waitfordebugger=yes was set on the command line.
So. Be sure to remove the command line argument, after troubleshooting session.
Or, the process may appear hung on its next start.
Once a debugger attaches to the process, execution will drop past the WHILE loop, and pause at the Debugger.Break() statement.
This is a special statement the compiler allows in code, that forces a breakpoint stop if a debugger is attached.
You don't have to explicitly set a breakpoint on the Debugger.Break() statement.
The runtime will pause, there, as if a breakpoint was already set.
Usage
To leverage the above debug hook, add this command line argument to the startup command for your application/service:
waitfordebugger=yesAnd, attach your remote debugger to the process.
Once attached, your remote debugging session will see the application paused at the Debugger.Break() statement.
You can then step execution past the Debugger.Break() in the same manner as if the application/service was started from your IDE.
This allows you to troubleshoot startup problems that may occur in test or prod, as long as you can attach a remote debugger.
See this page for how to accomplish that: Visual Studio Linux Remote Debugging
Cheers
Allow Remote Debugging of Docker Containers
When remotely debugging linux docker containers, the account that your remote debugging session uses to SSH into the Linux host must have RW access to the docker.sock process.
If the permission is not granted, you may see an error like this:
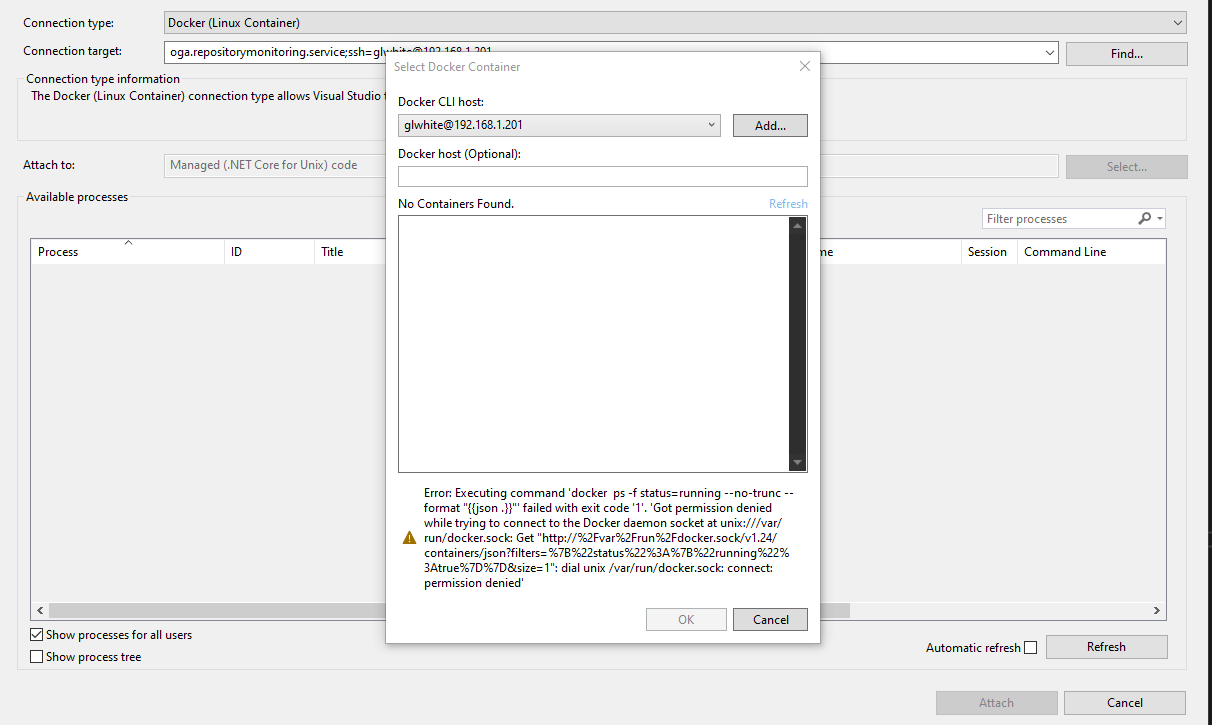
The above error means that (barring an SSH connection problem) the user account cannot communicate with the docker socket.
Here's a good article that expands on permissions problems with Docker: Troubleshooting Docker Permission Denied Problems
Granting permission to the remote debugger user can be done with either of the below ways:
Adding to the Docker Group
You can add the user to the docker permission group:
sudo usermod -aG docker $USERNOTE: The above assumes that docker.sock allows RW permissions to the docker docker group.
You can check this by listing the directory entry of docker.sock:

The above shows that members of the 'docker' group have RW access to docker.sock.
So, adding your SSH user to that group, allows access.
Open Permissions for docker.sock
This method creates a security vulnerability that may give anyone on the system, access to docker resources or allow commands.
If adding your SSH user to the docker group fixes the problem, stop here.
Use this method if changing the group access does not work, and you can mitigate the security hole of opening permissions to other users on the host.
The legacy method would be to open filesystem permissions on the docker.sock file like this:
sudo chmod 666 /var/run/docker.sockOr, by changing permission on the symbolic link in /run, if your distro maps /var/run to /run with a symbolic link of the entire folder:
sudo chmod 666 /run/docker.sockNo reboot or restart of the docker engine is required to fix this permission.
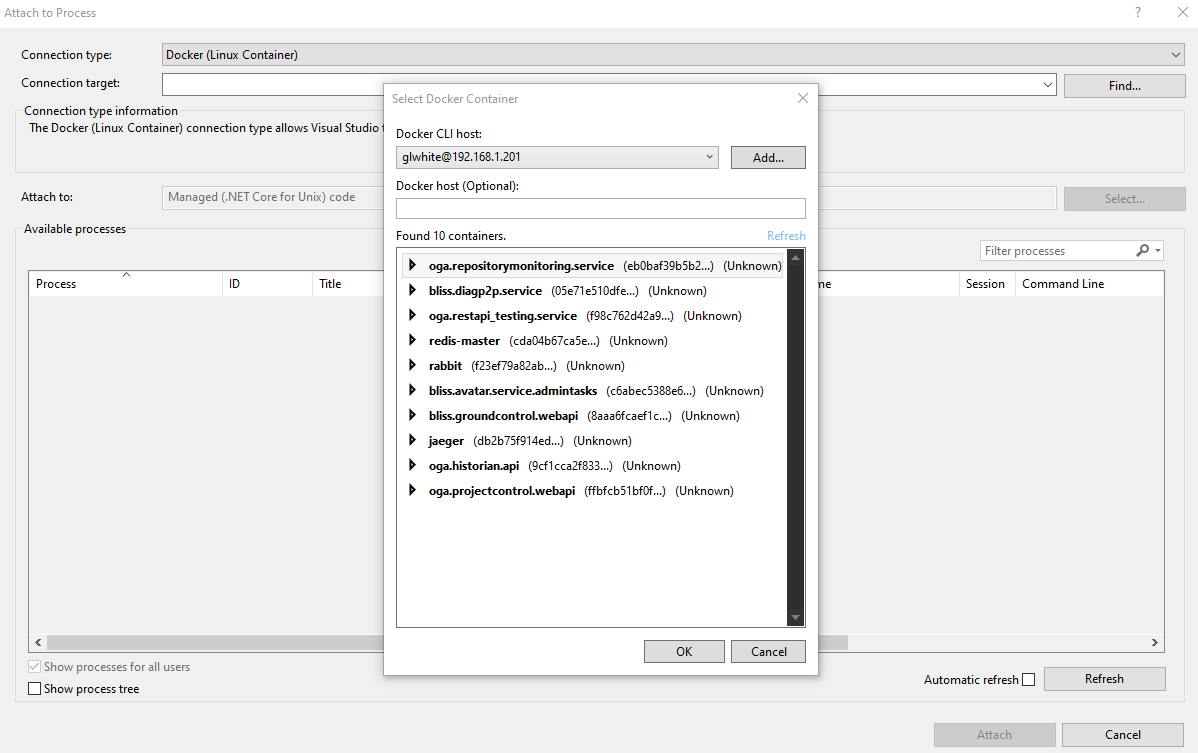
Once corrected, you should not see the permission error.
And instead, see a list of services you can remote attach to and debug:
GitHub SSH Key Updates
When the GitHub client SSH key expires, any checked out repository must be updated to use the new key.
This is because we embed key properties in its name.
And with many active repositories checked out for development, updating each one is tedious and error-prone.
And since TortoiseGit assigns SSH keys, to each repository, without any explicit sharing, every checked out repository must be updated.
Luckily, the key path is set in a config file of each checked out repo, that resembles an INI file.
We cooked up a dotnet tool that will update SSH client keys for all repos.
It will iterate all checked out git repos in: c:\Projects.
It searches for every config file inside a .git folder.
If found, it checks that the repo URL belongs to one of our orgs.
And if so, it updates the Putty Key file to whatever path we require.
The VS Solution is here: C:\Projects\OGA.Tools\OGA.GitCheckout.Tools\OGA.GitCheckout.Tools\OGA.GitCheckout.Tools
When it’s necessary to run it again, just update the static public properties in Program.cs, with the new key path.
And, add any orgs that may be missing.
Then, run it against the C:\Projects folder, to update all checked out repositories.
TortoiseGit Setting the SSH Key
Here are steps to set the SSH key for a repo checkout.
-
Open File Explorer and navigate to the checkout folder.
-
Right-click the folder, Select TortoiseGit → Settings.
-
From the Settings page, on the left-hand navigation pane, locate the Git node and select the Remote node under it.
-
Then, in the right-hand pane, select origin in the Remote list, and the URL and key path will be displayed on the right.
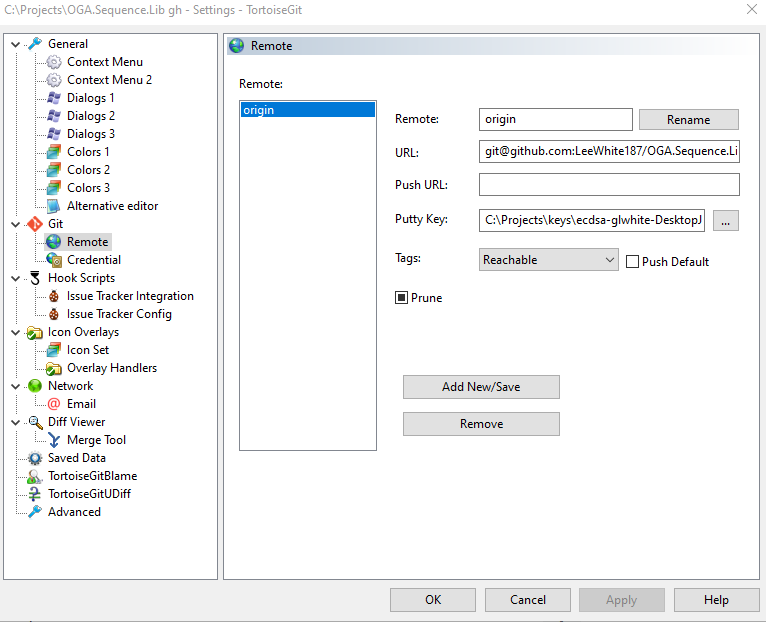
You can update the key path for the checked out repository, by changing the Putty Key text field, and pressing Ok.
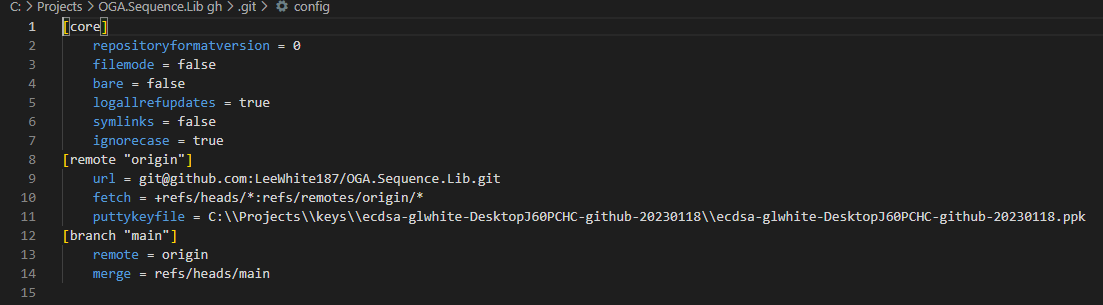
This same config is also available in the checked out repository’s working folder, at this relative path:
<<workingfolder>>\.git\config
The file looks like this:
Automated Method
When the SSH key expires and you have many repositories checked out, see this page for how to update all checkout folders quickly: GitHub SSH Key Updates
Install DotNet 6 on Ubuntu 24.04
The process of installing DotNet on Ubuntu has evolved a bit.
It was especially rocky on Ubuntu v22, where the OS package manager had conflicts with the official Microsoft packages, rendering the installation broken.
But, it appears that in Ubuntu 24.04, it works.
Here are the steps for NET 6 in Ubuntu 24.04:
Taken from here: https://learn.microsoft.com/en-us/dotnet/core/install/linux-ubuntu-install?tabs=dotnet6&pivots=os-linux-ubuntu-2404
First, add the repository:sudo add-apt-repository ppa:dotnet/backports
Now, you can install the environment that fits the use case for the host.
If you will perform development or compilation on the host, install the SDK:
sudo apt-get update && \
sudo apt-get install -y dotnet-sdk-6.0
NOTE: Installing the SDK, includes runtimes for .NET with ASP.NET Core support.
So, there is no need to install a runtime with the SDK.
If your host will perform only runtime, you need to decide if it requires ASP.NET support or not.
If ASP.NET Core support is needed, use this:
sudo apt-get update && \
sudo apt-get install -y aspnetcore-runtime-6.0
If your host doesn't require ASP.NET Core support, install just the .NET runtime with this:
sudo apt-get install -y dotnet-runtime-6.0C# Dealing with Sudo
Sudo presents some challenges when scripting command line work.
Sudo was intended ONLY to be presented for interactive user sessions, to make sure a user is aware of the risk of the command being executed.
But instead. Even a scripted CLI call from Python or C# will be presented with a sudo challenge, despite the actual intent of sudo.
So. We have a few options to deal with this:
a. We can add the user account to the sudoers group, so any CLI call will not be presented with a sudo challenge.
b. We can write fancy stream handling to imitate the standard input of a PTY, so we can inject a sudo response IF asked.
c. We can leverage the -S argument of sudo, and pipe the user's password as standard input, via echo.
Piping via Echo
Sudo has a switch '-S' which tells it to accept the user's password via standard input:
sudo -S <command>We can pipe a password into the above command with Echo, like this:
echo "your_password" | sudo -S <command>But, two subtleties are still to be dealt with.
First, Bash shell saves command history, so the echo command will expose our password in history.
So, we must tell bash to not save history for our command, like this:
export HISTIGNORE='*sudo -S*' && echo "your_password" | sudo -S <command>The above takes care of our password not being recorded to command history.
Second. Sudo is not consistent in its ask for a password. Specifically, it will look in its cache for a user's password, and use that if available. So, we must tell it to ignore any cached credentials, by adding the '-k' switch:
sudo -S -k <command>Now, the whole command string becomes:
export HISTIGNORE='*sudo -S*' && echo "your_password" | sudo -S -k <command>And, we can safely use the above composite command as a wrapper around any sudo command we need to perform through a python or C# CLI wrapper.
References:
https://superuser.com/questions/67765/sudo-with-password-in-one-command-line
Arch Linux VM Setup
Base VM Needs
Select guest OS type: Linux and Linux 4.x from the Vsphere dropdowns.
Make sure the install ISO is mounted, and boot the VM.
Once the live terminal is up, determine if the guest VM is efi or not:
ls /sys/firmware/efi/efivars
If it’s an EFI partition, you will see something like this:

Make sure your live terminal can reach the internet:
ping -c www.google.com
Update the datetime:
timedatectl set-ntp true
Partitioning your hard disk
Use this command to see what devices are available:
lsblk
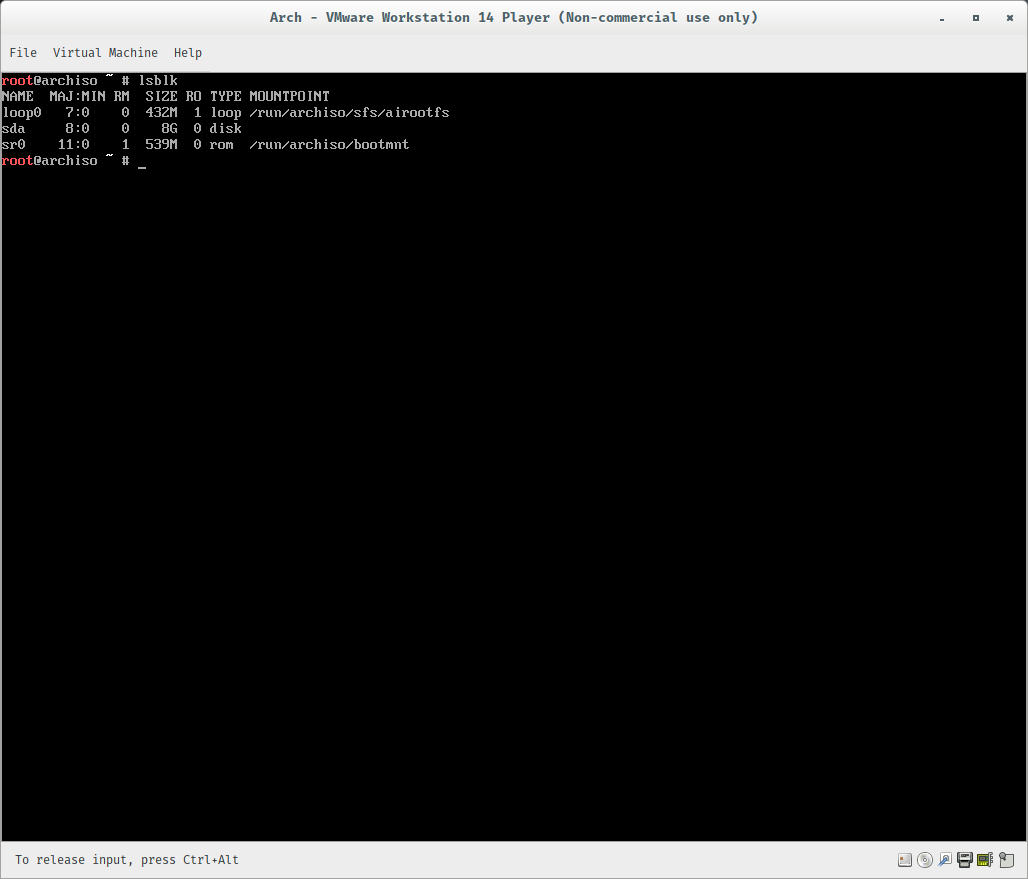
Start the partition editor with the hard disk of where you want to install the OS:
cfdisk /dev/sda
The partition utility UI will show an empty list of partitions.
We will create a boot partition, swap partition, and root partition.
To do so, select gpt from the list (if asked) and then partition the hard drive. I like to have 4 separate partitions for an install:
-
Boot partition, with 512MB
-
Swap partition, which can very. An old rule of thumb is to use 2x the amount of RAM you have, so I chose 1GB
-
Root partition, which can also very. I chose 3GB, but it is up to you. Depending on what you plan on using the vm for, you might want to go to as much as 1/3 of the disk space that you’re using.
-
Home partition, which is just the leftover space.
Make sure that you select the proper filesystem types: Your boot partition should be Microsoft basic data, your swap should be Linux swap, and your home and root partitions should be Linux filesystem. You should have something like this when you’re done:
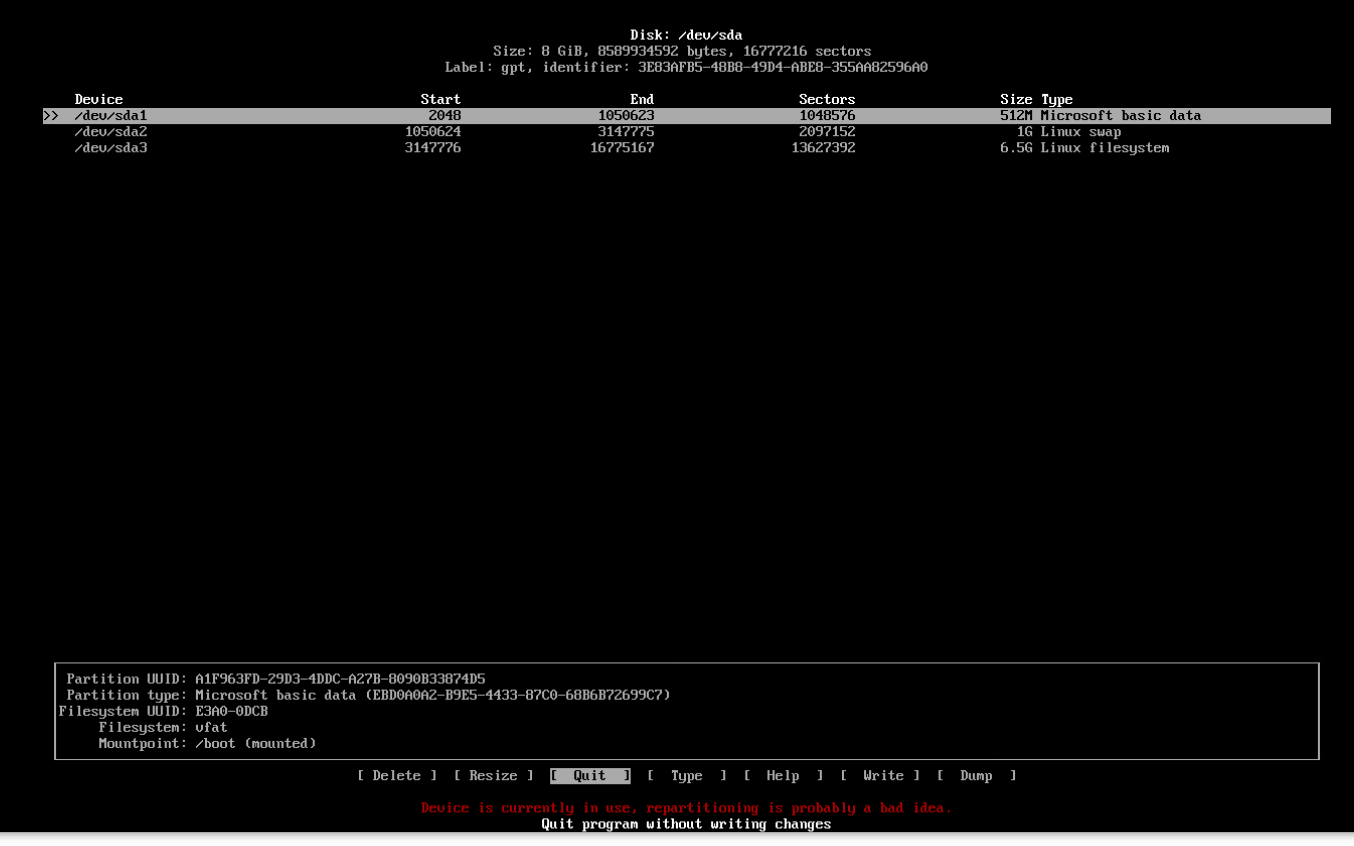
Don’t forget to hit Write before you quit.
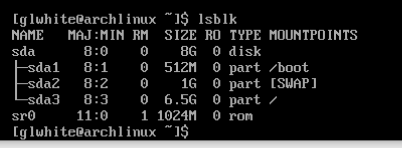
Now, type the following to see your filesystem layout:
$ lsblk
Populate the Partitions
### Mounting the filesystem Let’s mount the filesystem next. Type out everything below, and we’ll meet on the other side and see how things went.
$ mkfs.vfat -F32 /dev/sda1
$ mkswap /dev/sda2
$ mkfs.ext4 /dev/sda3
$ swapon /dev/sda2
We just set the file system to fat32 for the boot partition, swap on the swap partition, and ext4 for the root partition. After that, we told the computer to use the swap partition as swap.
Now we can actually mount them:
$ mount /dev/sda3 /mnt
$ mkdir /mnt/boot
$ mkdir /mnt/home
$ mount /dev/sda1 /mnt/boot
If everything went according to plan, you have the skeleton of your Arch install all set up. Now we can get into the actual nuts and bolts of the installation, and the hard part is over with. If we run our trusty $lsblk, we should see:

Install the OS
First, sync the repository:
pacman -Syy
Start the install with the baseline files and packages:
pacstrap -i /mnt base base-devel linux linux-firmware vim nano
The above will take a bit to install files and packages.
It will install vim and nano for editing.
Configure the OS
Generate an fstab file that matches our current layout:
genfstab -U /mnt >> /mnt/etc/fstab

These next steps, we will use chroot to configure the OS before running it.
Step into the mounted OS, so we can set it up:
$ arch-chroot /mnt
Setup timezone and the system clock:
$ ln -sf /usr/share/zoneinfo/America/New_York /etc/localtime
$ hwclock --systohc.
Setup our locale, by uncommenting one, here:
$ nano /etc/locale.gen
Uncomment one, like this, and save the file:
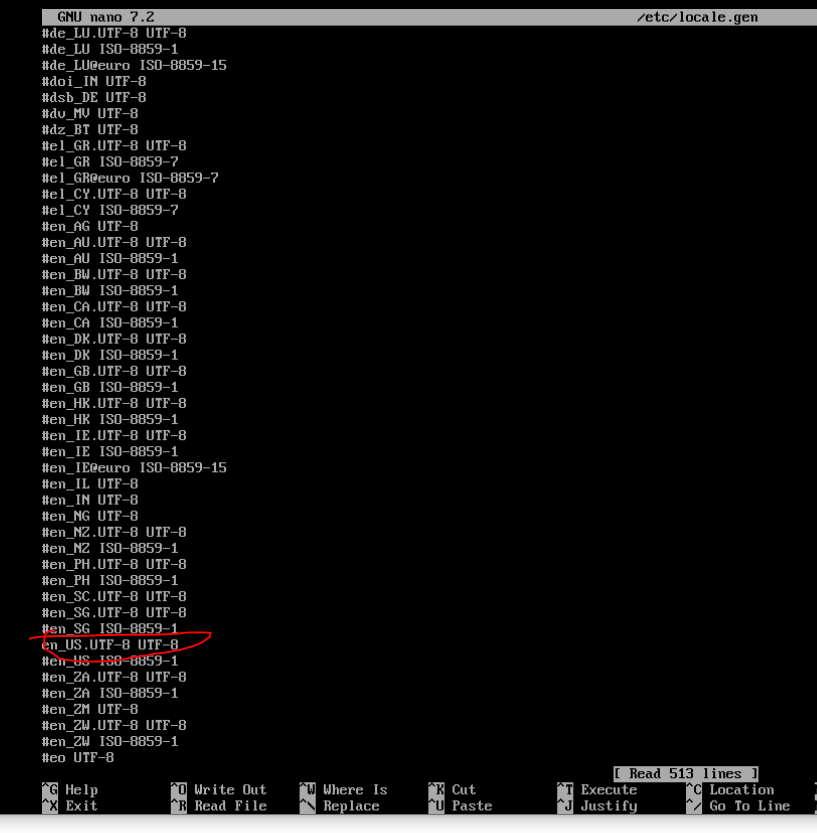
Accept the change, with:
locale-gen
Set the language variable in /etc/locale.conf:
$ echo "LANG=en_US.UTF-8" >> /etc/locale.conf
Specify a hostname:
echo "somehosenamewe choose" >> /etc/hostname
Update our hosts file:nano /etc/hosts
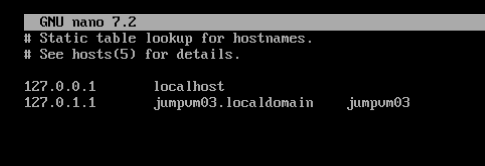
Make sure to add a localhost and loopback entries, like above.
Add the sudo package, so it can be used later:
pacman -S sudo
Change the root password with:
passwd
Add a secondary user:
useradd -m secondaryuser
passwd secondaryuser
Give the second user some privileges:
usermod -aG wheel,audio,video,storage secondaryuser
Install Grub Bootloader
Make sure you are still inside arch-chroot.
Install packages:
pacman -S grub efibootmgr
Create the efi folder:
mkdir /boot/efi
Mount the boot partition into the efi folder:
mount /dev/sda1 /boot/efi
Install grub:
grub-install --target=x86_64-efi --bootloader-id=GRUB --efi-directory=/boot/efi
Set grub config:
grub-mkconfig -o /boot/grub/grub.cfg
Setup Visudo
Tell visudo to use nano:
EDITOR=nano visudo
Uncomment the wheel group, so it can do anything:
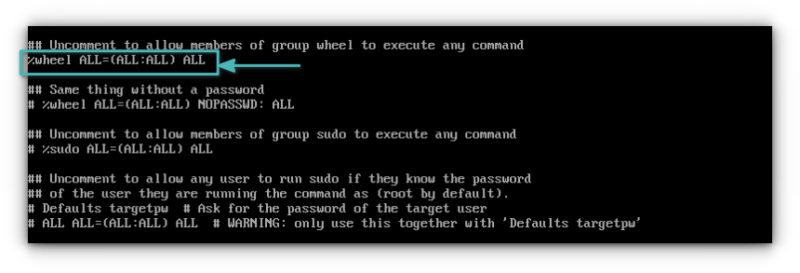
Save change, and close it.
Install a Desktop Environment
The first step is to install the X environment. Type the below command to install the Xorg as display server along with the network manager. You can refer to the official documentation for Wayland.
pacman -S xorg networkmanagerNow, you can install GNOME desktop environment on Arch Linux using:
pacman -S gnomeEnable the desktop and network manager:
systemctl enable gdm.service
systemctl enable NetworkManager.service
Reboot
Exit Chroot, with this:
exit
Unmount the os, so we can restart:
umount -R /mnt
Restart the machine:
sudo reboot
Identify Network Adapter
Use this to find the name of our network adapter:
ip link show
Static IP Address
Create a file, here:
/etc/systemd/network/20-wired.network
Populate it:
[Match]
Name=ens32

[Network]
Address=10.0.1.2/24
Gateway=10.0.1.1
DNS=1.1.1.1
DNS=1.0.0.1
Enable Network Setting Services
This first one makes the network settings permanent.
The second one grants name resolution.
systemctl enable systemd-networkd.service
systemctl enable systemd-resolved.service
Add OpenSSH
Install openssh:
sudo pacman -S openssh
Start the service:
sudo systemctl start sshd
Enable the service:
sudo systemctl enable sshd
Add a firewall rule:
sudo ufw allow 22/tcp
SSH Problems
If your ssh server is not accepting connections, ping it from another box.
If ping works, check that the ssh service is listening, with this:
sudo nmap -p 22 127.0.0.1
Ubuntu: Converting a System Account to Interactive
Sometimes, you will come across software applications and platforms that will run under a system account.
This is fine and dandy out of the box.
But once you need to expand the functionality of the software application. you find that the system account has no defined bash shell, no password, and no profile.
For example: This is the case when adding features to a Jenkins build server.
The Jenkins service runs as a system account, named: jenkins.
And, it executes build pipeline scripts under that user context.
The problem is, there's no easy way to install user-specific software packages to the jenkins user, without being able to login or switch to it.
So, here are steps for how to modify a system account.
Locating User Home
First thing that needs to be done, is to locate the home path for the system account.
This is stored in /etc/passwd, as the second to last field of the user record.
Here's an example of what the home path looks like for a Jenkins user:

For normal users, this will be /home/<username>.
But for system accounts, it can be anything.
And as such, you need to pull it out of /etc/passwd, to know where to do later steps in this article.
Adding a Shell to a System User
A system user account has no defined shell.
This can be seen by finding the user record in: /etc/passwd, and locating the last field.
For a system account, it will be set to: /bin/false, or /usr/nologin.
You don't necessarily need to assign a shell to a system account to impersonate it in a shell.
It is possible to temporarily open a shell and impersonate the system account.
See this page for how to do that: Linux: Impersonating Users
This command will assign a permanent shell to the system account:
sudo usermod -s /bin/bash <username>Once done, you can switch to the system account, with this:
sudo su jenkinsAdding a Profile to a System User
If you run across a software package that installs on a per-user basis, such as NVM or NPM, your system account may need a profile file to exist, or the software package installer might fail to complete, as it cannot find a suitable profile file for the system account.
To fix this, you need to copy in a skeleton profile file from /etc/skel, into the home folder of the system account.
To do this, locate the HOME path for the system user (see above), and copy the profile file into it, with this:
sudo cp /etc/skel/.bashrc /<homepath>/.bashrcAs an example, the following will copy the skeleton bash profile file into a Jenkins account's HOME folder, and assign the correct permissions:
sudo cp /etc/skel/.bashrc /var/lib/jenkins/.bashrc
sudo chmod 644 /var/lib/jenkins/.bashrc
HowTo Install Windows 11 with Local Account
https://www.tomshardware.com/how-to/install-windows-11-without-microsoft-account
OGA.PostGres.Lib Usage
Here’s notes on how to create and manage databases with OGA.PostGres.Lib.
This applies to use cases for:
-
Standing up a temporary database for unit and integration testing.
-
Creating live database tables with compatible column types for storing class properties.
-
Blending NPGSQL usage with EntityFramework Core.
How to Stop Cell HotSpot Throttling
Here's a simple thing to do, to get around hotspot throttling when tethered to a phone.
What's happening is that your cell provider is watching the TTL value of packets coming to the cell tower, and looking for ones that have hopped through your cell phone (as tethered traffic).
Normal traffic reaching the cell network would have a TTL of 64, and the cell network decreases that to 63.
However, a tethered device starts with a 64, and your phone, as the tethered intermediary, decreases the TTL of packets to 63.
Your cell provider watches for packets marked with 63, to know what is tethered traffic.
And since carriers like to throttle tethered traffic, they will apply throttling to packets with TTL=63.
To get around this, you need your tethered traffic to appear like it came from the phone, itself.
To do this, we increment the initial TTL at the PC, so the phone will decrement it to 64.
And in doing so, the traffic will appear, to the cell network, as if it came from the phone.
This works, reliably on T-Mobile and Verizon.
Here's the command to execute on a Windows PC:
netsh int ipv4 set glob defaultcurhoplimit=65NOTE: Run in an elevated terminal.
NOTE: The effect is immediate. So, there's no need to restart anything.
Once done, set it back to TTL of 64 with:
NOTE: I've added how to revert this, for cleanliness.
But, it is not necessary to reset the value, when done.
There is no detrimental effect from a +1 offset to packet TTL.
Packets will just be allowed "one more" hop before dying... if they don't reach their destination.
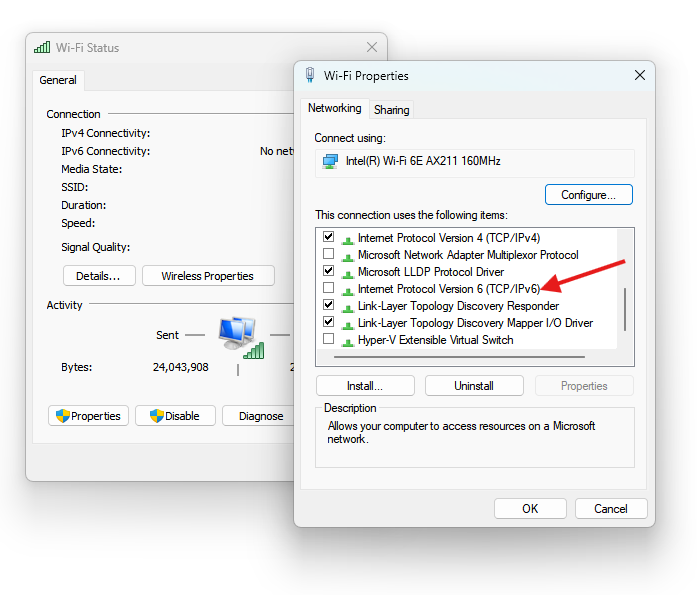
netsh int ipv4 set glob defaultcurhoplimit=64IPV6
For some sites, you will also need to disable IPV6 on your wifi adapter, as well.
To do so, open the adapter settings, and uncheck IPv6 protocol usage for your wifi adapter, like the below example:
GitHub Personal Access Tokens
These expire annually.
We use a couple for testing and automated access.
Creation
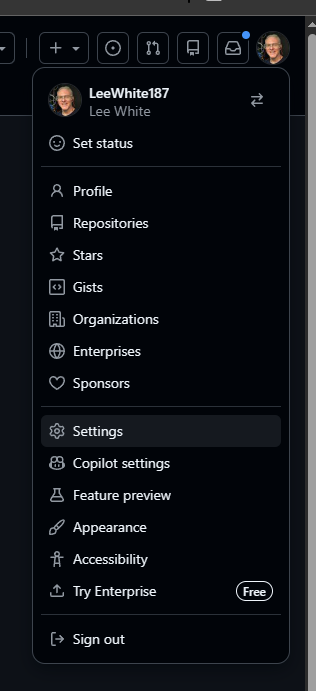
To create a new token, open the GitHub page.
Click on your profile in the upper right.
Scroll down and click Settings.
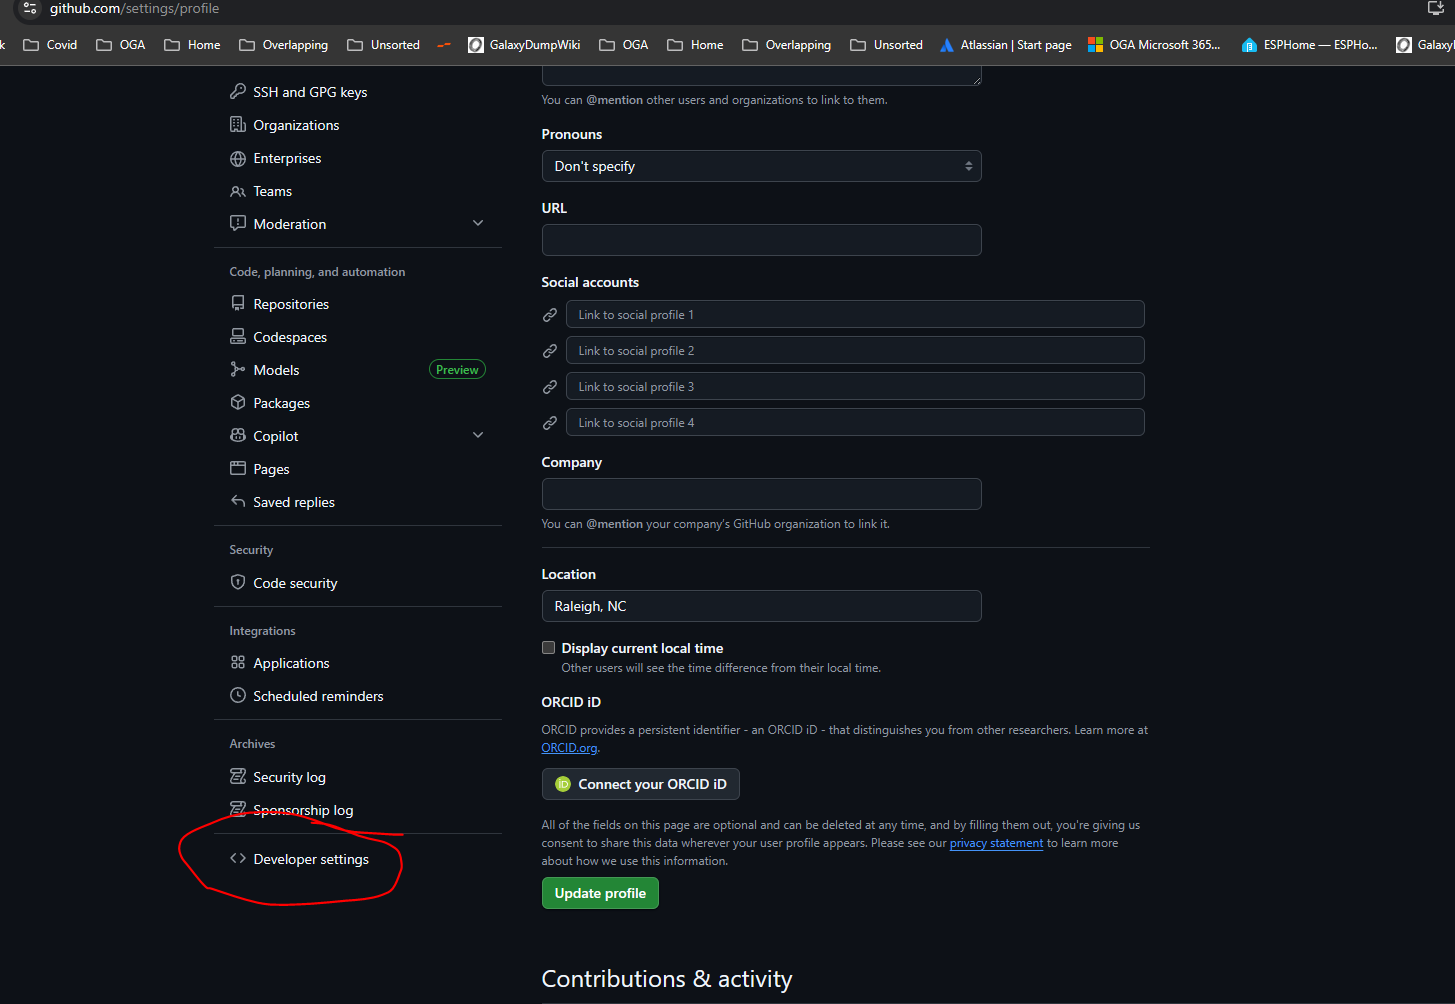
Scroll down to the bottom of the left-hand menu, and click on Developer Settings.
Expand the Personal Access Tokens node, and select Fine-Grained Tokens.
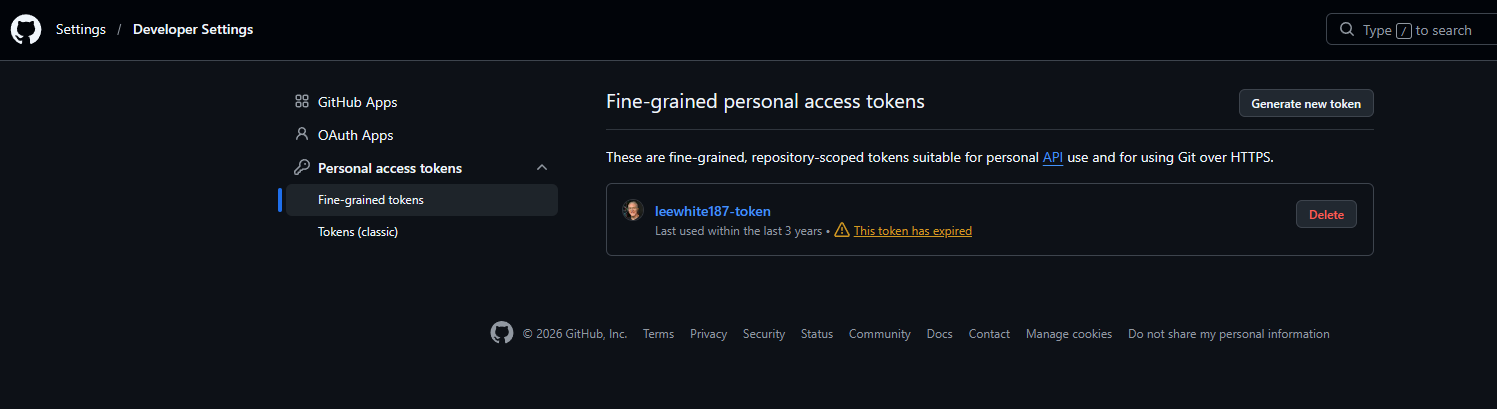
It will list any tokens you currently have and their expiry.
To make a new one, click Generate New Token.
Give it a meaningful token name.
Ideally, this will be a multi-term token, such as:
<username>-<purpose>-<dateofissue>
For example, the user's pat may be:
LeeWhite187-UserAccess-20260426
User Access Token Specifics
We have two active tokens.
- LeeWhite187-UserAccess-20260426
- LeeWhite187-TestAccess-20260426
LeeWhite187-UserAccess-20260426
This is a Fine-Grained token.
Named: LeeWhite187-UserAccess-20260426
Expiry, set to one year from creation.
Repository Access, set to All Repositories.
Here are added permissions:
- Commit Statuses - Access: Read Only
- Contents - Access: Read Only
- Environments - Access: Read Only
- Issues - Access: Read Only
- Metadata - Access: Read Only (Grayed Out)
- Commit Statuses - Access: Read Only
- Pull Requests - Access: Read Only
LeeWhite187-TestAccess-20260426
This is a classic Personal Access Token.
It was created to get around the access limitation of the fine-grained token.
Specifically, the classic PAT inherently has access across all orgs.
Whereas, the fine-grained PAT needs to be granted access to each one.
So, we wanted the classic token, so we don't have to edit token permissions, just to make testing work.
Named: LeeWhite187-TestAccess-20260426
Expiry, set to one year from creation.
It has access for:
- Repo:status
- public_repo
- read:org
- read:user
- read:email
- read:enterprise
- read:audit_log
Old NET Core Setup on Ubuntu 22
This used to be the method of setting up the dot net runtime and SDK on an ubuntu machine.
But, the Ubuntu packages for dotnet conflict with Microsoft’s, and give errors when attempting to list the runtimes that got installed.
NOTE: This old method is left, here, in case a pre-Ubuntu 22 machine needs it.
NOTE: See this page for how to install .NET in Ubuntu 24: https://wiki.galaxydump.com/books/howto/page/install-dotnet-6-on-ubuntu-2404
NET Core Setup
This section is here to cover both runtime and SDK installations.
However, the steps for installing the dotnet runtime and dependencies is in a tested ansible role, docker-runtime.
Call it from the build server to perform the tasks defined here.
These instruction were taken from here: https://docs.microsoft.com/en-us/dotnet/core/install/linux-debian
Update packages:
sudo apt-get updateInstall keys for Debian:
wget https://packages.microsoft.com/config/debian/11/packages-microsoft-prod.deb -O packages-microsoft-prod.deb
sudo dpkg -i packages-microsoft-prod.deb
rm packages-microsoft-prod.deb
Install the SDK:
sudo apt-get update &&
sudo apt-get install -y dotnet-sdk-6.0
Check that the SDK was installed:
dotnet --list-sdksInstall the runtime (this is only required if the SDK was NOT installed):
sudo apt-get update &&
sudo apt-get install -y aspnetcore-runtime-6.0
Check that the runtime was installed:
dotnet --list-runtimesDotnet Cannot be Found
If you have a naked service running on Ubuntu 22, and it fails to startup, and its journalctl logs show this error:
.NET location: Not foundBe sure to check that your dotnet runtime is installed with:
dotnet --infoIf the proper runtime is installed, your problem is likely that the Ubuntu package is hosed.
See this for details: https://github.com/dotnet/runtime/issues/79237#issuecomment-1342719457
Here’s the package manager bug reference: https://bugs.launchpad.net/ubuntu/+source/dotnet6/+bug/1999266
To fix the problem, your dotnet application needs to be able to locate the base dotnet runtime folder.
Edit this file: /etc/dotnet/install_location
If something is wrong, it likely points to: /usr/lib/dotnet, which is where dotnet SHOULD be installed.
But, the net6 packages are messed up, and get installed, here: /usr/share/dotnet, instead.
To fix things, edit the file (/etc/dotnet/install_location), to point to the correct folder:

Save the change, and try to restart your naked service. It should start up, fine.