# Arch Linux VM Setup
### Base VM Needs
Select guest OS type: Linux and Linux 4.x from the Vsphere dropdowns.
Make sure the install ISO is mounted, and boot the VM.
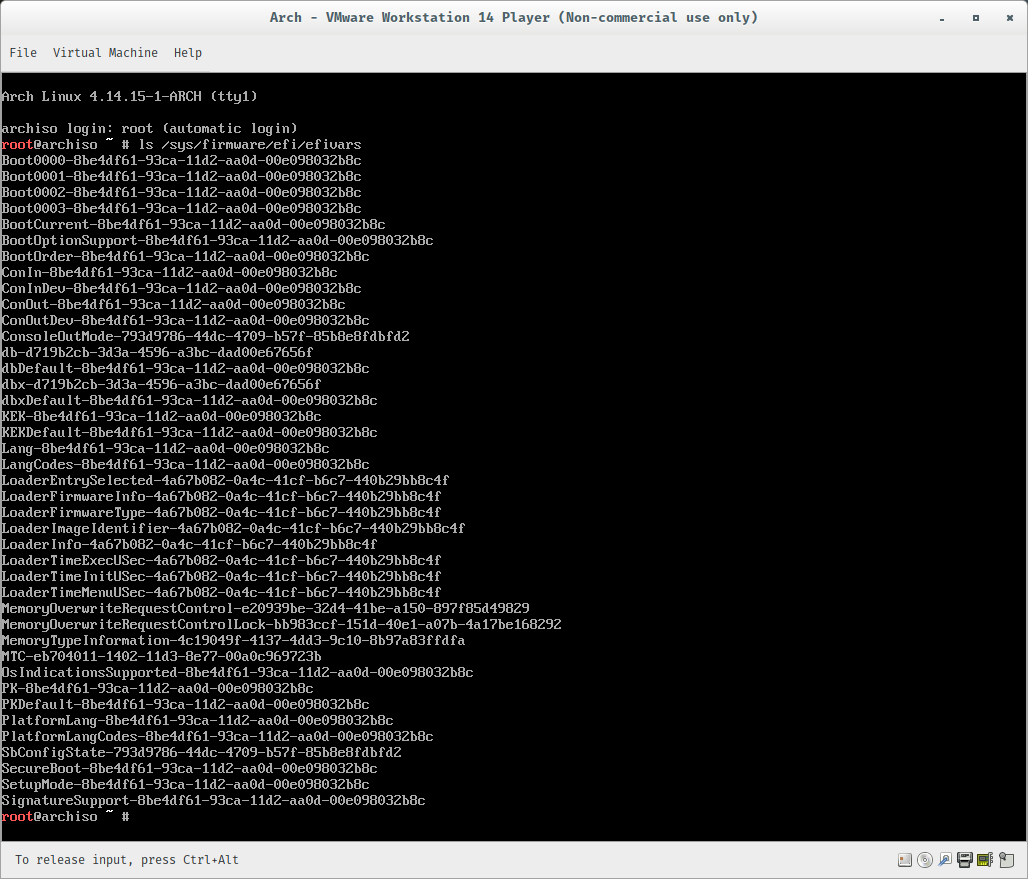
Once the live terminal is up, determine if the guest VM is efi or not:
`ls /sys/firmware/efi/efivars`
If it’s an EFI partition, you will see something like this:
[](https://wiki.galaxydump.com/uploads/images/gallery/2025-02/XGdEDyNH2hcFVAaH-image.png)
Make sure your live terminal can reach the internet:
`ping -c www.google.com`
Update the datetime:
` timedatectl set-ntp true`
### Partitioning your hard disk
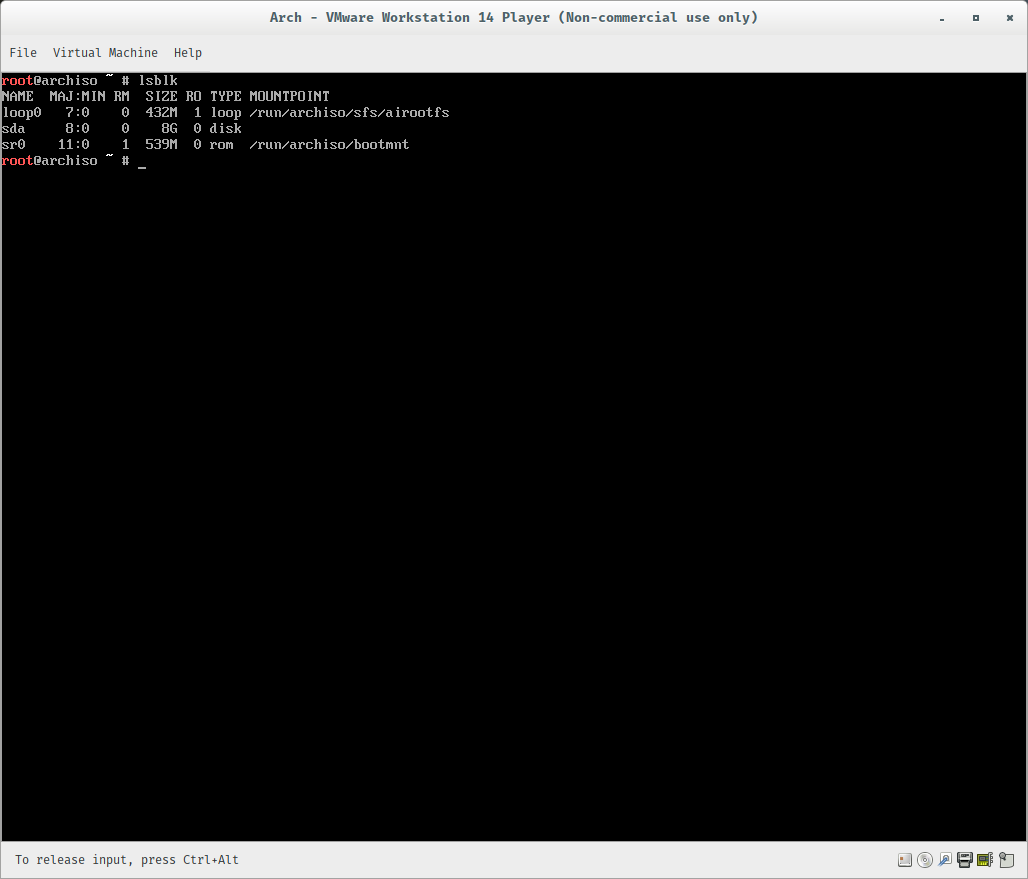
Use this command to see what devices are available:
`lsblk`
[](https://wiki.galaxydump.com/uploads/images/gallery/2025-02/r9ozoCA1GD4vtQxS-image.png)
Start the partition editor with the hard disk of where you want to install the OS:
`cfdisk /dev/sda`
The partition utility UI will show an empty list of partitions.
We will create a boot partition, swap partition, and root partition.
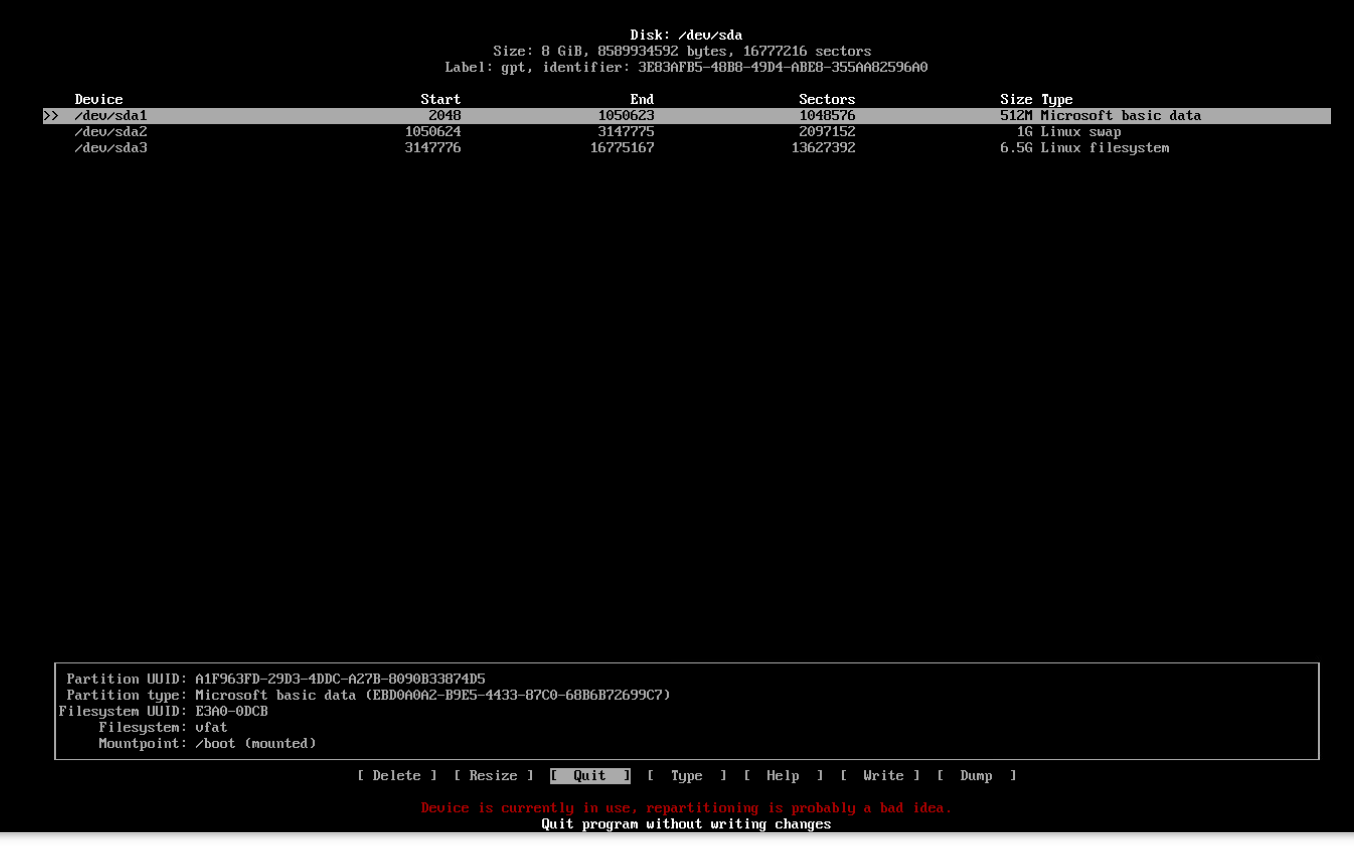
To do so, select `gpt` from the list (if asked) and then partition the hard drive. I like to have 4 separate partitions for an install:
1. Boot partition, with 512MB
2. Swap partition, which can very. An old rule of thumb is to use 2x the amount of RAM you have, so I chose 1GB
3. Root partition, which can also very. I chose 3GB, but it is up to you. Depending on what you plan on using the vm for, you might want to go to as much as 1/3 of the disk space that you’re using.
4. Home partition, which is just the leftover space.
Make sure that you select the proper filesystem types: Your boot partition should be Microsoft basic data, your swap should be Linux swap, and your home and root partitions should be Linux filesystem. You should have something like this when you’re done:
[](https://wiki.galaxydump.com/uploads/images/gallery/2025-02/abpM3I14iSehaYBx-image.png)
Don’t forget to hit Write before you quit.
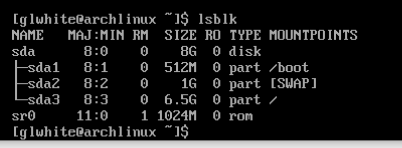
Now, type the following to see your filesystem layout:
`$ lsblk`
[](https://wiki.galaxydump.com/uploads/images/gallery/2025-02/7UZJGjKNaY4dSked-image.png)
### Populate the Partitions
\### Mounting the filesystem Let’s mount the filesystem next. Type out everything below, and we’ll meet on the other side and see how things went.
```bash
$ mkfs.vfat -F32 /dev/sda1
$ mkswap /dev/sda2
$ mkfs.ext4 /dev/sda3
$ swapon /dev/sda2
```
We just set the file system to fat32 for the boot partition, swap on the swap partition, and ext4 for the root partition. After that, we told the computer to use the swap partition as swap.
Now we can actually mount them:
```bash
$ mount /dev/sda3 /mnt
$ mkdir /mnt/boot
$ mkdir /mnt/home
$ mount /dev/sda1 /mnt/boot
```
If everything went according to plan, you have the skeleton of your Arch install all set up. Now we can get into the actual nuts and bolts of the installation, and the hard part is over with. If we run our trusty `$lsblk`, we should see:
[](https://wiki.galaxydump.com/uploads/images/gallery/2025-02/fHPD7KLWzrvvkM47-image.png)
### Install the OS
First, sync the repository:
`pacman -Syy`
Start the install with the baseline files and packages:
`pacstrap -i /mnt base base-devel linux linux-firmware vim nano`
The above will take a bit to install files and packages.
It will install vim and nano for editing.
### Configure the OS
Generate an fstab file that matches our current layout:
`genfstab -U /mnt >> /mnt/etc/fstab`
[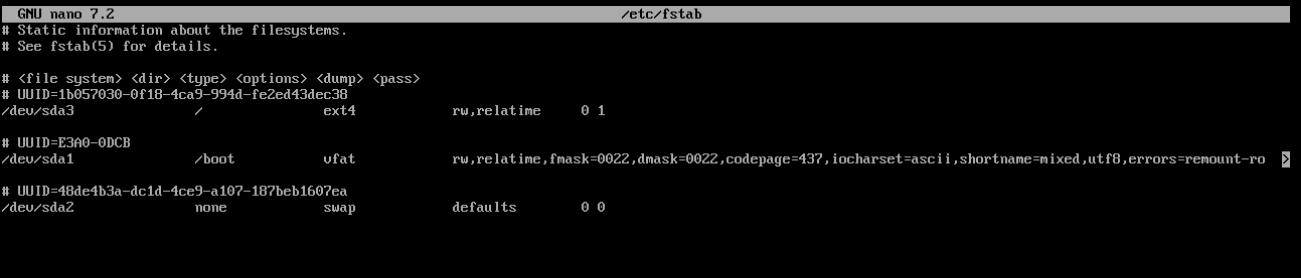](https://wiki.galaxydump.com/uploads/images/gallery/2025-02/6BiJwEQZwOBs5kXV-image.png)
These next steps, we will use chroot to configure the OS before running it.
Step into the mounted OS, so we can set it up:
`$ arch-chroot /mnt`
Setup timezone and the system clock:
```bash
$ ln -sf /usr/share/zoneinfo/America/New_York /etc/localtime
$ hwclock --systohc.
```
Setup our locale, by uncommenting one, here:
`$ nano /etc/locale.gen`
Uncomment one, like this, and save the file:
[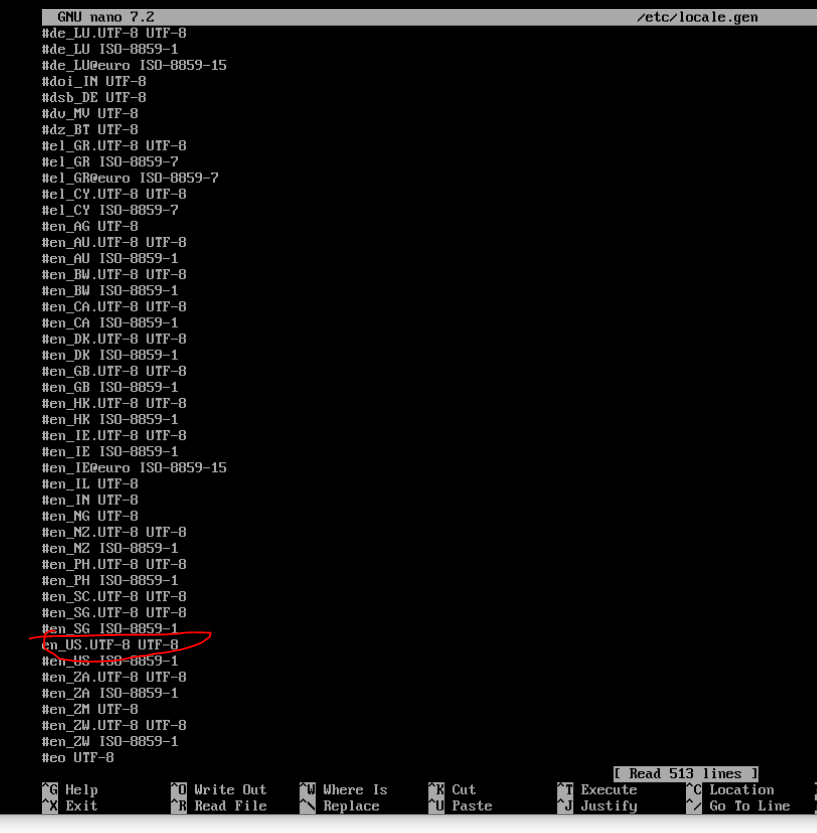](https://wiki.galaxydump.com/uploads/images/gallery/2025-02/8gydWDpLREkwTx7u-image.png)
Accept the change, with:
`locale-gen`
Set the language variable in /etc/locale.conf:
`$ echo "LANG=en_US.UTF-8" >> /etc/locale.conf`
Specify a hostname:
`echo "somehosenamewe choose" >> /etc/hostname`
Update our hosts file:
`nano /etc/hosts`
[](https://wiki.galaxydump.com/uploads/images/gallery/2025-02/cD619oth8fGKGAmf-image.png)
Make sure to add a localhost and loopback entries, like above.
Add the sudo package, so it can be used later:
`pacman -S sudo`
Change the root password with:
`passwd`
Add a secondary user:
```bash
useradd -m secondaryuser
passwd secondaryuser
```
Give the second user some privileges:
`usermod -aG wheel,audio,video,storage secondaryuser`
### Install Grub Bootloader
Make sure you are still inside arch-chroot.
Install packages:
`pacman -S grub efibootmgr`
Create the efi folder:
`mkdir /boot/efi`
Mount the boot partition into the efi folder:
`mount /dev/sda1 /boot/efi`
Install grub:
`grub-install --target=x86_64-efi --bootloader-id=GRUB --efi-directory=/boot/efi`
Set grub config:
`grub-mkconfig -o /boot/grub/grub.cfg`
### Setup Visudo
Tell visudo to use nano:
`EDITOR=nano visudo`
Uncomment the wheel group, so it can do anything:
[](https://wiki.galaxydump.com/uploads/images/gallery/2025-02/eTQ0rCB8Y60zTJwC-image.png)
Save change, and close it.
### Install a Desktop Environment
The first step is to install the X environment. Type the below command to install the [Xorg as display server](https://itsfoss.com/display-server/ "https://itsfoss.com/display-server/") along with the network manager. You can refer to the [official documentation](https://wiki.archlinux.org/title/wayland?ref=itsfoss.com "https://wiki.archlinux.org/title/wayland?ref=itsfoss.com") for Wayland.
```bash
pacman -S xorg networkmanager
```
Now, you can install GNOME desktop environment on Arch Linux using:
```bash
pacman -S gnome
```
Enable the desktop and network manager:
```bash
systemctl enable gdm.service
systemctl enable NetworkManager.service
```
### Reboot
Exit Chroot, with this:
`exit`
Unmount the os, so we can restart:
`umount -R /mnt`
Restart the machine:
`sudo reboot`
### Identify Network Adapter
Use this to find the name of our network adapter:
`ip link show`
Static IP Address
Create a file, here:
`/etc/systemd/network/20-wired.network`
Populate it:
```c
[Match]
Name=ens32
[Network]
Address=10.0.1.2/24
Gateway=10.0.1.1
DNS=1.1.1.1
DNS=1.0.0.1
```
### Enable Network Setting Services
This first one makes the network settings permanent.
The second one grants name resolution.
```c
systemctl enable systemd-networkd.service
systemctl enable systemd-resolved.service
```
### Add OpenSSH
Install openssh:
`sudo pacman -S openssh`
Start the service:
`sudo systemctl start sshd`
Enable the service:
`sudo systemctl enable sshd`
Add a firewall rule:
`sudo ufw allow 22/tcp`
### SSH Problems
If your ssh server is not accepting connections, ping it from another box.
If ping works, check that the ssh service is listening, with this:
`sudo nmap -p 22 127.0.0.1`