NOTE: If you are installing NVM and Node on a Jenkins server, you will need to run all of the following under the jenkins user context. See this page for how to impersonate the Jenkins user: [Linux: Impersonating Users](https://wiki.galaxydump.com/link/111) As a quick answer, run this to become the Jenkins user, for the purpose of the steps in this article, you can use: `sudo su jenkins` Or: `sudo -u jenkins bash` And, be sure to exit from the jenkins user context, when finished.
### Housekeeping A few things to note about these steps: These steps are aligned for an Ubuntu 22 host, so they may require adjustment for other distros and versions. These are designed for a build server that will be able to build for versions of Angular. So, we use NVM to manage Node.js, as different Angular versions are compatible with non-overlapping Node.js versions. ### Removing Existing #### Remove Existing Angular Versions This command will indicate what Angular version is active for the session: `ng version` If installed, you will see this: [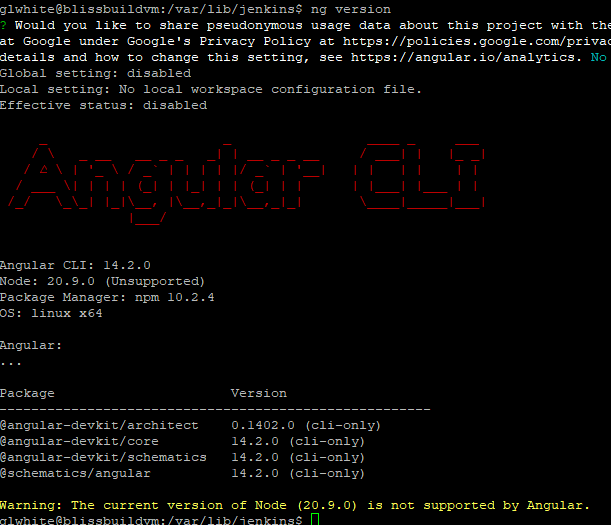](https://wiki.galaxydump.com/uploads/images/gallery/2025-02/Z14iD05mkt0Sj65t-image.png) But, the above command could be responding to a locally scoped Angular version. So, instead. We want to see what's globally installed, with this: `npm list -g --depth=0` If Angular is installed globally, it will appear in the output, like this: [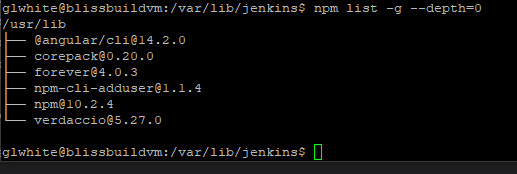](https://wiki.galaxydump.com/uploads/images/gallery/2025-02/QfxtWjgAyYdFQ0DG-image.png) If Angular is globally installed, you can remove it with this: `sudo npm uninstall -g @angular/cli` Once removed, you can confirm it with the same command that listed it: `npm list -g --depth=0` And, it should be missing from the output: [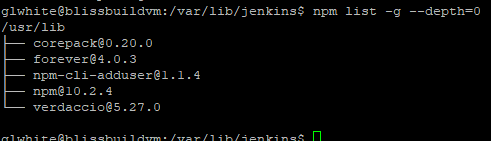](https://wiki.galaxydump.com/uploads/images/gallery/2025-02/vZsXNax7Iq57cJni-image.png) Now, run this to see if Angular is still installed: `ng version` If it returns an Angular banner, then you need to be more drastic. Run this, to see where Angular is installed: `which ng` If installed, you will see something like this: [](https://wiki.galaxydump.com/uploads/images/gallery/2025-02/qtb0CkMoYHbvGjMg-image.png) ##### Remove via Package Managers Check if Angular is installed, via Snap: ```bash snap list | grep angular ``` If installed, remove it with this: ```bash sudo snap remove angular-cli ``` Check for other package manager installations: ```bash dpkg -l | grep angular ``` If found, remove with this: ```bash sudo apt remove --purge angular-cli -y ``` ##### Manual Removal You can manually remove Angular with this: ```bash sudo rm -rf $(which ng) ``` Or, if you installed Angular under `npm root -g` run these: ```bash sudo rm -rf /usr/local/lib/node_modules/@angular sudo rm -rf /usr/local/bin/ng ``` Now, a call to this should fail: `ng version` #### Installing Node.js Once Angular has been scrubbed from the host, we need to install Node.js, as this is a dependency of Angular. Since building Angular apps and libraries may require multiple versions of Angular, we will follow steps to install NVM, to let us have multiple versions of Node.js. So, follow these pages, to install Node.js on the build server: Remove any existing Node.js versions with the removal steps from here: [Installing Node.js on Ubuntu](https://wiki.galaxydump.com/link/114) Follow this to install NVM, to allow the install of multiple versions of Node.js: [NVM - Node.js Version Manager](https://wiki.galaxydump.com/link/109) # Jenkins: Accessing Private NPM Repository For a Jenkins build server to publish packages to an NPM repository, the jenkins user account must be able to authenticate to the NPM repository. NPM repository authentication is normally performed with an authentication tokens. The auth token is stored in this file: ~/.nmprc, of the user account. So. Since our Jenkins build server executes pipeline steps as the jenkins user account, we need to somehow get an auth token into the HOME folder of that account. We have a couple ways to do this: - Run a one-time pipeline step (that will create the jenkins user and retreive an auth token). - Run as a jenkins user in a shell, that will do the same. For either method, we need to install a package, called: npm-cli-adduser. This package will allow us to add users that can be used by npm publishing steps. Here's how to install npm-cli-adduser, globally on a host: ```bash npm install -g npm-cli-adduser ``` The above, will install the tool, globally. So, there shouldn't be a need to install in a Jenkins user shell session. Next, we need to decide which method we will follow, to create the new NPM repository user and get an authentication token for it. Regardless of the choice, a successful outcome will create a new account on the repository, and give Jenkins an authentication token for publishing packages. #### One-Time Pipeline Step Doing this method involves creating a temporary Jenkins build job that includes the following pipeline step: ```go // NOTE: If you have to do this again, set the password to something valid. stage('Add User') { // This step is enabled once, to add the jenkins user to the registry, under the jenkins service account context. steps { // NOTE: Make sure the user name is unique. // We don't really care about what it is, as we only want the auth token put in the jenkins ~/ folder. sh "npm-cli-adduser -uNOTE: Be sure to a username and password that Jenkins will use to authenticate to the NPM repository.
Running the above pipeline step in a build job will create the user on the NPM repository, and return an authentication token that will be stored in the Jenkins home folder "~/". #### From a Jenkins Shell Open an SSH connection to the Jenkins build server, and execute the following to gain a shell session as the jenkins system account: ``` sudo su jenkins ```NOTE: If you haven't already modified the kjenkins account to have a defined shell and profile, follow the steps, here: [Ubuntu: Converting a System Account to Interactive](https://wiki.galaxydump.com/link/120)
With a shell open as the jenkins user, we can run the same command as the pipeline, above: ```bash npm-cli-adduser -uNOTE: Be sure to a username and password that Jenkins will use to authenticate to the NPM repository.
### Success Once we've done either of the above methods, the Jenkins build server will have an auth token that it can used to publish packages to the NPM repository. The authentication token will be stored on a file, here: ~/.npmrc If successful, we can open that file, and see the received auth token tied to the repository URL. [](https://wiki.galaxydump.com/uploads/images/gallery/2025-02/RThso6e2GwQGFFdq-image.png) The above shows we have an auth token for our repository. And, our NPM config points to our private repository. # Jenkins: Upgrading Here are some notes on upgrading Jenkins with a WAR file. Adapted from here: [https://www.baeldung.com/ops/jenkins-war-update](https://www.baeldung.com/ops/jenkins-war-update) Identify where the current war is running, by opening Jenkins, going to Manage Jenkins, and System Information. Find the executable-war entry and note the path. [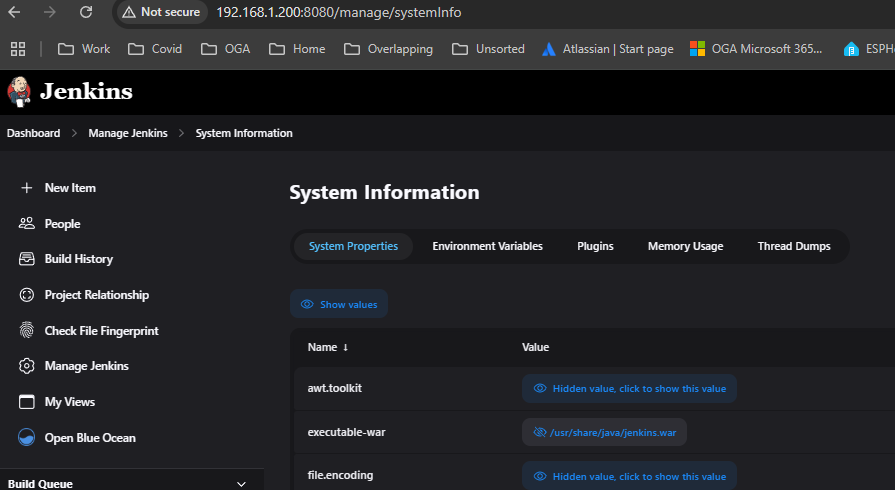](https://wiki.galaxydump.com/uploads/images/gallery/2025-02/RjJsdh9NG2XROmlu-image.png) Stop Jenkins: `sudo systemctl stop jenkins` Once stopped navigate to a folder where you can download things. Download the latest version of Jenkins as a WAR file: ```bash wget https://updates.jenkins-ci.org/latest/jenkins.war ``` Or, download a specific version: ```bash wget https://updates.jenkins-ci.org/download/war/2.375.1/jenkins.war ``` Update the downloaded war file permissions: ```bash chown root:root jenkins.war chmod 644 jenkins.war ``` Now, make a backup of the existing war file (at the path from System Information): ```bash mv /usr/share/java/jenkins.war /usr/share/java/jenkins.war.old ``` Copy the downloaded jenkins war file over the existing executable: ``` sudo mv /download/jenkins.war /usr/share/java/ ```NOTE: Be sure to change the folder path of the downloaded file.
You should be able to start the new version with: ```bash sudo systemctl start jenkins ``` # Jenkins Fails to Install Packages for Angular Builds Anytime your Angular project has changed Angular CLI versions, it is quite possible that the Jenkins job will fail, because its latent working copy has a different (older) Angular version cached in it.NOTE: This article was written when our Jenkins server only built for one Angular version target. So, it may need updating for cleaning up project-scoped Angular versions.
To fix this, you could possibly delete the working copy from the Jenkins workspace. Haven’t tried that yet. But, there are two commented out lines in the Jenkins pipeline scripts that will fix it. Open the Jenkins pipeline script and find this block: ```bash stage('Build Library') { steps { // Adapted from here: https://www.baeldung.com/ops/jenkins-pipeline-change-to-another-folder // NOTE: This 'dir' command will switch the directory only for the steps inside it. // After the block, the working directory reverts to the jenkinsfile folder. dir("${solutionName}/workspace") { /* execute commands in the workspace directory */ // sh "ng update @angular/cli@15 --allow-dirty" // sh "ng update @angular/core@15 --allow-dirty" sh "npm run build-library" } } } ``` Uncomment the two ng update lines, so Jenkins will update its working copy to the desired Angular version. NOTE: Be sure to set the desired Angular version, where the above has ‘15’. This should fix the build error. NOTE: This is only required once to upgrade the Jenkins workspace. So, comment these lines back out after a successful build. #### Other things to fix if this problem won’t go away: If that doesn’t fix things, then whatever library you recently upgraded its Angular version may need to be manually built/packed/published outside of Jenkins, so it can properly pull in that library dependency with an acceptable Angular dependency version. If the workspace that library is in, includes any other libraries, such as a Middle-Library, used for dependency testing, that intermediate library also must be built/packed/published outside of Jenkins, so any listed dependency on it uses the same Angular version that you upgraded to. # Building Angular in Jenkins Pipelines Here are some things that need to be done, for a Jenkins build server to build/pack/publish Angular libraries, and apps.NOTE: This page assumes the library or app source code is being built in a monorepo workspace.
When using the same Jenkins build server to build Angular apps that target differing versions of Angular, it is necessary to swap in the required Node.js version, compatible with that version of Angular.See this article for setting up NVM: [Jenkins: Add Angular Build Support](https://wiki.galaxydump.com/link/113)
With NVM installed on the build server, we need to make sure that the build job configuration and pipeline steps are setup. ### Build Job Config These differ slightly, depending if we are building an app or a library. Libraries get published to an NPM repository, whereas apps get published to Artifactory. ##### Library Job Config When compiling an Angular library, the job's Properties need to include these: ```bash ENV_SolutionName=oga.webui.runtimesecurity ENV_WorkspaceName=workspace ENV_projectName=lib-oga-webui-runtimesecurity ENV_gitrepo=git@github.com:ogauto/OGA.WebUI.RuntimeSecurity.Lib.git ENV_angularVersion=15 ``` Here's a description of each property: - ENV\_Solution - folder name inside the same folder where the jenkinsfile sits. - ENV\_WorkspaceName - folder name insides the solution folder, that is the monorepo workspace root. - ENV\_projectName - name of the library, as listed in npm. This is also the folder name, inside the workspace's projects folder. - ENV\_gitrepo - full path to the git repository. - ENV\_angularVersion - version of Angular being targeted. Will be: 14, 15, 17.0.7, 17.3.0. ##### App Job Config When compiling an Angular application, the job's Properties need to include these: ```bash ENV_artifactoryUploadRepo=oga-built-dev ENV_artifactoryRepoFolder=OGA.Backups.WebUI ENV_SolutionName=OGA.Backups.WebUI ENV_WorkspaceName=backupsui-workspace ENV_projectName=mgmtui ENV_globalProjectName=oga.backups.webui ENV_artifactZipFileName=OGA.Backups.WebUI ENV_gitrepo=git@github.com:LeeWhite187/OGA.Backups.WebUI.git ENV_angularVersion=17.0.7 ``` Here's a description of each property: - ENV\_artifactoryUploadRepo - repository name on the Artifactory server. - ENV\_artifactoryRepoFolder - folder name, inside the Artifactory repository. - ENV\_Solution - folder name inside the same folder where the jenkinsfile sits. - ENV\_WorkspaceName - folder name insides the solution folder, that is the monorepo workspace root. - ENV\_projectName - folder name, under the projects folder, where the app's source is located. - ENV\_globalProjectName - application full name, used by the post-action notification step, when publishing job status. - ENV\_artifactZipFileName - Name of the published zip file, containing the built application. - ENV\_gitrepo - full path to the git repository. - ENV\_angularVersion - version of Angular being targeted. Will be: 14, 15, 17. ### Pipeline Steps Here's a description of necessary details in the pipeline job for an Angular app or library. #### Common Pipeline Steps Here are common elements for both Angular app and library pipelines. ##### Environment Block Both pipeline types lead off with an environment step, to populate the jenkins user session with necessary variables. ```java pipeline { agent any environment { // Define where NVM is located (in the user's home), so we can call its scripts... NVM_DIR = "${HOME}/.nvm" } ... } ``` Place the environment block before all scripts blocks and after the agent block, like above. ##### Angular Version Step This step figures out what specific version of Node.js and Angular will be needed. Place this step above others that run NVM. ```java // Determine the actual version of Angular and Node.js that we need to compile with... stage('Angular Version') { steps { script { echo "angularVersion: ${angularVersion}" if (angularVersion == '14') { env.NODE_VERSION = "16" env.NG_CLI_VERSION = "14.2.0" } else if (angularVersion == '15.2.10') { env.NODE_VERSION = "18" env.NG_CLI_VERSION = "15.2.10" } else if (angularVersion == '17.0.7') { env.NODE_VERSION = "20" env.NG_CLI_VERSION = "17.0.7" } else if (angularVersion == '17.3.0') { env.NODE_VERSION = "20" env.NG_CLI_VERSION = "17.3.0" } else if (angularVersion == '17.3.12') { env.NODE_VERSION = "20" env.NG_CLI_VERSION = "17.3.12" } else if (angularVersion == '19.2.3') { env.NODE_VERSION = "22" env.NG_CLI_VERSION = "19.2.3" } else { error "Unsupported Angular version: ${angularVersion}" } echo "env.NG_CLI_VERSION is: $env.NG_CLI_VERSION" echo "env.NODE_VERSION is: $env.NODE_VERSION" } } } ``` ##### NVM Swap-In Step The next step will install the Node.js and Angular CLI version for the project. It looks like this: ```java stage('Install Node.js & Angular CLI') { steps { // // Adapted from here: https://www.baeldung.com/ops/jenkins-pipeline-change-to-another-folder // // NOTE: This 'dir' command will switch the directory only for the steps inside it. After the block, the working directory reverts to the jenkinsfile folder. // dir('Libraries/oga.webui.sharedkernel/workspace') // { // /* execute commands in the workspace directory */ // NOTE: We wrapped the NVM and NPX calls in a single shell call that first loads the .bashrc profile, because the shell is noninteractive. // NOTE: The '.' before the $HOME/.bashrc call is the Ubuntu equivalent of the command 'source'. sh "whoami" sh ''' . $NVM_DIR/nvm.sh nvm install $NODE_VERSION nvm use $NODE_VERSION npx -p @angular/cli@$NG_CLI_VERSION ng version ''' // } // sh ''' // source $NVM_DIR/nvm.sh // nvm install $NODE_VERSION // nvm use $NODE_VERSION // npx -p @angular/cli@$NG_CLI_VERSION ng version // ''' } } ``` It employs a 'source' command ( a '.' in Ubuntu Linux) to load the jenkins user environment with NVM variables. It will swap in the Node.js version, and install Angular. ##### NPM Install Step The next step will install packages, via npm. It uses 'npm ci', instead of 'npm install'. This is because 'ci' will stick to package versions that have been defined in your package.json lock file, instead of installing the latest version. So, using 'npm ci' ensures a consistent build, that matches dependency versions to what you last developed in. ```java stage('Install Packages') { steps { // Adapted from here: https://www.baeldung.com/ops/jenkins-pipeline-change-to-another-folder // NOTE: This 'dir' command will switch the directory only for the steps inside it. After the block, the working directory reverts to the jenkinsfile folder. dir("${solutionName}/${workspaceName}") { /* execute commands in the workspace directory */ // See this for these commented out lines: https://wiki.galaxydump.com/books/howto/page/jenkins-fails-to-install-packages-for-angular-builds // sh "ng update @angular/cli@15 --allow-dirty" // sh "ng update @angular/core@15 --allow-dirty" //sh "npm install" sh ''' . $NVM_DIR/nvm.sh nvm use $NODE_VERSION npm ci ''' } } } ``` The above common pipeline steps are necessary to swap in libraries and load packages required for building. #### App Build and Publish Steps Here's the steps to build and publish an application: ```java stage('Build App') { steps { // Adapted from here: https://www.baeldung.com/ops/jenkins-pipeline-change-to-another-folder // NOTE: This 'dir' command will switch the directory only for the steps inside it. After the block, the working directory reverts to the jenkinsfile folder. dir("${solutionName}/${workspaceName}") { /* execute commands in the workspace directory */ //sh "npm run build-library" //sh "npx ng build ${projectName} --configuration=production" sh ''' . $NVM_DIR/nvm.sh nvm use $NODE_VERSION npx ng build ''' + "${projectName}" + ''' --configuration=production ''' } } } stage('Create Publish Folder') { steps { fileOperations([folderCreateOperation("${solutionName}/publish")]) } } stage('Zip-App') { steps { script { zip zipFile: "${solutionName}/publish/${artifactZipFileName}-angular.zip", archive: false, dir: "${solutionName}/${workspaceName}/dist/${projectName}/browser", overwrite: true } } } ``` After the above zip step has executed, just use a normal Artifactory publish step to push the zip file to your bin repository for later deployment. #### Library Build, Pack, and Publish Steps The steps for a library are a little different. It includes a pack step, and publishes to a different repository type (npm repo): ```java stage('Build Library') { steps { // Adapted from here: https://www.baeldung.com/ops/jenkins-pipeline-change-to-another-folder // NOTE: This 'dir' command will switch the directory only for the steps inside it. After the block, the working directory reverts to the jenkinsfile folder. dir("${solutionName}/${workspaceName}") { /* execute commands in the workspace directory */ //sh "npm run build-library" //sh "npx ng build ${projectName} --configuration=production" sh ''' . $NVM_DIR/nvm.sh nvm use $NODE_VERSION npx ng build ''' + "${projectName}" } } } stage('Pack Library') { steps { /* Execute the pack command from the library's dist folder */ // Adapted from here: https://www.baeldung.com/ops/jenkins-pipeline-change-to-another-folder // NOTE: This 'dir' command will switch the directory only for the steps inside it. After the block, the working directory reverts to the jenkinsfile folder. dir("${solutionName}/${workspaceName}/dist/${projectName}") { /* execute commands in the workspace directory */ sh ''' . $NVM_DIR/nvm.sh nvm use $NODE_VERSION npm pack ''' } } } stage('Publish Library') { steps { /* Execute the publish command from the library's dist folder */ // Adapted from here: https://www.baeldung.com/ops/jenkins-pipeline-change-to-another-folder // NOTE: This 'dir' command will switch the directory only for the steps inside it. After the block, the working directory reverts to the jenkinsfile folder. dir("${solutionName}/${workspaceName}/dist/${projectName}") { sh ''' . $NVM_DIR/nvm.sh nvm use $NODE_VERSION npm publish --registry https://npmrepo.ogsofttech.com:4873/ ''' } } } ``` # Jenkins References [Jenkins Tutorial — Part 5 — When Conditions](https://itnext.io/jenkins-tutorial-part-5-when-conditions-76e61fc8ac0e) [Conditionals in a Declarative Pipeline Jenkinsfile](https://michakutz.medium.com/conditionals-in-a-declarative-pipeline-jenkinsfile-d1a4a44e93bb) [Jenkins Declarative Pipeline Tutorial](https://dba12c.wordpress.com/2022/06/10/jenkins-declarative-pipeline-tutorial/) [Declarative Pipeline With Jenkins - DZone Refcards](https://dzone.com/refcardz/declarative-pipeline-with-jenkins)