SSH Keys
- SSH Key Naming Convention
- How to Get Host SSH Key Fingerprints
- Creating SSH Keys in Windows
- Authenticating to Linux Server with SSH Keys
- Linux: Disabling Password Authentication
- Adding SSH Keys with ssh-copy-id
- Adding SSH Keys with CAT
- Linux SSH Key Management
SSH Key Naming Convention
This page describes a good naming convention for SSH keys, that makes them easier to track, rotate, and revoke.
You should use this naming convention for the filename of keys.
And as well, use the same convention when populating the the comment field of each key.
Here are some design choices for SSH key naming:
- SSH keys are a client-centric object. So, the name should be client-centric.
Specifically, the name should include the username (actual user or service name). - To more easily track key usage, the name should include the client machine, where it is installed.
- To know how old a key is (for expiry purposes), the name should include the creation date.
- Since key algorithms can become compromised or superceded by newer ones, some distros and services will refuse certain key types.
So, we will include the key algo in the name.
The composite key name convention becomes this:
<keytype>-<username>-<client>-<date>
Here is an example of this key naming:
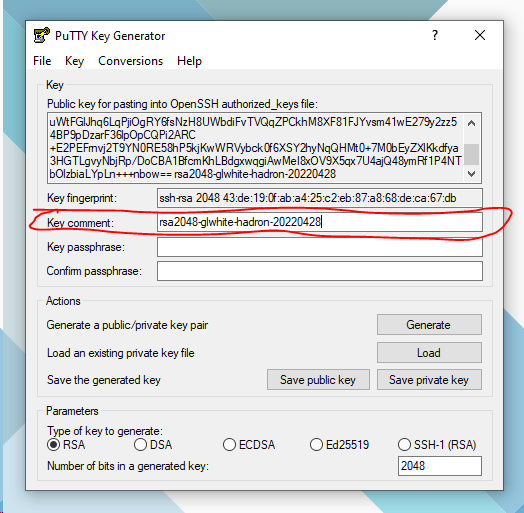
RSA2048-glwhite-hadron-20220428
The above key name expression has the following terms:
-
Key type - what encryption type was used and key strength
-
User Name - associates a key to a single user, for proper authentication and access authorization
-
Client device - associates a key to a device, so the key can be revoked if the device is compromised
-
Creation timestamp - marks when the key was created, so older versions can be identified and revoked
Following this convention allows use to easily identify keys that need to be revoked. As we can revoke keys by device, by user, or by type as a particular encryption becomes obsolete.
As well, the creation time allows us to know when to periodically rotate keys, to limit risk.
The key name should be used as the key comment at the end of a key string in an SSH key file on a server.
The key name should be part of both the private and public key file names (ppk files) on a client machine.
The key name can be set as the Key Comment when generating a key, using PuttyGen, like this:
When PuttyGen creates a key, both the private key and public keys should be saved to disk.
A password can be added to the private key, from within PuttyGen, to prevent unauthorized usage.
If the private key is saved without a password, be sure to store it in a safe bag or in an encrypted volume.
The public key can be stored and distributed without concern.
NOTE: We’ve purposely kept the creation time as the last term. This ensures that any automation used to rotate keys can successfully identify the timestamp for all keys (by looking at the last term).
Definite Purpose Keys
There are scenarios that require an ssh key for a definite purpose, such as authentication to a service, such as Github.
In this scenario, it is wise to include the service as a term in the ssh key name and key comment.
Doing so, extends the key naming convention to:
<keytype>-<username>-<client>-<purpose>-<date>
Here is an example of this key naming:
RSA2048-glwhite-hadron-github-20220428
How to Get Host SSH Key Fingerprints
Here’s a short command line statement that will fetch the host ssh key fingerpring without authenticating with it:
ssh-keyscan host | ssh-keygen -lf -Here’s another way to clean up ssh host key fingerprints:
# remove any old fingerprints for the host
ssh-keygen -R server.example.com
# add SSH fingerprints for the host
ssh-keyscan -t ecdsa,ed25519 -H server.example.com >> ~/.ssh/known_hosts 2>&1
Creating SSH Keys in Windows
General Notes
SSH keys can be easily generated in Windows, using PuttyGen.
See this article for an update based on obsolete SHA-1 RSA key usage: Ubuntu 22.04 SSH the RSA key isn't working since upgrading from 20.04
Based on the obsolescence of RSA keys in Ubuntu, it is advised to use ECDSA keys instead.
Needed Tooling
This tutorial uses PuttyGen to create SSH keys in Windows. So, download and install it if needed.
PuttyGen can be downloaded, here: PuTTYgen Download
Good SSH Key Conventions
Here are some good conventions to follow for key security and easy maintenance:
User Keys
Each user should have their own SSH keys. No sharing for obvious reasons.
If a user is fired or leaves, only the keys identified for that user need to be revoked.
Again. No sharing keys between users.
Client Devices
An SSH key should be created for each client device that a user connects from.
Having a unique set of keys for each client device compartmentalizes the risk of a lost or stolen device. Specifically, when a user’s laptop or phone is lost or compromised, only the SSH keys on that device need to be revoked. Other keys for that user remain unaffected.
Don’t use ssh keys creation for one device on another device. Don’t share them between clients!
Sharing keys across clients does several things:
-
It prevents the remote endpoint from accurately identifying the client.
-
If a client is compromised, it is harder to identify and isolate the keys that need to be revoked for the compromised client.
SSH Key Naming
See this page for naming convention: SSH Key Naming Convention
Authenticating to Linux Server with SSH Keys
Once you have configured the server with SSH key authentication, you can follow this to attempt connection.
NOTE: Using SSH key authentication does not require a password for the remote account.
From a Linux host, use this:
ssh username@remote_hostIf this is your first time connecting to this host (if you used the last method above), you may see something like this:
OutputThe authenticity of host '203.0.113.1 (203.0.113.1)' can't be established.
ECDSA key fingerprint is fd:fd:d4:f9:77:fe:73:84:e1:55:00:ad:d6:6d:22:fe.
Are you sure you want to continue connecting (yes/no)? yes
This means that your local computer does not recognize the remote host. Type “yes” and then press ENTER to continue.
If you did not supply a passphrase for your private key, you will be logged in immediately.
If you supplied a passphrase for the private key when you created the key, you will be prompted to enter it now.
NOTE: your keystrokes will not display in the terminal session for security.
After authenticating, a new shell session should open for you with the configured account on the remote server.
Linux: Disabling Password Authentication
Once you have confirmed that you have SSH key access to a Linux host (using SSH without a password), it is safe to disable password-based authentication.
WARNING: This step will lock down password-based logins, so ensuring that you will still be able to get administrative access is crucial.
Before proceeding, make sure that you do, indeed, have SSH-key authentication access configured for at least one user with sudo privileges.
NOTE: Best practice is that the configured administrative user is not actually the root user.
But, is a non-root user, with sudo privileges.
Note: If you are setting up a DigitalOcean VM, and provided an SSH key when creating a droplet, password authentication may have been automatically disabled. You can still verify this by reading on.
Once you’ve confirmed that your remote account has administrative privileges (has sudo access), log into your remote server with SSH keys.
Then, open up the SSH daemon’s configuration file:
sudo nano /etc/ssh/sshd_configInside the SSH config file, search for a directive called PasswordAuthentication.
This line may be commented out with a # at the beginning of the line.
Uncomment the line by removing the #, and set the value to no.
This will disable your ability to log in via SSH using account passwords:
. . .
PasswordAuthentication no
. . .
Save and close the config file when you are finished by pressing CTRL+X, then Y to confirm saving the file.
To actually activate the updated SSH config changes, we need to restart the sshd service:
sudo systemctl restart sshAs a precaution, open up a new terminal window and test that the SSH service is functioning correctly before closing your current session:
ssh username@remote_hostOnce you have verified your SSH service is functioning properly, you can safely close all current server sessions.
The SSH daemon on your Ubuntu server now only responds to SSH-key-based authentication.
Password-based logins have been disabled.
Adding SSH Keys with ssh-copy-id
If you are attempting to add an SSH key (to a Linux host), from another Linux host, you can use a built-in utility called, ssh-copy-id .
The ssh-copy-id tool is included by default in many operating systems, so you may have it available on your local system. For this method to work, you must already have password-based SSH access to your server.
Due to its simplicity, this method is highly recommended if available. If you do not have ssh-copy-id available to you on your client machine, you may use one of the two alternate methods provided in this section (copying via password-based SSH, or manually copying the key).
NOTE: Using ssh-copy-id requires password authentication enabled.
See the bottom of this page for how to temporarily enable password auth on the remote host.
Requires Password Auth
This utility is easy to use, before disabling password authentication.
But, it does encounter issues, trying to copy a public key to a remote host, while simultaneously logging into it with a different key.
That quite often fails.
So, first, we will ensure that password authentication is enabled on the remote host.
Log into the remote host, and open the sshd_config file, located at: /etc/ssh/sshd_config.
Locate the line with 'PasswordAuthentication', and set it to yes, like this:
...
PasswordAuthentication yes
...
Save and close the config file.
Restart the ssh service, with this:
sudo systemctl restart sshNow, you can use the utility from the local linux VM.
SSH-Copy-Id Usage
To use the utility, you specify the remote host that you would like to connect to, and the user account that you have password-based SSH access to.
NOTE: The account you log in to the local Linux host with, will also be the account, whose public SSH key will be pushed to the remove Linux host. So, this will be the account to which your public SSH key will be copied.
The abbreviated syntax is:
ssh-copy-id username@remote_hostYou can also specify the public key file and port, like this:
ssh-copy-id -i ~/.ssh/id_rsa.pub USER@HOST -p PORTYou may see the following message:
OutputThe authenticity of host '203.0.113.1 (203.0.113.1)' can't be established.
ECDSA key fingerprint is fd:fd:d4:f9:77:fe:73:84:e1:55:00:ad:d6:6d:22:fe.
Are you sure you want to continue connecting (yes/no)? yes
This means that your local computer does not recognize the remote host. This will happen the first time you connect to a new host. Type “yes” and press ENTER to continue.
Next, the utility will scan your local account for the id_rsa.pub key that we created earlier. When it finds the key, it will prompt you for the password of the remote user’s account:
Output/usr/bin/ssh-copy-id: INFO: attempting to log in with the new key(s), to filter out any that are already installed
/usr/bin/ssh-copy-id: INFO: 1 key(s) remain to be installed -- if you are prompted now it is to install the new keys
username@203.0.113.1's password:
Type in the password (your typing will not be displayed, for security purposes) and press ENTER.
The utility will connect to the account on the remote host using the password you provided.
It will then copy the contents of your ~/.ssh/id_rsa.pub key into a file in the remote account’s home ~/.ssh directory called authorized_keys.
You should see the following output:
OutputNumber of key(s) added: 1

Now try logging into the machine, with:   "ssh 'username@203.0.113.1'"
and check to make sure that only the key(s) you wanted were added.
Disable SSH Password Auth
Once you have pushed the SSH key to the remote host, you need to disable password authentication.
From a terminal session with the remote host, open the sshd_config file (same as earlier), located at: /etc/ssh/sshd_config.
Locate the line with 'PasswordAuthentication', and set it to no, like this:
...
PasswordAuthentication no
...
Save and close the config file.
Restart the ssh service, with this:
sudo systemctl restart sshNow, you have added the public SSH key of your local linux user account, to the remote Linux VM.
And, you should have SSH key authenticated access to the remote Linux host.
Adding SSH Keys with CAT
Here's a quick and dirty way to upload SSH keys to a remote user account, using the CAT command.
This can be done, if your local host doesn't have the ssh-copy-id utility.
If you do not have ssh-copy-id available, but you have password-based SSH access to an account on your server, you can upload your keys using a conventional SSH method.
We can do this by using the cat command to read the contents of the public SSH key on our local computer and piping that through an SSH connection to the remote server.
On the other side, we can make sure that the ~/.ssh directory exists and has the correct permissions under the account we’re using.
We can then output the content we piped over into a file called authorized_keys within this directory. We’ll use the >> redirect symbol to append the content instead of overwriting it. This will let us add keys without destroying previously added keys.
The full command looks like this:
cat ~/.ssh/id_rsa.pub | ssh username@remote_host "mkdir -p ~/.ssh && touch ~/.ssh/authorized_keys && chmod -R go= ~/.ssh && cat >> ~/.ssh/authorized_keys"You may see the following message:
OutputThe authenticity of host '203.0.113.1 (203.0.113.1)' can't be established.
ECDSA key fingerprint is fd:fd:d4:f9:77:fe:73:84:e1:55:00:ad:d6:6d:22:fe.
Are you sure you want to continue connecting (yes/no)? yes
This means that your local computer does not recognize the remote host. This will happen the first time you connect to a new host. Type yes and press ENTER to continue.
Afterwards, you should be prompted to enter the remote user account password:
Outputusername@203.0.113.1's password:After entering your password, the content of your id_rsa.pub key will be copied to the end of the authorized_keys file of the remote user’s account.
You can then, attempt to use SSH key authentication.
Linux SSH Key Management
See this article for an update based on obsolete SHA-1 RSA key usage: Ubuntu 22.04 SSH the RSA key isn't working since upgrading from 20.04
NOTE: We currently have two tutorials for this, that need to be consolidated into one. So, maybe this alternate tutorial fills your use-case: How to Setup SSH Key Authentication to Linux
Step 1 - Key Creation
Follow this page for creating keys in Linux: Creating SSH Keys in Linux
Or, Follow this page for creating keys in Windows: Creating SSH Keys in Windows
After following one of the above tutorials, you should have a public and private key that you can use to authenticate.
The next step is to place the public key on your server so that you can use SSH-key-based authentication to log in.
Step 2 — Copying the Public Key to a Linux Server
There’s a couple ways to add an SSH public key to a remote host:
-
Using SSH-Copy-ID
-
Using CAT
-
Manually Copying
Using SSH-Copy-ID
The quickest way to copy your public key to the Ubuntu host is to use a utility called ssh-copy-id. Due to its simplicity, this method is highly recommended if available.
See this page for how to use it: Adding SSH Keys with ssh-copy-id
Using CAT
If you do not have ssh-copy-id available, but you have password-based SSH access to an account on your server, you can upload your keys using a conventional SSH method.
Here’s a method for uploading an SSH key with cat: Adding SSH Keys with CAT
Manually Copying
If you don’t have SSH access to the remote host, you will need to directly paste in a user’s SSH public key.
See this page for how to manually add SSH keys to a Linux host: Linux: Manually Installing SSH Keys
Step 3 — Authenticating to Your Ubuntu Server Using SSH Keys
If you have successfully completed one of the procedures above, you should be able to log into the remote host without providing the remote account’s password.
See this page for how to: Authenticating to Linux Server with SSH Keys
If key-based authentication was successful, continue on to learn how to further secure your system by disabling password authentication.
Step 4 — Disabling Password Authentication on Your Server
Once you have confirmed that you can access the VM, with SSH key authentication, follow this page to disable password authentication: Linux: Disabling Password Authentication
Conclusion
You should now have SSH-key-based authentication configured on your server, allowing you to sign in without providing an account password.
If you’d like to learn more about working with SSH, take a look at our SSH Essentials Guide.