NOTE: See bottom of article for esx243 NFS script.
To fix this isn’t a simple right-click reconnect, unfortunately. So, here goes… Open a Putty session to the ESX host as the root user. Run this to list NFS shares: ```bash esxcli storage nfs list ``` It might not come up with anything. No worries. If your shares are using NFS4, use this command, instead: ```bash esxcli storage nfs41 list ``` As reference, here's what the storage list normally looks like: [](https://wiki.galaxydump.com/uploads/images/gallery/2026-07/b57nqLJ07wYkPMSe-image.png) Open a web session to your ESX host, and copy out the datastore name (the inaccessible one), like this: [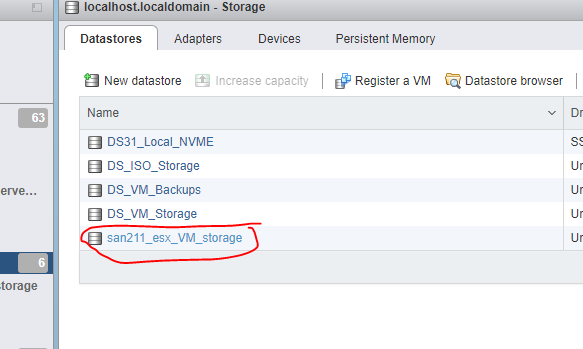](https://wiki.galaxydump.com/uploads/images/gallery/2026-07/MEaPCThQsKag00re-image.png) Now, delete the inaccessible share by running the following from the Putty session: ```bash esxcli storage nfs remove -v DATASTORE_NAME ```NOTE: Replace `DATASTORE_NAME` with the name of the datastore you got from the ESX host web UI.
The above command will forcibly remove the NFS share. You should be able to confirm it is gone from the web UI. Once it is gone, you need to re-add the datastore by creating a new one. The config dialog would look like this: [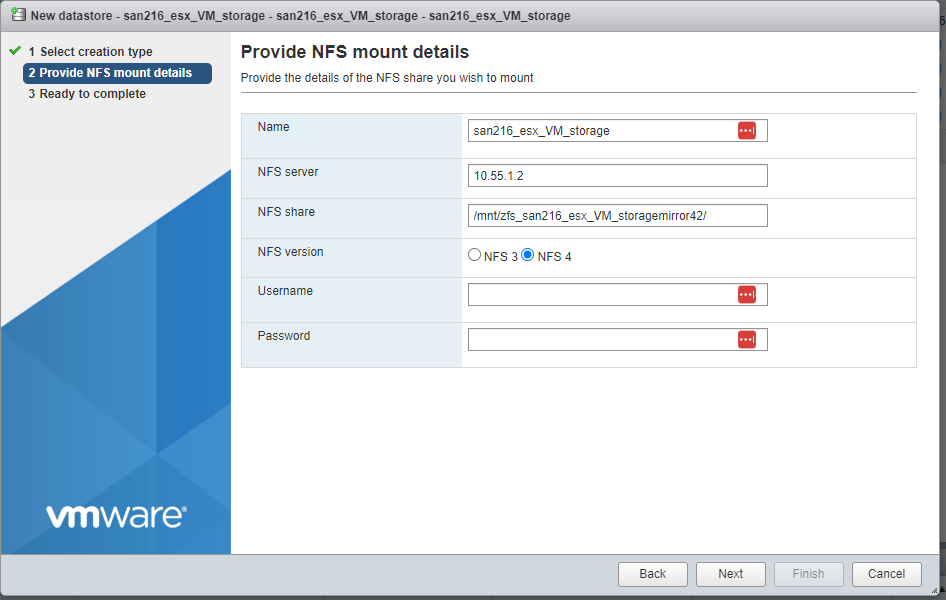](https://wiki.galaxydump.com/uploads/images/gallery/2026-07/kMRRkHRx4tASnyaS-image.png) Once done, you should be able to refresh the web UI and the “inaccessible” states will slowly go away as VMs are scanned. The add datastore can also be scripted by doing the add from the command, of this form: ``` esxcli storage nfs add -H HOST -s ShareName/MountPoint -v DATASTORE_NAME ``` #### Here’s a script for fixing the inaccessible NFS share of SAN216 on ESX243 whenever the power goes out: ``` esxcli storage nfs remove -v san216_esx_VM_storage esxcli storage nfs41 add -H 10.55.1.2 -s /mnt/zfs_mirror42/san216_esx_VM_storage -v san216_esx_VM_storage ``` #### Here’s a script for fixing the inaccessible NFS share of SAN211 on ESX243 whenever the power goes out: ``` esxcli storage nfs remove -v san211_esx_VM_storage esxcli storage nfs41 add -H 10.55.0.2 -s /mnt/zfs_mirror/san211_esx_VM_storage -v san211_esx_VM_storage ``` ### Fixing SAN211 Shares If the datastores from SAN211 are showing as inaccessible, run these to remove and readd each one. This one will remove and readd the ISO datastore... ```bash esxcli storage nfs41 remove --volume-name DS_ISO_Storage esxcli storage nfs41 add \ --hosts 10.55.0.2 \ --share /mnt/zfs_z2/esx_iso_storage \ --volume-name DS_ISO_Storage ``` This one will remove and readd the VM backup datastore... ```bash esxcli storage nfs41 remove --volume-name DS_VM_Backups esxcli storage nfs41 add \ --hosts 10.55.0.2 \ --share /mnt/zfs_z2/esx_VM_Backups \ --volume-name DS_VM_Backups ``` This one will remove and readd the ISO datastore... ```bash esxcli storage nfs41 remove --volume-name DS_VM_Storage esxcli storage nfs41 add \ --hosts 10.55.0.2 \ --share /mnt/zfs_z2/esx_VM_storage \ --volume-name DS_VM_Storage ```