
Moving MSSQL Databases
Here are steps to move SQL Server databases from one volume to another.
WARNING: These steps assume that you can take the SQL engine offline as needed for this activity.
General Notes
This page is broken up into separate moves, one for each type of database:
- master
- model
- msdb
- tempdb
- user databases
This is done, in case you want to split these out, or just need to move some of them.
NOTE: There is no supported method of moving a database from one volume to another, while maintaining client access to it.
You need to plan this activity for an outage window.
SQL Server requires that database and log file paths be in the server's local filesystem.
This is required since SQL Server utilizes file share locks and VSS.
So, don't get fancy and define any network or distributed shares as database paths.
SQL Server will not create file folders, when you define storage paths.
You will have to create and setup any paths, beforehand.
Databases exist as a database file and a separate log file (a journal of transactions and unstored changes).
Always move log files separately from data, to ensure that no single, composed DDL statement will corrupt both.
Some databases include one or multiple .ndf files. If so, move all of them when you move the database file.
SQL Server requires read/write/delete permissions to access database, log, and backup files.
Be sure to update the ACL of the base file path(s), to allow the assigned SQL engine service user to access it.
Working List
To start off this process, we will identify where all databases are stored.
This will let us check off the ones that we want to move.
Run this query to list all databases and log files for the SQL engine host:
USE master;
GO
SELECT
    d.name AS DbName,
    mf.type_desc,
    mf.name AS LogicalName,
    mf.physical_name
FROM sys.databases d
JOIN sys.master_files mf ON mf.database_id = d.database_id
ORDER BY d.name, mf.type_desc, mf.name;
The above query will give you, your task list of all the things to move.
See the relevant database type section, for how to move each type.
File Paths
SQL Server uses a default base folder path, where it creates databases.
If you are moving database to a new volume, you should update this path, to that location.
This ensures that new databases will be created, there.
To see the existing configured paths, open SSMS and connect to the SQL engine host with sys privileges.
Once open, right-click the SQL engine and select properties.
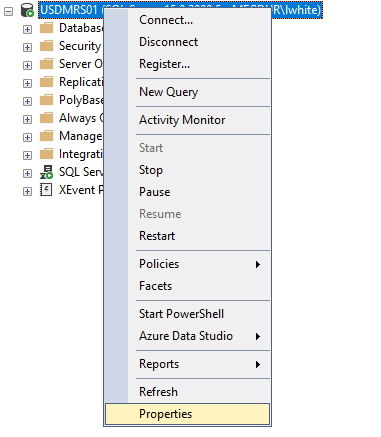
Then, select Database Settings.
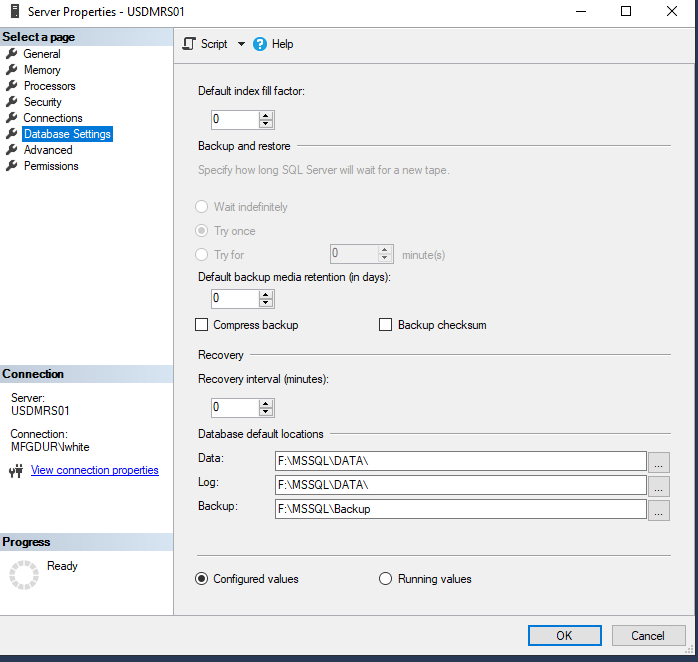
The above screenshot shows the three file paths that SQL Server uses for data:
- Data (databases)
- Log (transaction logs)
- Backup (where it pushes backups)
Normally, the transaction log files sit alongside the database files.
So, the first two paths will usually be the same.
The third is an optional, default path, where backups are pushed.
NOTE: Be sure to create the new base path in the local filesystem, and not on a distributed or network share.
The SQL Engine service utilizes VSS and share locks. Neither of which, work well on a distributed or network share.
Once you've decided on a path, make sure the folder security allows the SQL engine service to have full privileges (read/write/delete).
NOTE: Be sure to set folder security, of the target base path, so that the SQL engine service can access files.
This usually causes trouble when the SQL engine host is restarted after a database file move.
Moving TempDb
First up, is the TempDb database.
It is recreated on service startup, making it the simplest to move.
NOTE: This means, you don't have to actually move files around for this.
You only have to change the assigned file path and restart the service.
NOTE: Your SQL engine may be configured with more than one tempdb, to reduce allocation contention.
Normally, the following query will show your tempdb file locations.
SELECT name, physical_name FROM sys.master_files WHERE database_id = DB_ID('tempdb');WARNING: the above query will not return the paths for ALL tempdb database.
To be sure that you see the location of ALL tempdb files, use this more advanced query:
USE master;
GO
SELECT
    name        AS LogicalName,
    type_desc   AS FileType,
    physical_name
FROM sys.master_files
WHERE database_id = DB_ID('tempdb')
ORDER BY type_desc, name;
You will see something like this:

NOTE: The above shows our normal tempdb file (and its log file), as well as, a second tempdb called: temp2.
This means that the SQL engine host has been configured with a second tempdb database to help with queries.
When ready to move the tempdb files, execute this:
NOTE: Be sure to include an alter statement for each tempdb that you intend to move.
This requires you to name each one, like the following example does.
USE master;
GO
ALTER DATABASE tempdb MODIFY FILE ( NAME = tempdev, FILENAME = N'F:\MSSQL\DATA\tempdb.mdf' );
ALTER DATABASE tempdb MODIFY FILE ( NAME = templog, FILENAME = N'F:\MSSQL\DATA\templog.ldf' );
ALTER DATABASE tempdb MODIFY FILE ( NAME = temp2, FILENAME = N'F:\MSSQL\DATA\tempdb_mssql_2.ndf' );
Once the configured tempdb locations are updated, restart the SQL engine service, for the change to take effect.
After the SQL engine service is restarted, you can verify the tempDb has moved with this:
USE master;
GO
SELECT
    name        AS LogicalName,
    type_desc   AS FileType,
    physical_name
FROM sys.master_files
WHERE database_id = DB_ID('tempdb')
ORDER BY type_desc, name;
Moving Model and msdb
These are the engine databases for the SQL engine host.
Here are steps to move them.
NOTE: They require a service restart to be moved.
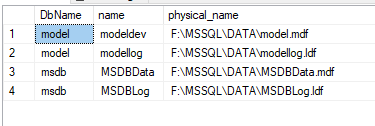
Get their current paths with this:
USE master;
GO
SELECT DB_NAME(database_id) AS DbName, name, physical_name
FROM sys.master_files
WHERE DB_NAME(database_id) IN ('model','msdb');
You'll see something like this:

Now, is a good time to identify their folder with a File Explorer window.
Update their paths to the target location, with this:
USE master;
GO
ALTER DATABASE model MODIFY FILE ( NAME = modeldev,  FILENAME = N'F:\MSSQL\DATA\model.mdf' );
ALTER DATABASE model MODIFY FILE ( NAME = modellog,  FILENAME = N'F:\MSSQL\DATA\modellog.ldf' );

ALTER DATABASE msdb  MODIFY FILE ( NAME = MSDBData,  FILENAME = N'F:\MSSQL\DATA\MSDBData.mdf' );
ALTER DATABASE msdb  MODIFY FILE ( NAME = MSDBLog,   FILENAME = N'F:\MSSQL\DATA\MSDBLog.ldf' );
Once the paths are configured, you need to stop the SQL engine service.
DO NOT RESTART THE SQL ENGINE SERVICE UNTIL YOU'VE MOVE THE FILES!
NOTE: When moving database files, make sure moves are done as a file MOVE and not as a file COPY.
A file copy, within the same volume, will create a second copy of the file, and consume extra space.
Whereas, a file MOVE will simply update file pointers for the new path, and not actually affect content.
With File Explorer, move the database and log files for model and msdb, to their new location.
Once the files are moved, you can restart the SQL engine service, and they will be mounted at their new location.
Extra Model Database Files
After moving the configured model and msdb files, in the previous section, check the source file path for any remaining model files.
These would be named like the following:

Normally, you won't see these, but they could be leftovers from a replication or upgrade.
To ensure that they are NOT attached to any database on the SQL engine host, verify they don't show up in the following query:
USE master;
GO
SELECT DB_NAME(database_id) AS DbName, name, physical_name
FROM sys.master_files
WHERE physical_name LIKE N'%model_%'
   OR physical_name LIKE N'%replicatedmaster%'
   OR physical_name LIKE N'%msdb%'
ORDER BY physical_name;
You should see just the model and msdb files (with their logs):
And for a sanity check, verify that only the master database is included in the service startup, with this:
USE master;
GO
SELECT name, physical_name
FROM sys.master_files
WHERE database_id = DB_ID('master');
You should see only the master database and its log file:

NOTE: Extra model files, like this, could be from a replication or upgrade.
But, do check that there is NOT another SQL engine running on the host, and is sharing the sql folder.
This can happen on development machines.
As one last check, you can ask SQL to give a list of all database files it thinks it is using, with this:
USE master;
GO
SELECT
    d.name AS DbName,
    mf.type_desc,
    mf.name AS LogicalName,
    mf.physical_name
FROM sys.databases d
JOIN sys.master_files mf ON mf.database_id = d.database_id
ORDER BY d.name, mf.type_desc, mf.name;
The above query should list every database that SQL is using; master, model, msdb, and all user databases.
Once you've confirmed that the extra model files, in the source file path are not listed in the above queries, then there is not need to carry them forward to the new file path.
You can safely delete them.
Master Database
The master database requires some special handling, since it is configured in the service startup parameters.
Here is how to move it.
USE master;
GO
SELECT name, physical_name
FROM sys.master_files
WHERE database_id = DB_ID('master');
You'll see something like this:

To move it, you don't update configuration in SSMS.
Instead, we will modify the startup parameters of the SQL engine service.
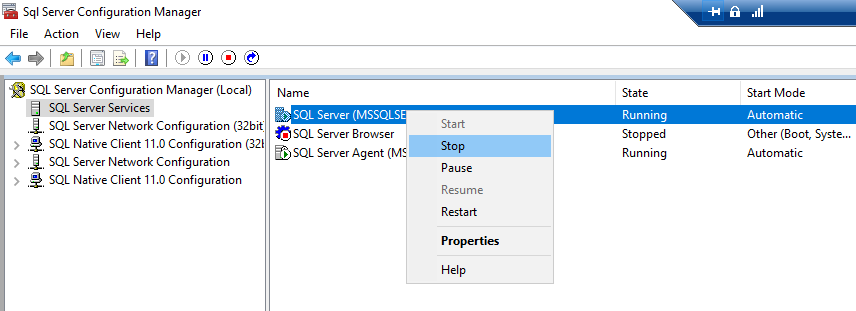
Open the SQL Server Configuration Manager, and stop the SQL Server engine.
You do this by selecting the SQL Server Services node in the left-pane.
Then, identify, in the right-pane, the service instance that is running your database engine.
NOTE: If your install has more than one SQL engine host, there will be multiple SQL Server instances in the right-hand pane.
But, each one will have a unique service name, in parenthesis.
Once identified, right-click it and stop the service.
With the service stopped, move master.mdf and mastlog.ldf to the new file path.
Now, open the startup parameters for the service, located at: SQL Server instance (right-hand pane) -> Properties -> Startup Parameters:
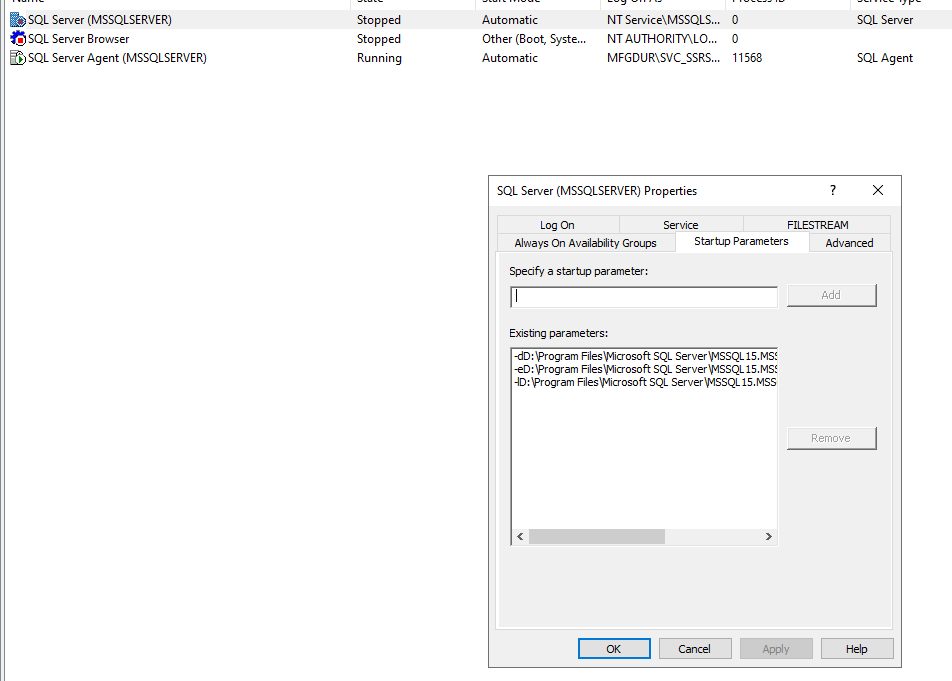
The master database file path will be configured as the '-d' parameter.
The master log file path will be configured as the '-l' parameter.
To update each one, simply click on the line in the Existing Parameters window, and update the path in the text field above it.
Then, click the Add/Update button for each change.
Once the paths are updated, click OK, to accept the changes.
Start the SQL Service back up, and verify it started.
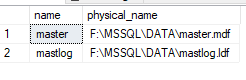
Once the SQL engine service is restarted, you can verify the master database paths, with this:
USE master;
GO
SELECT name, physical_name
FROM sys.master_files
WHERE database_id = DB_ID('master');
It will look something like this:
User Databases (One at a time)
To move a single user database, do the following steps.
Get the current paths for the database and log files, with this:
USE master;
GO
SELECT name AS LogicalName, type_desc, physical_name
FROM sys.master_files
WHERE database_id = DB_ID(N'YourDbName');
You will see two entries, like this:

Tell SQL Server what the new paths will be, with this:
USE master;
GO
ALTER DATABASE [YourDbName] MODIFY FILE ( NAME = N'YourDbName',     FILENAME = N'X:\SqlData\YourDbName.mdf' );
ALTER DATABASE [YourDbName] MODIFY FILE ( NAME = N'YourDbName_log', FILENAME = N'X:\SqlLogs\YourDbName_log.ldf' );
NOTE: Update both the NAME and FILENAME fields for the database and its log file.
With SQL Server configured for the new paths, we need to offline the database, with this:
USE master;
GO
ALTER DATABASE [YourDbName] SET OFFLINE WITH ROLLBACK IMMEDIATE;
Move the database log files to the new path.
Bring the database back online, with this:
USE master;
GO
ALTER DATABASE [YourDbName] SET ONLINE;
Once moved and mounted again, you can verify the database path, with this:
USE master;
GO
SELECT name AS LogicalName, type_desc, physical_name
FROM sys.master_files
WHERE database_id = DB_ID(N'YourDbName');
User Databases (Moving in Bulk)
This is a means to move all user databases at the same time.
This method uses auto-generated DDL.
WARNING: Auto-generating DDL is a tool with a very sharp blade. Be careful how you handle it.
WARNING: This method composes DDL that affects your SQL engine's configuration.
Only do this if you sufficiently understand the risks, and are not just being lazy.
WARNING: This is an advanced method, and is not recommended without proper backups.
Though it is possible, it is NOT supported by Microsoft.
If you are sufficiently lazy, here we go...
For the database files, generate the modify file statements with this query:
NOTE: Be sure to update the base file path, where it says: X:\SqlData\', with your target folder path.
USE master;
GO
SELECT
    'ALTER DATABASE [' + d.name + '] MODIFY FILE ( NAME = N'''
    + mf.name + ''', FILENAME = N''X:\SqlData\' +
    RIGHT(mf.physical_name, CHARINDEX('\', REVERSE(mf.physical_name)) - 1)
    + ''' );'
FROM sys.databases d
JOIN sys.master_files mf ON d.database_id = mf.database_id
WHERE d.database_id > 4     -- user databases only
  AND mf.type_desc = 'ROWS'
ORDER BY d.name;
And for the associated log files, generate the modify file statements with this query:
USE master;
GO
SELECT
    'ALTER DATABASE [' + d.name + '] MODIFY FILE ( NAME = N'''
    + mf.name + ''', FILENAME = N''X:\SqlLogs\' +
    RIGHT(mf.physical_name, CHARINDEX('\', REVERSE(mf.physical_name)) - 1)
    + ''' );'
FROM sys.databases d
JOIN sys.master_files mf ON d.database_id = mf.database_id
WHERE d.database_id > 4
  AND mf.type_desc = 'LOG'
ORDER BY d.name;
Review the generated DDL statements, to ensure all user databases are being handled, and the target path is correct.
You can offline the user databases with this statement.
NOTE: This helps you not make a total mess, by being lazy and moving everything in bulk.
USE master;
GO
SELECT
    'ALTER DATABASE [' + name + '] SET OFFLINE WITH ROLLBACK IMMEDIATE;'
FROM sys.databases
WHERE database_id > 4;
Adjust any folder paths (in the auto-generated DDL statement lists for database and log files) as necessary.
Once good, execute both sets of statements (for database files and log files), to update the database paths and the log paths.
Now, stop the SQL Server engine service, so that it quiesces all file data.
Once stopped, you can move the database and log files to the new folder path.
Once moved, you can start the SQL Server engine service.
If you offlined the user databases, before moving them, you can bring them ONLINE with this:
USE master;
GO
SELECT
    'ALTER DATABASE [' + name + '] SET ONLINE;'
FROM sys.databases
WHERE database_id > 4;
Run this, to check the database file paths:
USE master;
GO
SELECT
    d.name AS DbName,
    mf.type_desc,
    mf.name AS LogicalName,
    mf.physical_name
FROM sys.databases d
JOIN sys.master_files mf ON d.database_id = mf.database_id
WHERE d.database_id > 4
ORDER BY d.name, mf.type_desc;
Verify Database Locations
Once you've moved all databases, you can run this query (same as the one at the top of this page), to verify that all databases have been moved.
USE master;
GO
SELECT
    d.name AS DbName,
    mf.type_desc,
    mf.name AS LogicalName,
    mf.physical_name
FROM sys.databases d
JOIN sys.master_files mf ON mf.database_id = d.database_id
ORDER BY d.name, mf.type_desc, mf.name;
Verify Database States
Once you've moved databases, run this to check their status:
USE master;
GO
SELECT name, state_desc
FROM sys.databases
ORDER BY name;
They should all be listed as ONLINE.
No Comments