System Administration
- Linux
- Linux: Impersonating Users
- Installing Node.js on Ubuntu
- Ubuntu 22: Removing Existing Node.js
- OpnSense Notes
- Supermicro Fan Problems
- Supermicro Fan Scripting
- HowTo Retrieve Key and Cert from PFX
- Linux Disk Usage
- Creating SSH Keys in Linux
- Kali in VMWare
- Create PFX Cert File (for IIS)
- Docker Space Full
- Windows
- Generate SSL Cert
- Converting PEM to crt and key
- Convert SSL PFX for NGINX Usage
- NTP Server
- WSL Setup
- RunDeck Backups
- Ubuntu Service Creation (Systemd)
- SystemCtl Usage
- UFW and Docker
- Docker Commands
- SSH Keys
- SSH Key Naming Convention
- How to Get Host SSH Key Fingerprints
- Creating SSH Keys in Windows
- Authenticating to Linux Server with SSH Keys
- Linux: Disabling Password Authentication
- Adding SSH Keys with ssh-copy-id
- Adding SSH Keys with CAT
- Linux SSH Key Management
- Linux VM Provisioning
- Linux: Allow User to Skip Sudo Challenge
- Linux: Missing .SSH Folder
- Linux: Shell Appearance
- Managed Host User Setup
- HowTo Configure IIS Reverse Proxy
- How to Add Root CAs to Ubuntu
- Ubuntu Server Setup
- Ubuntu Host Setup
- Ubuntu: Setup SSH Server
- Ubuntu: Setup Static IP Address
- Ubuntu: Set Hostname
- Linux: Manually Installing SSH Keys
- How to Setup SSH Key Authentication to Linux
- SSRS
- Code Signing Token Setup
- Connecting to SSH Server from Windows
- HashiCorp Vault
- Generate Certificates with Hashicorp Vault
- Hashicorp Vault Setup
- Clustering HashiCorp Vault
- HashiCorp Vault Cluster Unseal
- Vault Wrapping Tokens
- Vault Token Administration
- Vault Single-Node Unseal
- Vault Administrative Setup
- Vault as Root CA
- Vault as Intermediate CA
- Handling Vault Node Restart
- Local GPS NTP Time Server
- Ubuntu: Use Private NTP Server
- Debian 13: Use Private NTP Server
- NGINX: Deploy SSL Certificate
- Windows File Explorer - Spawn New Window
- Royal TS: Using SSH Keys
- Debian VM Template
- VMWare Export OVA
- Debian: Offline Package Installation
- Debian: Setup Static IP Address
- Windows 10 Moving Recovery Partition
Linux
Linux Network Monitoring
Here’s a list of some useful terminal based network monitoring utilties:
https://askubuntu.com/questions/257263/how-to-display-network-traffic-in-the-terminal
Best one we have used so far, is BMon.
It’s available as: sudo apt install bmon
Can be run with:
sudo bmon…where the -p is the interface.
When running you can see this:
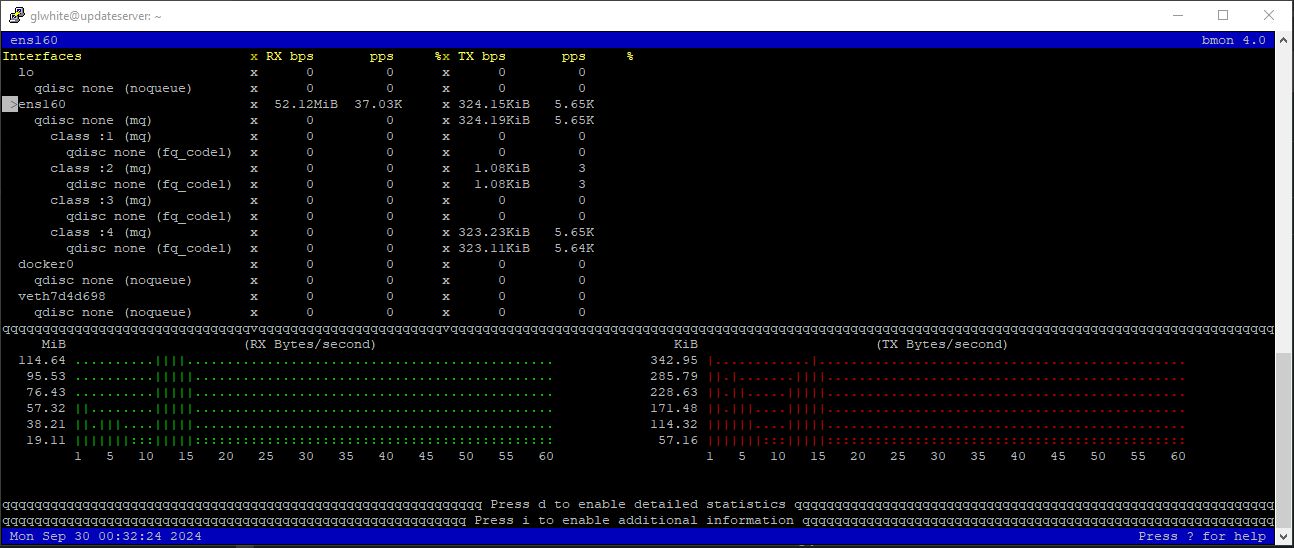
By default, you can scroll through the available interfaces, and see stats for each.
If you want to run it for a specfic NIC, use this:
sudo bmon -p nebula200Linux: Impersonating Users
NOTE: This page was created to generalize the technique of impersonating a system account that has no defined shell, and no known password. Specifically, it was documented as a means to add functionality to a Jenkins build server (where the jenkins account has a disabled shell).
Solution
If you come across a software package on a Linux host that runs with a system account (one without a known password or defined shell), here are ways to do things as a system account user.
The above check in /etc/passwd will indicate what shell is defined for the Jenkins user.
Normally, it will be set to: /bin/false.
This means that the user's shell is disabled.
Obviously the above screenshot indicates the jenkins shell is: /bin/bash.
But, this was set as a permanent fix, that could have been a drastic solution, and not totally necessary, since we've learned since then.
Here are a couple of things we can do, when we must install things for the jenkins user (that will execute them).
1. Temporarily switch to Another User (if it has no defined shell).
If the login shell is /bin/false or /user/sbin/nologin, you won't be able to use su jenkins directly.
Instead, you can run either of these:
sudo -u jenkins -s --shell /bin/bashOr:
sudo -u jenkins bashThis gives you a shell as jenkins.
2. Permanent Change (If You Want to Allow Logins)
If you want to enable login for the jenkins user, you can change its shell to /bin/bash:
sudo usermod -s /bin/bash jenkinsNow, you can switch users normally with:sudo su jenkins
Or (if running as root):su - jenkins
3. Running a Specific Command as the Jenkins User
If you only need to run a single command as jenkins, you can use:
sudo su jenkins <command>For example:
sudo -u jenkins whoamiOr:
sudo -u jenkins ssh-keygen -t rsa -b 4096 -f /var/lib/jenkins/.ssh/id_rsaExamples
Here are examples of how to use the above technique to impersonate a user.
Installing SSH Keys
sudo -u jenkins mkdir -p /var/lib/jenkins/.ssh
sudo -u jenkins chmod 700 /var/lib/jenkins/.ssh
sudo -u jenkins ssh-keygen -t rsa -b 4096 -f /var/lib/jenkins/.ssh/id_rsaConfiguring Git for a Jenkins User
sudo -u jenkins git config --global user.name "Jenkins CI"
sudo -u jenkins git config --global user.email "jenkins@example.com"Getting Environment Variables for a User
sudo -u jenkins envInstalling Node.js on Ubuntu
This page shows how to install Node.js on an Ubuntu 22 host.
It only shows how to install a single, global Node.js version.
If you need multiple Node.js version support, see this page to work with NVM (Node Version Manager): NVM - Node.js Version Manager
NOTE: If you will need to work with multiple versions of Node.js on the same host, such as performing automated builds of Angular apps for different Angular versions, then these steps won't work for you.
Instead, you need to install NVM to manage those versions of Node.js.
Removing Old Versions
Before installing Node.js, it is necessary to remove any existing version of Node from the host.
Be sure to remove any existing versions of Node.js before continuing.
Normally, you can do this through the package manager that installed it.
NOTE: If you're running Ubuntu 22, you will need to follow this: Ubuntu 22: Removing Existing Node.js
Check if Node.js was installed via APT:
dpkg -l | grep nodejsIf found, remove it with this:
sudo apt remove --purge nodejs npm -y
sudo apt autoremove -yIf Node.js was installed, via NVM (Node Version Manager), and you want to remove a version that NVM is maintaining, do this:
nvm uninstall <version>Ex; nvm uninstall 16 or nvm uninstall 18
Install Single Node.js Version
NOTE: This will install a single Node.js version.
See the later section for installing multiple Node.js versions.
Use this to install the desired version of Node.js:
sudo apt update
sudo apt-get install -y ca-certificates curl gnupg
sudo mkdir -p /etc/apt/keyrings
curl -fsSL https://deb.nodesource.com/gpgkey/nodesource-repo.gpg.key | sudo gpg --dearmor -o /etc/apt/keyrings/nodesource.gpg
NODE_MAJOR=20
echo "deb [signed-by=/etc/apt/keyrings/nodesource.gpg] https://deb.nodesource.com/node_$NODE_MAJOR.x nodistro main" | sudo tee /etc/apt/sources.list.d/nodesource.list
sudo apt-get update
sudo apt-get install nodejs -yVerify the node version with this: sudo node -v
Ubuntu 22: Removing Existing Node.js
Ubuntu 22 comes with an existing version of node.js, v12, that is difficult to upgrade.
This is because the libnode-dev package is holding onto it, and we must release it, first.
Removing Conflicting Versions
Run these to remove the conflicting package:
sudo apt-get remove libnode-dev
sudo apt-get update
Now, you can remove old versions of node.js:
sudo apt remove nodejs
cd /etc/apt/sources.list.d
sudo rm nodesource.list
sudo apt --fix-broken install
sudo apt update
sudo apt remove nodejs
sudo apt remove nodejs-doc
OpnSense Notes
Here’s a collection of notes and details for the house router setup.
Build
Software: OpnSense 24.7.4_1
Hardware: Gigabyte H97N-Wifi motherboard
Processor: Intel i5-4460
Setup
Base setup was done following this article: https://homenetworkguy.com/how-to/set-up-a-fully-functioning-home-network-using-opnsense/#unbound-dns-general
Dynamic DNS Setup is here: https://oga.atlassian.net/wiki/spaces/~311198967/pages/234848257/OpnSense+DynDNS+Setup
It’s a good guide on how to add a new VLAN and associated interface.
Network Ports
Here’s a picture of the backside of the router, showing ports and connections:
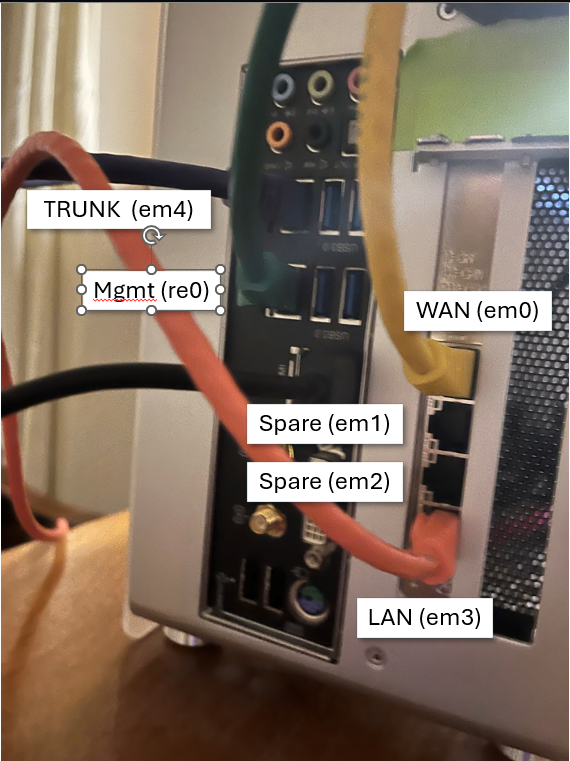
Here’s the list of used connections:
|
Logical |
Service |
Connection |
|---|---|---|
|
WAN (em0) |
Incoming internet connection. |
Connects directly to fiber transceiver |
|
Spare (em1) |
Spare port |
NA |
|
Spare (em2) |
Spare port |
NA |
|
LAN (em3) |
Untagged LAN traffic. |
Connects to switch, SW20, port 8. |
|
Trunk (em4) |
VLan tagged traffic from main switch. |
Connects to switch, SW20, port 1. |
|
Mgmt (re0) |
Management access from VLAN60. |
Connects to switch, SW20, port 16. |
Web UI Access
The UI is available on the LAN interface at: https://192.168.1.1
The LAN interface is LAN3 (em3), which is the bottom port on the 4-port NIC.
Locked out of Web GUI
If you ever get locked out of the web interface, open an ssh session to the router, and issue this:
configctl webgui restart renew
Taken from here: https://docs.opnsense.org/troubleshooting/webgui.html
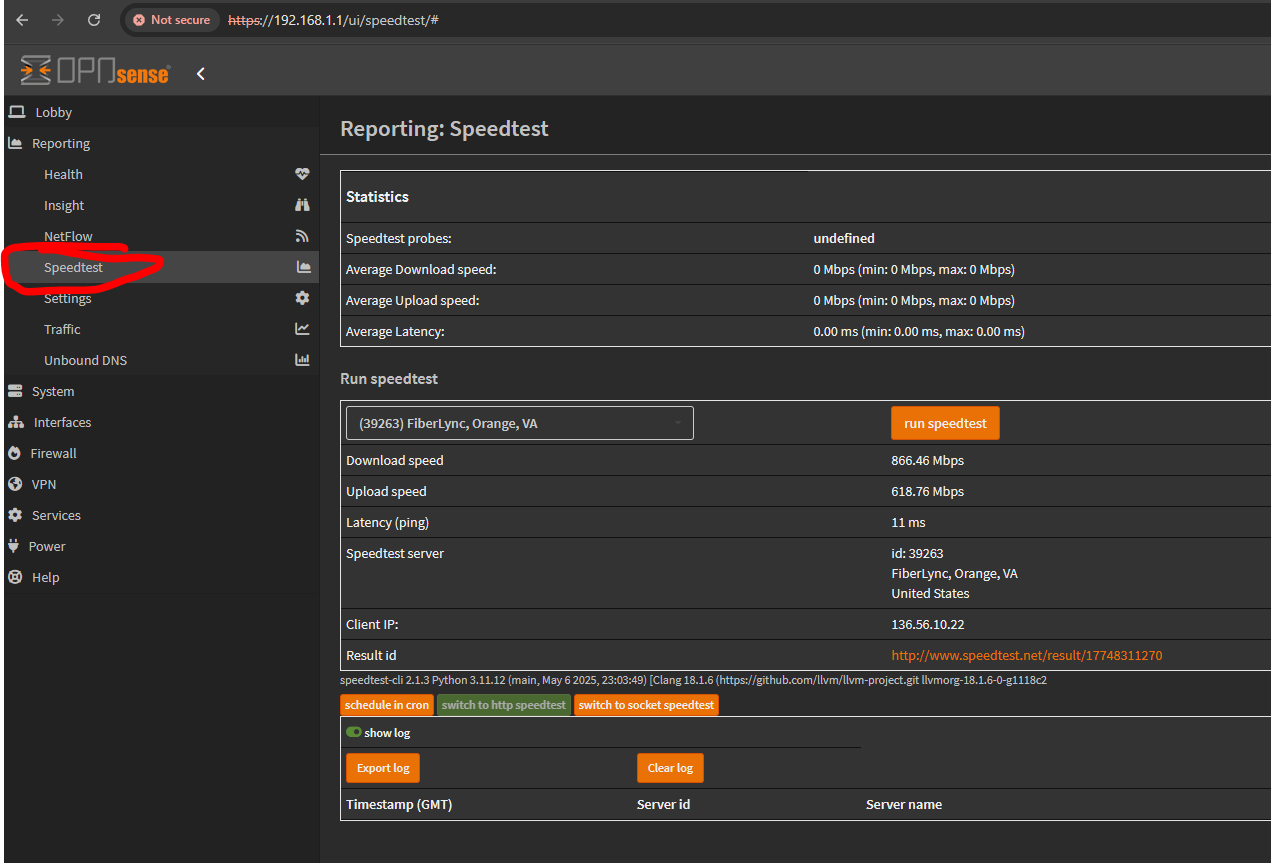
Speed Test
Installed speed test plugin from here: https://github.com/mimugmail/opn-repo
This requires opening an SSH session to the router, and running this line (taken from the GitHub page):
fetch -o /usr/local/etc/pkg/repos/mimugmail.conf https://www.routerperformance.net/mimugmail.conf
pkg updateOnce installed, open OpnSense and navigate to available plugins.
Locate the added plugin called: os-speedtest-community, and install it.
Once installed, you can open it from here:
Supermicro Fan Problems
If you are running Noctua cooling fans in your PC and the PC is cycling fans up and down, then it’s probably because the motherboard thinks a fan has failed and is ramping them all up to compensate.
This is happening because Noctua fans run a lower RPM than other fan models.
If you are trying to fix this fan problem on an esxi host, you will need to install IPMITool from here: Installing IPMITool on ESXI
This tutorial taken from here: Supermicro motherboard loud fans
To fix this, requires editing the fan config via IPMITOOL.
Open a command line on your server, and download or install ipmitool:
apt-get install ipmitoolList the fans of the motherboard with:
ipmitool -I lan -U ADMIN -H 10.100.10.200 sensorIf you’re running on the actual host, you can just use this:
ipmitool sensorThe listing will include all the relevant fan Ids the motherboard recognizes.
You will need to update the lower speed limits of each fan, with the following:
ipmitool -I lan -U ADMIN -H 10.100.10.200 sensor thresh FAN1 lower 150 225 300Or, from the local host:
ipmitool sensor thresh FAN1 lower 150 225 300
The above command has these switches:
ADMIN – enter username of your IPMI interface
10.1550.20.200 – enter IP address of your IPMI interface
FAN1 – FAN for which you want to set values
150 – lower non-recoverable value
225 – lower critical value
300 – lower non-critical value
Usually, the change is immediate.
But if not, shutdown the host, disconnect the power cord for a few minutes.
Then, reboot. And, it should be corrected.
Supermicro Fan Scripting
Some references:
https://www.truenas.com/community/threads/script-hybrid-cpu-hd-fan-zone-controller.46159/
https://forums.servethehome.com/index.php?resources/supermicro-x9-x10-x11-fan-speed-control.20/
https://www.mikesbytes.org/server/2019/03/01/ipmi-fan-control.html
HowTo Retrieve Key and Cert from PFX
Here’s a good article on how to export SSL certificates, extract the key and certificate, and import it into AWS.
How To Convert Windows PFX Certificate Files Into PEM Format On Linux
The above article uses openSSL, which can be found for Windows, here:
Win32/Win64 OpenSSL Installer for Windows - Shining Light Productions
As well, the above article has an error in Step 4, that removes the password from the key.pem to create the raw private key file.
That command should be:
openssl rsa -in key.pem -out server.keyLinux Disk Usage
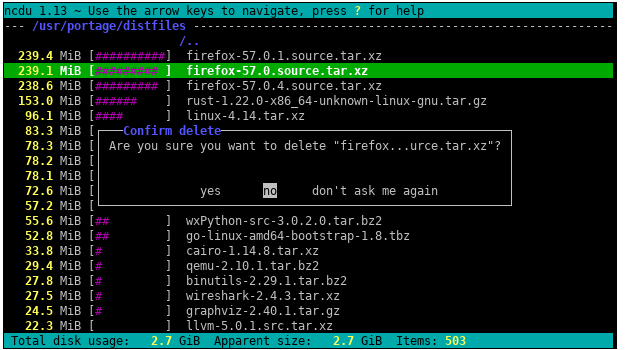
Linux has a few means to analyze a disk for space usage.
One way, is a package called, ncdu.
It can be downloaded with:
sudo apt install ncduYou execute it, like this:
sudo ncdu -x /NOTE: -x forces it to stay within the same filesystem, and not traverse other mounts.
You can add the -r switch, to make it read-only.
When run, it will iterate the filesystem, and create an interactive usage list, like this:
Clearing Tmp Folder
Ansible likes to push container images and other things into the /tmp folder of its host.
Here’s a quick command to clear temp files that are older than 10 days:
sudo find /tmp -type f -atime +10 -delete
Creating SSH Keys in Linux
Creating an SSH key is straightforward on a linux client, using this command:
ssh-keygenBy default recent versions of ssh-keygen will create a 3072-bit RSA key pair, which is secure enough for most use cases (you may optionally pass in the -b 4096 flag to create a larger 4096-bit key).
NOTE: See this page for naming conventions, before actually creating a new key: SSH Key Naming Convention
Also. The command allows you to specify the key type (-t), key size (-b), key comment (-C), and output filename (-f) like this:
ssh-keygen -t rsa -b 4096 -C "rsa4096-glwhite-hadron-20230913" -f ./rsa4096-glwhite-hadron-20230913.keyHere are some different type and size combinations:
# Create an RSA key with key size of 4096 bits...
ssh-keygen -t rsa -b 4096
# Create a DSA key...
# This is an old government key type (Digital Signature Algorithm), defaulting to a 1024 bit size.
ssh-keygen -t dsa
# Create an ECDSA521 key...
ssh-keygen -t ecdsa -b 521
# Create an ED25519 key...
# NOTE: This type is not widely accepted, yet.
ssh-keygen -t ed25519If you ran the command without specifying a filename (-f), it will prompt you for the output location:
OutputGenerating public/private rsa key pair.
Enter file in which to save the key (/your_home/.ssh/id_rsa):You can accept the default path (pressing enter), to save the key pair into the .ssh/ subdirectory in your home directory, or specify an alternate path.
If a key already exists at the path, you may see the following prompt:
Output/home/your_home/.ssh/id_rsa already exists.
Overwrite (y/n)?WARNING: If you choose to overwrite the key on disk, you will not be able to authenticate using the previous key anymore. Be very careful when selecting yes, as this is a destructive process that cannot be reversed.
You should then see the following prompt:
OutputEnter passphrase (empty for no passphrase):Here you optionally may enter a secure passphrase, which is highly recommended. A passphrase adds an additional layer of security to prevent unauthorized users from logging in. To learn more about security, consult our tutorial on How To Configure SSH Key-Based Authentication on a Linux Server.
You should then see the output similar to the following:
OutputYour identification has been saved in /your_home/.ssh/id_rsa
Your public key has been saved in /your_home/.ssh/id_rsa.pub
The key fingerprint is:
SHA256:/hk7MJ5n5aiqdfTVUZr+2Qt+qCiS7BIm5Iv0dxrc3ks user@host
The key's randomart image is:
+---[RSA 3072]----+
| .|
| + |
| + |
| . o . |
|o S . o |
| + o. .oo. .. .o|
|o = oooooEo+ ...o|
|.. o *o+=.*+o....|
| =+=ooB=o.... |
+----[SHA256]-----+Kali in VMWare
Here are some things for installing Kali in a VMWare VM.
Adapted from here: https://www.kali.org/docs/virtualization/install-vmware-guest-vm/
Choose the latest Workstation Hardware version. 16.x is current as of this writing.
Kali is debian based, so use the latest version Debian HAL.
Give your VM at least two processors and two cores per processor (4 cores minimum).
Give it at least 4GB.
The tutorial recommend using NAT for the NIC. Go with this, until we need bridged, in case there’s a subtlety of NAT that’s beneficial.
Accept the LSI and SCSI disk defaults, and choose at least 40GB size.
Once created, open the Edit VM Settings, and find the USB controller.
Disable the Automatically Connect new USB devices, so that you will be prompted for each one, as needed.
On the Display pane, be sure to disable Accelerate 3D graphics, as this causes trouble for some people.
On the Power tab, enable the Report Battery Information to Guest, as this is helpful, so you get notifications when the host is out of juice.
And, enable time sync with the host, so you don’t have to set the clock for updates to work.
Create PFX Cert File (for IIS)
Windows IIS requires a pfx file when importing an SSL certificate.
This can be created from a crt and a key file using openssl and the following steps.
Locate the openssl.exe on your system. It is usually installed as part of git, and located, here:
C:\Program Files\Git\usr\bin\openssl.exe
Open a command line and navigate to the folder where your crt and private key file (key) are stored.
Execute a command of the following form, to create the pfx.
NOTE: You will need to replace elements with your specific key names:
openssl pkcs12 -export -out new-pfx-cert.pfx -inkey private-key.key -in certificate.crtFor example, when using the openssl binary and a specific site’s key, the statement looks like this:
"C:\Program Files\Git\usr\bin\openssl.exe" pkcs12 -export -out STAR.ogsofttech.com.pfx -inkey STAR.ogsofttech.com.key -in STAR.ogsofttech.com.crtYou will be prompted for the password of the key file.
NOTE: The pfx will be generated without error, regardless if the entered key password was correct or not.
Windows IIS will confirm the password on import, and fail if incorrect.
Docker Space Full
Here are some things to check on when the disk on a docker host gets full.
sudo docker system prune -a -fThis will cleanup other resource types:
docker system prune -aThis command will remove older logs from the container logs folder:
sudo find /projects/container_logs/ -type f -mtime +7 -name '*.log' -exec rm {} \;This command will remove logs from the container folder:
sudo find /var/lib/docker/containers/ -name "*-json.log" -exec truncate -s 0 {} \;This command will remove older logs from the /var/log/oga folder:
This takes care of logs generated by naked services.
sudo find /var/log/oga/ -type f -mtime +7 -name '*.log' -exec rm {} \;This command will remove older logs from the /var/log/bliss folder:
This takes care of logs generated by naked services.
sudo find /var/log/bliss/ -type f -mtime +7 -name '*.log' -exec rm {} \;Windows
Validating AD Machine Account
NOTE: If you are looking to fix a machine account, see this page: Windows: Repair a Domain Machine Account
Here's a couple ways to validate the machine account of a PC in an Active Directory domain:
NOTE: This must be run from an elevated window.
dsregcmd /statusIf successful, it will output a device state of DomainJoined: yes.
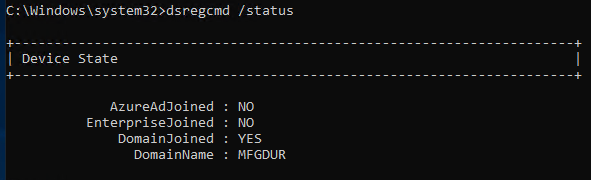
NOTE: It outputs several blocks of info. So, you may have to scroll up to see the status.
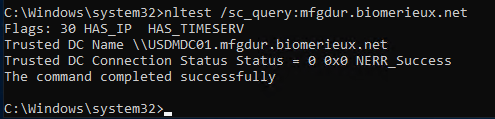
Also. You can use this:
NOTE: This must be run from an elevated window.
nltest /sc_query:<<domain name>>If successful, it will give a NERR_Success status, like this:
Windows: Repair a Domain Machine Account
Here's a quick way to repair the domain membership for a machine account.
It doesn't require two reboots and new machine account churn.
To do so, open an elevated command line prompt and do this:
Test-ComputerSecureChannel -Verbose
# and only if that returns False:
Test-ComputerSecureChannel -Repair -Credential MFGDUR\<your-admin-account>The repair resets the machine-account password with the domain in seconds, no reboot, no rejoin.
Once executed, verify domain membership, by following this page: Validating AD Machine Account
Generate SSL Cert
Here’s some steps on how to generate and setup an SSL certificate for a web site.
-
First, order a certificate from a CA, like Sectigo, or Digicert.
-
Once your order is active, they will require you to submit a CSR.
This must be generated by you, and will output two things.
It will generate your private key (for all SSL traffic). And, it will generate the CSR that contains your public key to be signed by the CA. -
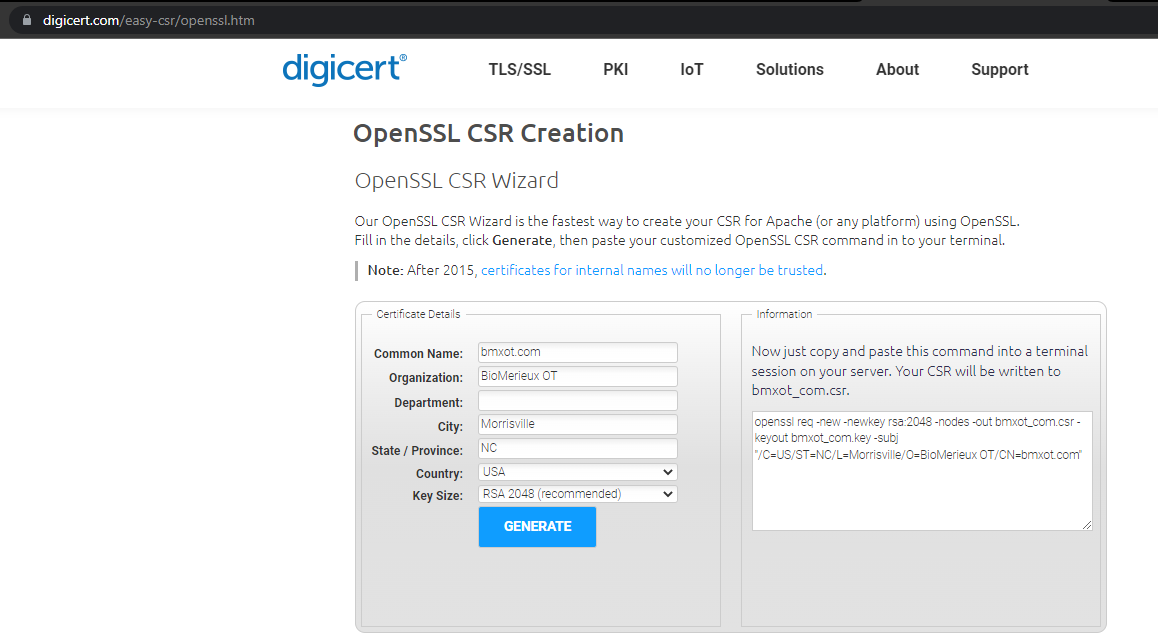
To generate a CSR is pretty easy. There’s a wizard tool, here, that will give you the command line string that you can execute on a linux box using openssl.
OpenSSL CSR Tool - Create Your CSR Faster | DigiCert.com
The CSR wizard looks like this:
Here’s what the CSR wizard looks like for a wildcard domain:
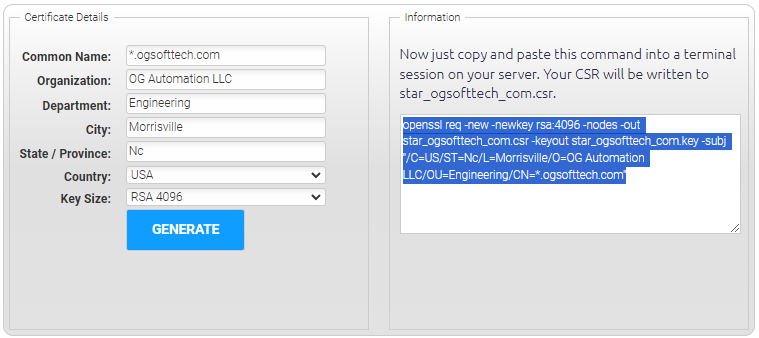
For the wildcard domain, the tool generates this output:
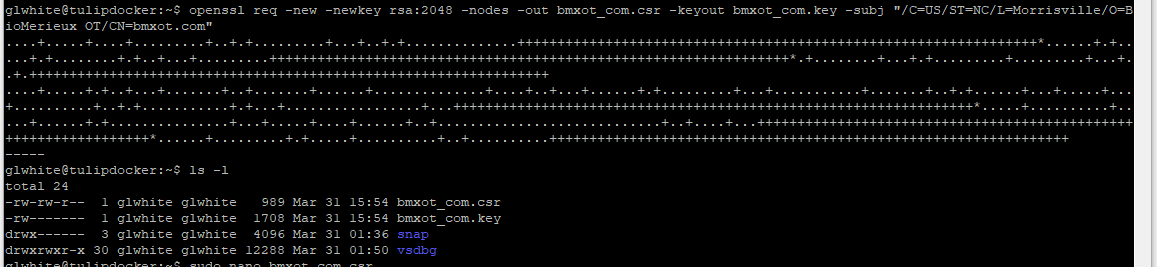
openssl req -new -newkey rsa:4096 -nodes -out star_ogsofttech_com.csr -keyout star_ogsofttech_com.key
-subj "/C=US/ST=Nc/L=Morrisville/O=OG Automation LLC/OU=Engineering/CN=*.ogsofttech.com"NOTE: The above is listed on multiple lines ONLY for display in this article. For usage, it must entered all on one command line.
Fill out the fields in the CSR request tool, and the right-hand pane will be what you execute as a shell statement in linux.
-
Open a linux shell, and execute the generated command, to create your private SSL key and CSR, like this:
NOTE: The second statement lists the folder contents, showing the generated key and CSR files.
-
Take your SSL key and put it in a safe place, until ready to deploy it to your website.
NOTE: We’ve had some trouble with the Sectigo validation flow, in that the validation will report failure (on the web page), when the certificate actually got issued.
So, don’t discard the private key you created, until you’ve confirmed via email that your CSR failed validation.
On a previous occasion, we saw the validation fail in the UI, and deleted the private key, to redo the CSR submission. But, it had actually passed and the certificate was issued… but the key was then deleted.
So, keep all versions until you have a validated key-crt pair.
-
Open the CSR file. It should look something like this:
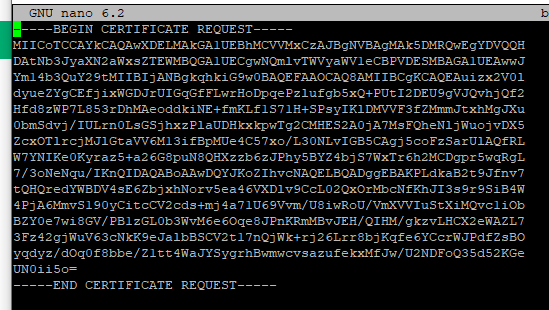
Paste its contents into a notepad session, so you can easily submit it to the CA website.
-
Go back to your CA website’s setup flow, and submit your CSR.
Once submitted, your CA will require some form of proof (validation) that you own the domain they’re creating the SSL key for. This will be via email reply, a custom DNS entry, or a file to expose on your website. -
Go through the validation of that, and your CA will send you your signed SSL certificate and bundle.
For example: The validation flow with Sectigo has an option for DNS registration.
To use it, you must log into your domain registrar, and add a special CNAME record to your domain, that Sectigo will use to verify that you own the domain being registered.
A CNAME DNS entry for validating domain ownership with Sectigo looks like this:

NOTE: It’s not clear if the Name field (of the DNS record) should include the domain at the end of the hash string. So, we added two entries; one with, and one without.
-
Once the validation steps have passed, the CA will issue your certificate (crt file) and a ca bundle.
-
Download the crt and bundle files from your CA.
Now, you should have a key file (the private key you created with your CSR), a crt file (your public certificate), and your CA should have given you a CA bundle file as well. -
For Nginx to use your certificate, it must be chained with the CA bundle.
This is a simple concatenation operation. To so, make sure both crt and CA bundle files are in the same folder, and execute the following: -
To make one, run the following command:
$ cat www.sitecertificatefile.com.crt intermediatebundle.crt > www.example.com.chained.crtThe above command takes the site certificate file and adds on the intermediate certificate, putting both into a composite file, called a chained certificate.
NOTE: The order of concatenation is important in the above command, as NGINX will consider the first certificate in the chained file as your SSL certificate.
When NGINX starts up, it will attempt to match the key and first certificate in the chained file. If they don’t match, it will give you an error like this:
SSL_CTX_use_PrivateKey_file(" ... /www.example.com.key") failed
(SSL: error:0B080074:x509 certificate routines:
X509_check_private_key:key values mismatch)This chained certificate is what needs to be pushed into the NGINX server configuration.
Refer to this: Configuring HTTPS servers
-
Move the key and chained crt files to your Nginx host, and configure Nginx to use them.
Converting PEM to crt and key
If you receive pem formatted certificate and key files from a CA registrar, you will need to convert them for use by a linux host.
Bundles and Chains
As well, it may be necessary to compose a certificate chain file, for the host, instead of a simple crt file.
Doing so, is required for Nginx and some mobile apps, as both require the CA authority certs to be in the same file as the host certificate.
To create a chain certificate, do this:
cat cert-start.pem ca-bundle.pem > full_chain.pemPem to Crt
To convert the cert file (from pem) to crt, do this:
openssl x509 -outform der -in your-cert.pem -out your-cert.crtPem to Key
To convert the private key (as pem) to key, do this:
openssl rsa -outform der -in private.pem -out private.keyConvert SSL PFX for NGINX Usage
NGINX doesn’t natively use a pfx key file (pfx is what Windows IIS needs). So, it must be converted to a private key, removing the public key from it.
Folder Creation
Create the folder for storing SSL certificates:
cd /etc/nginx/
mkdir ssl
cd ssl
chmod 700 /etc/nginx/sslPublic Cert
From the pfx file, recover the public certificate:
openssl pkcs12 -in cert.pfx -clcerts -nokeys -out public.crtNOTE: If you see an error, like the following, this means that the pfx was encoded with an old cipher.
And, you must run the openssl command in legacy mode.

To work around the above error, add the '-legacy' switch to your statement, like this:
openssl pkcs12 -legacy -in cert.pfx -clcerts -nokeys -out public.crtPrivate Key
From the pfx file, recover the encrypted private key:
openssl pkcs12 -in cert.pfx -nocerts -nodes -out private.rsaNOTE: Same as before. If you saw an error, when retrieving the public key, you will need to add the '-legacy' switch to the above statement.
Now, decrypt the encrypted private key:
openssl rsa -in private.rsa -out private.keyMoving Them
Move the public certificate and private key to the ssl folder, created earlier.
Set permissions on the ssl folder and files, so only root can access the certs and keys:
chmod 600 -R /etc/nginx/ssl/*NTP Server
Here are some useful commands when running a GPS-disciplined NTP server.
See this page for the local NTP server (192.168.1.12): Local GPS NTP Time Server
NTPQ
When running a query of an ntp server, you would use: ntpq -p.
What you see is this:
ntpq -pn
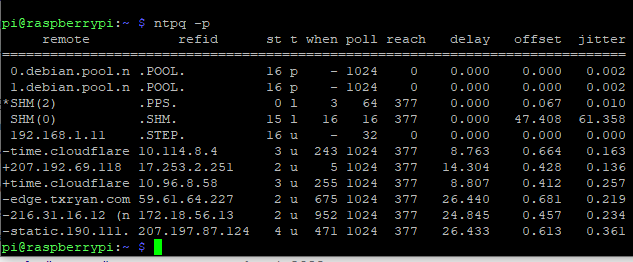
Here’s an explanation:
REMOTE = The servers and peers specified in the configuration file, from which your host will take time synchronization
Character that may prefix the remote hostname/IP address:
-
indicates the current synchronization source.
# indicates that the host is selected for synchronization, but distance from the host to the server exceeds the maximum value.
o indicates that the host is selected for synchronization and the PPS signal is in use.
+ indicates the host is included in the final synchronization selection set.
x indicates that the host is the designated false ticker by the intersection algorithm.
. indicates that the host is selected from the end of the candidate list.
– indicates a host discarded by the clustering algorithm.
blank indicates a host is discarded due to high stratum and/or failed sanity checks.
REFID = the current source of synchronization for the remote host
ST = the stratum level of the remote host
T = types available:
l local (such as a GPS clock)
u unicast (this is the common type)
m multicast
b broadcast
– netaddr (usually 0)
WHEN = number of seconds passed since the remote host response
POLL = polling interval to the remote host, defined with the “minpoll” value in ntp.conf file
REACH = indicates how successful attempts to reach the server are. This is an 8-bit shift register with the most recent probe in the 2^0 position. The value 001 indicates the most recent probe was answered, while 357 indicates one probe was not answered. The value 377 indicates that all the recent probes have been answered.
DELAY = (round trip time) indicates the time (in milliseconds) taken by the reply packet to return in response, to a query sent by the server.
OFFSET = indicates the time difference (in milliseconds) between the server’s clock and the client’s clock. When this number exceeds 128, and the message synchronization lost appears in the log file
JITTER = indicates the difference in the offset measurement between two samples. This is an error-bound estimate. Jitter is a primary measure of the network service quality.
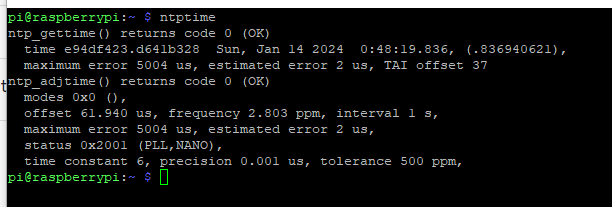
NTPTIME
This command will give you the current time as:
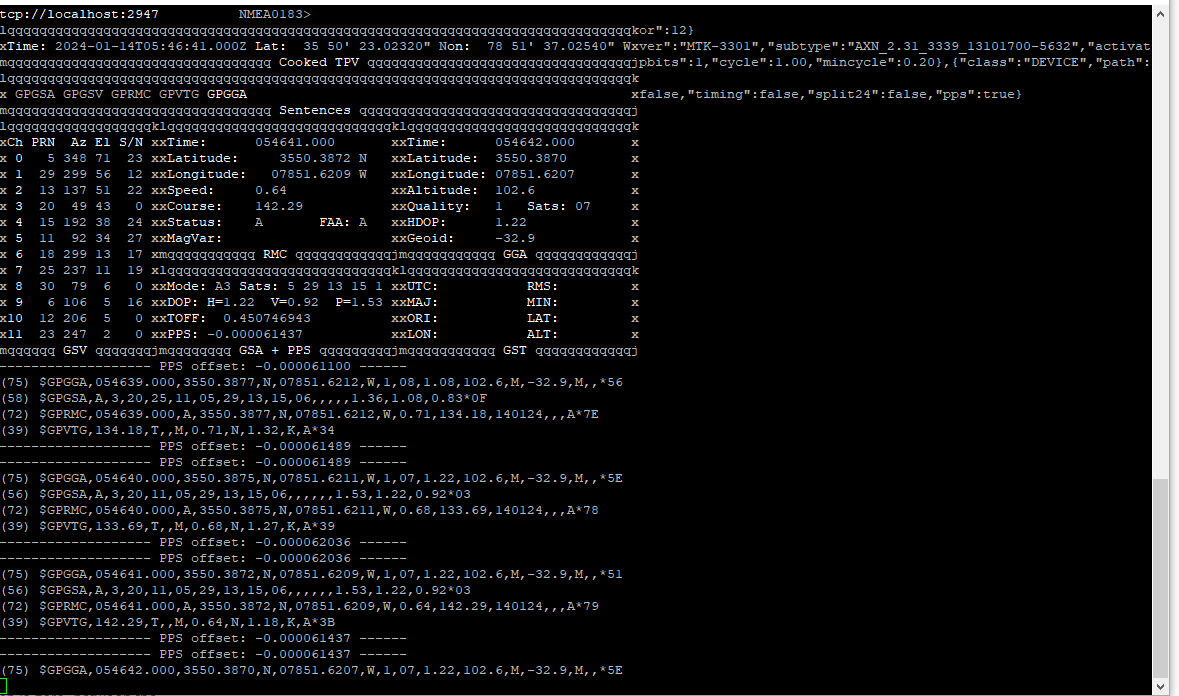
GPSMON
This is used to get access to a semi-graphical display of raw GPS location and time data.
The output looks like this:
WSL Setup
In case it’s necessary to use Windows Subsystem for Linux, here’s a good tutorial on how to get it running:
Set up a WSL development environment
Getting started with cross-platform development using .NET on Ubuntu on WSL | Ubuntu
Debugging a .NET App on Linux from Windows Visual Studio with WSL - NDepend Blog
RunDeck Backups
Adapted from here: https://docs.rundeck.com/docs/administration/maintenance/backup.html
We will use the rd tool to access the RunDeck API and export the project job list.
We will be backing things up to this folder:
/projects/rundeck_backups1. Execute this, to export the project and job list:
rd jobs list -f /projects/rundeck_backups/jobs.xml -p ansible-testIf the above command returns this error, you need to set the environment variable:

If so, set this variable:
export RD_URL=http://192.168.1.200:44402. Stop the server:
sudo systemctl stop rundeckd.service3. Backup the database:
sudo cp -r /var/lib/rundeck/data /projects/rundeck_backups/data/4. Copy the logs:
sudo cp -r /var/lib/rundeck/logs /projects/rundeck_backups/logs/5. Start the server:
sudo systemctl start rundeckd.service
Ubuntu Service Creation (Systemd)
Below are instructions on how to setup a binary as a linux service.
For additional systemd commands, see this: SystemCtl Usage
Service Creation
Here are steps to run a binary as a linux service.
Create a systemd unit file for the service by generating a file in: /lib/systemd/system
The file should contain these things:
[Unit]
Description=OGA.HostControl.Service
After=network.target
[Service]
ExecStart=/usr/bin/bliss/oga.hostcontrol.service/OGA.HostControl.Service --urls "http://192.168.1.201:4180;http://172.17.0.1:4180"
Environment=DOTNET_CLI_HOME=/temp
WorkingDirectory=/usr/bin/bliss/oga.hostcontrol.service
Restart=on-failure
[Install]
WantedBy=multi-user.targetNOTE: The above systemd unit file was generated for a dotnet service, called: OGA.HostControl.Service.
NOTE: This service runs as root, as no user was specified in the [Service] section.
NOTE: We have specified a working directory that points back to the bin folder of the service. This is necessary for a dotnet service.
Once the unit file has been created for the service, you must tell systemd to load it.
Tell systemd to reload unit files with this:
sudo systemctl daemon-reloadWith the unit file available, you should be able to start the service.
Start the service with this:
sudo systemctl start servicenameVerify the service is running with this:
sudo systemctl status servicenameOnce happy that the service is configured correctly and will run as required, you should enable it to start on boot.
To enable a service to start on boot, do this:
sudo systemctl enable servicenameAt this point, your service will startup each time the machine reboots.
SystemCtl Usage
Below is a list of commonly used systemd commands.
If you are needing to configure a binary as a linux service, see this: Ubuntu Service Creation
Reload Systemd Units
Each time you edit a systemd unit file, you must tell systemd to reload changes.
To reload all systemd unit config files:
sudo systemctl daemon-reloadConsole Logs
Systemd logs all console output from running services.
To get console logs from a service, do this:
sudo journalctl -u nginx.serviceReload Unit Files
Tell systemd to reload unit files with this:
sudo systemctl daemon-reloadStart a Service
Start the service with this:
sudo systemctl start servicenameCheck Service Status
Verify the service is running with this:
sudo systemctl status servicenameEnable Service Start on Boot
To enable a service to start on boot, do this:
sudo systemctl enable servicenameUFW and Docker
When running containers in Docker, you will come across the need for a container to gain access to a resource on the host.
If you have UFW firewall enabled, you will need to allow ingress from the docker network, running on the host.
To identify the docker network, run this:
sudo docker network lsIt will return the list of docker networks:

Next, you need to identify the docker network where your containers are addressed.
To do this, run the following on each network name:
sudo docker network inspect bridgeThe above command will give you a list of containers and their addresses and subnets.
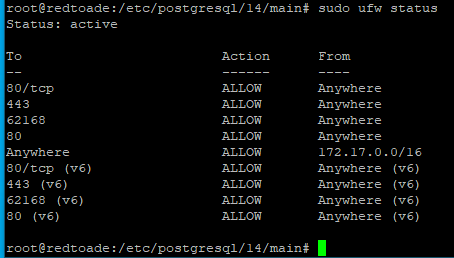
Next, you will update the ufw firewall rules to allow incoming connection from the docker subnet, like this:
sudo ufw allow from 172.17.0.0/16You can check the status and rules with:
sudo ufw statusThis will return something like this:
Now, you should be able to access host resources from a docker container, with UFW enabled.
Docker Commands
Here’s a list of commands to remember for docker administration.
List Containers
To list all docker containers on a host:
sudo docker ps -aRemove Containers
To remove all docker containers on a host:
sudo docker rm -f $(sudo docker ps -aq)Container Logs
To see the logs for a container:
sudo docker logs containernameContainer Stats
To get the stats of docker containers, as a single snapshot:
docker stats --no-streamAdditional commands are here: How To Remove Docker Images, Containers, and Volumes | DigitalOcean
Copy Files from Container
To copy files out of a docker container, do this:
sudo docker cp <imageid>:/pathincontainer ~/pathonhostRunning a Terminal Container
Sometimes, it’s necessary to spin up a blank docker container for testing network or other facilities from a terminal session in the container.
Here’s a quick command that will spin up a container with an ubuntu bash terminal.
NOTE: It also adds an /etc/hosts entry of (host.docker.internal) which is the docker entry for accessing the container’s host machine.
This is useful if you are testing visibility of any host services from the container.
docker run --rm -it --add-host host.docker.internal:host-gateway --entrypoint bash ubuntuOnce started and at the terminal, you can install network utilities such as ping, curl, etc with this:
apt-get update; apt-get install curl; apt-get install inetutils-ping; apt-get install net-toolsOpening a Terminal Inside An Active Container
If you want to open a terminal, inside an already running container, you can use this command:
docker exec -it <container_id_or_name> /bin/bashIf the container doesn't have bash, use this:
docker exec -it <container_id_or_name> /bin/shAs well, you can install network utilities, such as Ping, curl, etc, into the container while in its terminal:
apt-get update; apt-get install curl; apt-get install inetutils-ping; apt-get install net-toolsGet Docker Gateway Address
Here’s a pair of commands to get the docker’s bridge network gateway address and subnet:
docker network inspect bridge --format='{{(index .IPAM.Config 0).Gateway}}'
docker network inspect bridge --format='{{(index .IPAM.Config 0).Subnet}}'SSH Keys
SSH Key Naming Convention
This page describes a good naming convention for SSH keys, that makes them easier to track, rotate, and revoke.
You should use this naming convention for the filename of keys.
And as well, use the same convention when populating the the comment field of each key.
Here are some design choices for SSH key naming:
- SSH keys are a client-centric object. So, the name should be client-centric.
Specifically, the name should include the username (actual user or service name). - To more easily track key usage, the name should include the client machine, where it is installed.
- To know how old a key is (for expiry purposes), the name should include the creation date.
- Since key algorithms can become compromised or superceded by newer ones, some distros and services will refuse certain key types.
So, we will include the key algo in the name.
The composite key name convention becomes this:
<keytype>-<username>-<client>-<date>
Here is an example of this key naming:
RSA2048-glwhite-hadron-20220428
The above key name expression has the following terms:
-
Key type - what encryption type was used and key strength
-
User Name - associates a key to a single user, for proper authentication and access authorization
-
Client device - associates a key to a device, so the key can be revoked if the device is compromised
-
Creation timestamp - marks when the key was created, so older versions can be identified and revoked
Following this convention allows use to easily identify keys that need to be revoked. As we can revoke keys by device, by user, or by type as a particular encryption becomes obsolete.
As well, the creation time allows us to know when to periodically rotate keys, to limit risk.
The key name should be used as the key comment at the end of a key string in an SSH key file on a server.
The key name should be part of both the private and public key file names (ppk files) on a client machine.
The key name can be set as the Key Comment when generating a key, using PuttyGen, like this:
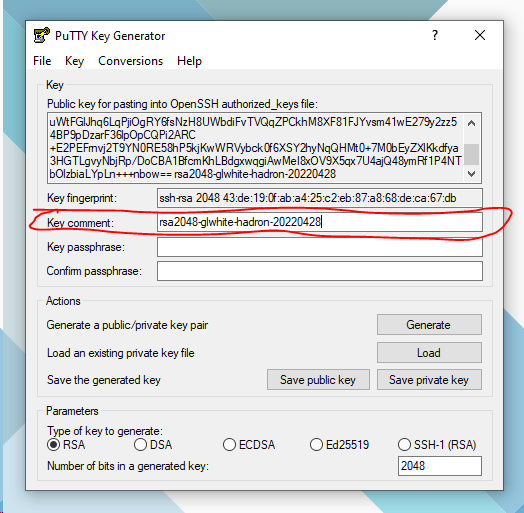
When PuttyGen creates a key, both the private key and public keys should be saved to disk.
A password can be added to the private key, from within PuttyGen, to prevent unauthorized usage.
If the private key is saved without a password, be sure to store it in a safe bag or in an encrypted volume.
The public key can be stored and distributed without concern.
NOTE: We’ve purposely kept the creation time as the last term. This ensures that any automation used to rotate keys can successfully identify the timestamp for all keys (by looking at the last term).
Definite Purpose Keys
There are scenarios that require an ssh key for a definite purpose, such as authentication to a service, such as Github.
In this scenario, it is wise to include the service as a term in the ssh key name and key comment.
Doing so, extends the key naming convention to:
<keytype>-<username>-<client>-<purpose>-<date>
Here is an example of this key naming:
RSA2048-glwhite-hadron-github-20220428
How to Get Host SSH Key Fingerprints
Here’s a short command line statement that will fetch the host ssh key fingerpring without authenticating with it:
ssh-keyscan host | ssh-keygen -lf -Here’s another way to clean up ssh host key fingerprints:
# remove any old fingerprints for the host
ssh-keygen -R server.example.com
# add SSH fingerprints for the host
ssh-keyscan -t ecdsa,ed25519 -H server.example.com >> ~/.ssh/known_hosts 2>&1
Creating SSH Keys in Windows
General Notes
SSH keys can be easily generated in Windows, using PuttyGen.
See this article for an update based on obsolete SHA-1 RSA key usage: Ubuntu 22.04 SSH the RSA key isn't working since upgrading from 20.04
Based on the obsolescence of RSA keys in Ubuntu, it is advised to use ECDSA keys instead.
Needed Tooling
This tutorial uses PuttyGen to create SSH keys in Windows. So, download and install it if needed.
PuttyGen can be downloaded, here: PuTTYgen Download
Good SSH Key Conventions
Here are some good conventions to follow for key security and easy maintenance:
User Keys
Each user should have their own SSH keys. No sharing for obvious reasons.
If a user is fired or leaves, only the keys identified for that user need to be revoked.
Again. No sharing keys between users.
Client Devices
An SSH key should be created for each client device that a user connects from.
Having a unique set of keys for each client device compartmentalizes the risk of a lost or stolen device. Specifically, when a user’s laptop or phone is lost or compromised, only the SSH keys on that device need to be revoked. Other keys for that user remain unaffected.
Don’t use ssh keys creation for one device on another device. Don’t share them between clients!
Sharing keys across clients does several things:
-
It prevents the remote endpoint from accurately identifying the client.
-
If a client is compromised, it is harder to identify and isolate the keys that need to be revoked for the compromised client.
SSH Key Naming
See this page for naming convention: SSH Key Naming Convention
Authenticating to Linux Server with SSH Keys
Once you have configured the server with SSH key authentication, you can follow this to attempt connection.
NOTE: Using SSH key authentication does not require a password for the remote account.
From a Linux host, use this:
ssh username@remote_hostIf this is your first time connecting to this host (if you used the last method above), you may see something like this:
OutputThe authenticity of host '203.0.113.1 (203.0.113.1)' can't be established.
ECDSA key fingerprint is fd:fd:d4:f9:77:fe:73:84:e1:55:00:ad:d6:6d:22:fe.
Are you sure you want to continue connecting (yes/no)? yesThis means that your local computer does not recognize the remote host. Type “yes” and then press ENTER to continue.
If you did not supply a passphrase for your private key, you will be logged in immediately.
If you supplied a passphrase for the private key when you created the key, you will be prompted to enter it now.
NOTE: your keystrokes will not display in the terminal session for security.
After authenticating, a new shell session should open for you with the configured account on the remote server.
Linux: Disabling Password Authentication
Once you have confirmed that you have SSH key access to a Linux host (using SSH without a password), it is safe to disable password-based authentication.
WARNING: This step will lock down password-based logins, so ensuring that you will still be able to get administrative access is crucial.
Before proceeding, make sure that you do, indeed, have SSH-key authentication access configured for at least one user with sudo privileges.
NOTE: Best practice is that the configured administrative user is not actually the root user.
But, is a non-root user, with sudo privileges.
Note: If you are setting up a DigitalOcean VM, and provided an SSH key when creating a droplet, password authentication may have been automatically disabled. You can still verify this by reading on.
Once you’ve confirmed that your remote account has administrative privileges (has sudo access), log into your remote server with SSH keys.
Then, open up the SSH daemon’s configuration file:
sudo nano /etc/ssh/sshd_configInside the SSH config file, search for a directive called PasswordAuthentication.
This line may be commented out with a # at the beginning of the line.
Uncomment the line by removing the #, and set the value to no.
This will disable your ability to log in via SSH using account passwords:
. . .
PasswordAuthentication no
. . .Save and close the config file when you are finished by pressing CTRL+X, then Y to confirm saving the file.
To actually activate the updated SSH config changes, we need to restart the sshd service:
sudo systemctl restart sshAs a precaution, open up a new terminal window and test that the SSH service is functioning correctly before closing your current session:
ssh username@remote_hostOnce you have verified your SSH service is functioning properly, you can safely close all current server sessions.
The SSH daemon on your Ubuntu server now only responds to SSH-key-based authentication.
Password-based logins have been disabled.
Adding SSH Keys with ssh-copy-id
If you are attempting to add an SSH key (to a Linux host), from another Linux host, you can use a built-in utility called, ssh-copy-id .
The ssh-copy-id tool is included by default in many operating systems, so you may have it available on your local system. For this method to work, you must already have password-based SSH access to your server.
Due to its simplicity, this method is highly recommended if available. If you do not have ssh-copy-id available to you on your client machine, you may use one of the two alternate methods provided in this section (copying via password-based SSH, or manually copying the key).
NOTE: Using ssh-copy-id requires password authentication enabled.
See the bottom of this page for how to temporarily enable password auth on the remote host.
Requires Password Auth
This utility is easy to use, before disabling password authentication.
But, it does encounter issues, trying to copy a public key to a remote host, while simultaneously logging into it with a different key.
That quite often fails.
So, first, we will ensure that password authentication is enabled on the remote host.
Log into the remote host, and open the sshd_config file, located at: /etc/ssh/sshd_config.
Locate the line with 'PasswordAuthentication', and set it to yes, like this:
...
PasswordAuthentication yes
...Save and close the config file.
Restart the ssh service, with this:
sudo systemctl restart sshNow, you can use the utility from the local linux VM.
SSH-Copy-Id Usage
To use the utility, you specify the remote host that you would like to connect to, and the user account that you have password-based SSH access to.
NOTE: The account you log in to the local Linux host with, will also be the account, whose public SSH key will be pushed to the remove Linux host. So, this will be the account to which your public SSH key will be copied.
The abbreviated syntax is:
ssh-copy-id username@remote_hostYou can also specify the public key file and port, like this:
ssh-copy-id -i ~/.ssh/id_rsa.pub USER@HOST -p PORTYou may see the following message:
OutputThe authenticity of host '203.0.113.1 (203.0.113.1)' can't be established.
ECDSA key fingerprint is fd:fd:d4:f9:77:fe:73:84:e1:55:00:ad:d6:6d:22:fe.
Are you sure you want to continue connecting (yes/no)? yesThis means that your local computer does not recognize the remote host. This will happen the first time you connect to a new host. Type “yes” and press ENTER to continue.
Next, the utility will scan your local account for the id_rsa.pub key that we created earlier. When it finds the key, it will prompt you for the password of the remote user’s account:
Output/usr/bin/ssh-copy-id: INFO: attempting to log in with the new key(s), to filter out any that are already installed
/usr/bin/ssh-copy-id: INFO: 1 key(s) remain to be installed -- if you are prompted now it is to install the new keys
username@203.0.113.1's password:Type in the password (your typing will not be displayed, for security purposes) and press ENTER.
The utility will connect to the account on the remote host using the password you provided.
It will then copy the contents of your ~/.ssh/id_rsa.pub key into a file in the remote account’s home ~/.ssh directory called authorized_keys.
You should see the following output:
OutputNumber of key(s) added: 1
Now try logging into the machine, with: "ssh 'username@203.0.113.1'"
and check to make sure that only the key(s) you wanted were added.Disable SSH Password Auth
Once you have pushed the SSH key to the remote host, you need to disable password authentication.
From a terminal session with the remote host, open the sshd_config file (same as earlier), located at: /etc/ssh/sshd_config.
Locate the line with 'PasswordAuthentication', and set it to no, like this:
...
PasswordAuthentication no
...Save and close the config file.
Restart the ssh service, with this:
sudo systemctl restart sshNow, you have added the public SSH key of your local linux user account, to the remote Linux VM.
And, you should have SSH key authenticated access to the remote Linux host.
Adding SSH Keys with CAT
Here's a quick and dirty way to upload SSH keys to a remote user account, using the CAT command.
This can be done, if your local host doesn't have the ssh-copy-id utility.
If you do not have ssh-copy-id available, but you have password-based SSH access to an account on your server, you can upload your keys using a conventional SSH method.
We can do this by using the cat command to read the contents of the public SSH key on our local computer and piping that through an SSH connection to the remote server.
On the other side, we can make sure that the ~/.ssh directory exists and has the correct permissions under the account we’re using.
We can then output the content we piped over into a file called authorized_keys within this directory. We’ll use the >> redirect symbol to append the content instead of overwriting it. This will let us add keys without destroying previously added keys.
The full command looks like this:
cat ~/.ssh/id_rsa.pub | ssh username@remote_host "mkdir -p ~/.ssh && touch ~/.ssh/authorized_keys && chmod -R go= ~/.ssh && cat >> ~/.ssh/authorized_keys"You may see the following message:
OutputThe authenticity of host '203.0.113.1 (203.0.113.1)' can't be established.
ECDSA key fingerprint is fd:fd:d4:f9:77:fe:73:84:e1:55:00:ad:d6:6d:22:fe.
Are you sure you want to continue connecting (yes/no)? yesThis means that your local computer does not recognize the remote host. This will happen the first time you connect to a new host. Type yes and press ENTER to continue.
Afterwards, you should be prompted to enter the remote user account password:
Outputusername@203.0.113.1's password:After entering your password, the content of your id_rsa.pub key will be copied to the end of the authorized_keys file of the remote user’s account.
You can then, attempt to use SSH key authentication.
Linux SSH Key Management
See this article for an update based on obsolete SHA-1 RSA key usage: Ubuntu 22.04 SSH the RSA key isn't working since upgrading from 20.04
NOTE: We currently have two tutorials for this, that need to be consolidated into one. So, maybe this alternate tutorial fills your use-case: How to Setup SSH Key Authentication to Linux
Step 1 - Key Creation
Follow this page for creating keys in Linux: Creating SSH Keys in Linux
Or, Follow this page for creating keys in Windows: Creating SSH Keys in Windows
After following one of the above tutorials, you should have a public and private key that you can use to authenticate.
The next step is to place the public key on your server so that you can use SSH-key-based authentication to log in.
Step 2 — Copying the Public Key to a Linux Server
There’s a couple ways to add an SSH public key to a remote host:
-
Using SSH-Copy-ID
-
Using CAT
-
Manually Copying
Using SSH-Copy-ID
The quickest way to copy your public key to the Ubuntu host is to use a utility called ssh-copy-id. Due to its simplicity, this method is highly recommended if available.
See this page for how to use it: Adding SSH Keys with ssh-copy-id
Using CAT
If you do not have ssh-copy-id available, but you have password-based SSH access to an account on your server, you can upload your keys using a conventional SSH method.
Here’s a method for uploading an SSH key with cat: Adding SSH Keys with CAT
Manually Copying
If you don’t have SSH access to the remote host, you will need to directly paste in a user’s SSH public key.
See this page for how to manually add SSH keys to a Linux host: Linux: Manually Installing SSH Keys
Step 3 — Authenticating to Your Ubuntu Server Using SSH Keys
If you have successfully completed one of the procedures above, you should be able to log into the remote host without providing the remote account’s password.
See this page for how to: Authenticating to Linux Server with SSH Keys
If key-based authentication was successful, continue on to learn how to further secure your system by disabling password authentication.
Step 4 — Disabling Password Authentication on Your Server
Once you have confirmed that you can access the VM, with SSH key authentication, follow this page to disable password authentication: Linux: Disabling Password Authentication
Conclusion
You should now have SSH-key-based authentication configured on your server, allowing you to sign in without providing an account password.
If you’d like to learn more about working with SSH, take a look at our SSH Essentials Guide.
Linux VM Provisioning
Here are some steps that need to be done when creating a VM template that will be used multiple times:
Template Usage
See this page to setup a deployed instance from a template VM: Ubuntu Host Setup
References
Here’s a good reference for template generation and cloud-init usage: https://medium.com/@dsykes012/making-a-custom-ubuntu-20-04-lts-focal-fossa-vm-template-that-works-with-cloud-init-2cfffb6783b4
Important Notes
Anytime you power on a Linux VM template, the VM thinks it is a spawned instance.
And so, it will create new values, such as Machine-ID, SSH host keys, etc.
This is the normal functionality of a spawned clone.
However. If you are simply powering up a template VM, to make changes or updates to the template, you will need to rerun the reset script, to clear out any set values (due to VM startup).
To do this, follow the instructions at the bottom of this page, link here: https://wiki.galaxydump.com/link/391#bkmrk-now.-each-time-you-s
Warning: Forgetting to run the reset script, before shutting down the template VM, will result in clones having similar properties.
Host Template Setup
Here are steps for creating a golden template VM.
Create Template VM
Create a VM guest instance with minimal CPU, memory, and hard disk space for the template.
We go with minimal resources, as it’s easier to script additional resources, than it is to reduce them.
For example, it’s much faster and less risk to expand a drive than reducing one.
Assign the VM’s NIC to the provisioning VLAN, as this allows us to easily access and setup deployed clones.
DHCP Addressing
Setup the template with DHCP, so we don’t worry about address collisions when spawning multiple clones at once.
Perform Updates and Upgrades
To speed up the process of clone setup, we will do any updates and upgrades on the template.
Do this:
apt update && apt -y upgrade && apt -y autoremove && apt clean
SSH Server
Install the openssh server:
sudo apt install openssh-serverVerify it's running with this:
sudo systemctl status sshConfigure it to listen on port 22 of all adapters.
Disable password authentication over SSH.
Firewall
Setup the ufw firewall rules with 22 as allowed:
sudo ufw allow sshDon’t enable the firewall on the template. We can script this as use cases require.
Switching to Root
In order to perform most of these setup tasks, you should be running as root.
To switch to root (from an existing user), use this:
sudo -i
Or
sudo -Provisioning User Account
In order for us to manage and deploy to the host, it needs a user account.
Follow the instructions on this page, to create the user account and setup access to it: Managed Host User Setup
User Cleanup
Log into the template VM as root.
This allows us to scrub unnecessary users and groups from the system.
Reset Hostname
Every host needs a unique name in your network.
So, we will clear an default the hostname of a template.
The following will erase it:
truncate -s0 /etc/hostnameAnd, this will set it to 'localhost':
hostnamectl set-hostname template01NOTE: The above actions are performed by the reset script (bottom of this page).
Next, we need to clear the hostname in the /etc/hosts file.
Open /etc/hosts, and set the entry (127.0.1.1) to 'template01', like this:

Save and close the hosts file.
WARNING: This last step, to update the hosts file is NOT performed by the reset script (bottom of this page).
You will need to perform the above step, manually, when creating the template.
Clear the Machine-Id
Machine-Id is a string value that uniquely identifies a linux host, similar to how a Windows VM is uniquely identified by its machine sid.
Linux stores the machine-id is stored in a file at: /etc/machine-id.
So. If you are cloning VMs, you need to make sure this value is different for each VM clone.
The following will erase the machine-id, and any symbolic links to it:
truncate -s0 /etc/machine-id
rm /var/lib/dbus/machine-id
ln -s /etc/machine-id /var/lib/dbus/machine-idThe next time the VM reboots, the OS will generate a new machine-id during the boot process.
NOTE: Each time you boot the template, creates a new machine Id.
So, you will need to re-execute the above, after each time you boot the template VM for updates or changes.
NOTE: The above actions are performed by the reset script (bottom of this page).
Reset Host SSH Keypairs
Every linux host holds a set of SSH keypairs that identify the host, and allow SSH connections with it.
For some hosts, there may be more than one keypair, each supporting a different encryption type: RSA, ECDSA, ed25519, etc...
These host SSH keys need to be unique for every host.
But when cloning a VM, these keys get duplicated.
So, we need a way for the linux template to reset its host keypairs. And for the clone to create a new set when it first boots.
The easiest way, is for us to delete the SSH keys from the template.
And, to create a one-shot service that will create a new set on startup.
On the template, we need to delete all host SSH keys that it possesses, with this:
sudo rm -f /etc/ssh/ssh_host_*_key /etc/ssh/ssh_host_*_key.pubNOTE: The above action is performed by the reset script (bottom of this page).
For a clone of the template to recreate host SSH keys, we need to create a new systemd daemon, that will create the new keys on startup, only if they don't yet exist.
We do so, by creating a systemd unit file, with this:
sudo nano /etc/systemd/system/ssh-hostkeys-generate.serviceAnd, we populate the service unit file with this:
[Unit]
Description=Generate SSH host keys if missing
DefaultDependencies=no
After=local-fs.target
Before=sshd.service ssh.service
ConditionPathExistsGlob=!/etc/ssh/ssh_host_*_key
[Service]
Type=oneshot
ExecStart=/usr/bin/ssh-keygen -A
# If you only want ed25519 + ecdsa, comment the line above and use:
# ExecStart=/bin/sh -c '/usr/bin/ssh-keygen -t ed25519 -N "" -f /etc/ssh/ssh_host_ed25519_key; \
# /usr/bin/ssh-keygen -t ecdsa -b 256 -N "" -f /etc/ssh/ssh_host_ecdsa_key'
[Install]
WantedBy=multi-user.target
The above service definition includes a check if any SSH keypairs exist in Line 6: ConditionPathExistsGlob=!/etc/ssh/ssh_host_*_key
This prevents the service from running more than once.
Once the systemd file is created, we need to reload the daemon and enable the service, with these:
sudo systemctl daemon-reload
sudo systemctl enable ssh-hostkeys-generate.serviceTemplate Reset Script
Here's the definition of the template reset script that is used to clean up a linux template VM, for cloning.
The reset script will:
- Reset the machine-id (same as described above)
- Clear the host SSH keypairs
- Clear the hostid
- Clear the hostname
- Clear the hostname in /etc/hosts
- Clear existing DHCP leases
- Reset the system entropy seed
- Clear logs and history
- Clear user traces
- Clear package caches
- Clear any Docker clientid
- Remove any Docker cached layers
The script should be stored, here: /etc/template/reset.sh
To create it, first, create the template folder, with this:
sudo mkdir /etc/templateOnce the folder exists, you can create the script file, with this:
sudo nano /etc/template/reset.shAnd, populate it with this code:
#!/bin/bash
# Name: Ubuntu 24.04 Template Reset Script.
# Version: 1.0
# Date: 20250816
# See this page: https://wiki.galaxydump.com/link/391
# Description: This script Will clear hostnames, leases, ids, keys, and other properties,
# before shutting down the template.
# This allows a clone to be made, and started up, with its own unique Ids, keys, etc.
set -euo pipefail
echo "Clearing host SSH keys..."
rm -f /etc/ssh/ssh_host_*_key /etc/ssh/ssh_host_*_key.pub
echo "Clearing host machine-id..."
truncate -s0 /etc/machine-id
rm /var/lib/dbus/machine-id
ln -s /etc/machine-id /var/lib/dbus/machine-id
echo "Clearing host machine-id..."
# systemd will recreate on boot; or: dd if=/dev/urandom of=/etc/hostid bs=4 count=1
# 20250816 Update: We've disabled the removal of the hostid file, on Ubuntu24, as this distro does
# NOT recreate the file on startup.
# As well, the hostid file is only used by some legacy apps/libraries.
# So, if a truly unique hostid is required, we will have to create a one-shot systemd service that
# will generate it on first-boot of a clone.
#rm -f /etc/hostid || true
echo "Clearing hostname..."
truncate -s0 /etc/hostname
hostnamectl set-hostname localhost
echo "Clear Existing DHCP Leases..."
# Debian/Ubuntu dhclient
rm -f /var/lib/dhcp/* || true
# NetworkManager leases
rm -f /var/lib/NetworkManager/*lease* || true
# systemd-networkd leases
rm -f /var/lib/systemd/network/* || true
echo "Let systemd reseed entropy on first-boot..."
rm -f /var/lib/systemd/random-seed || true
echo "Clear logs and history..."
journalctl --rotate || true
journalctl --vacuum-time=1s || true
rm -f /var/log/wtmp /var/log/btmp || true
: | tee /var/log/lastlog >/dev/null
find /var/log -type f -name '*.log' -exec truncate -s0 {} +
echo "Clear User Traces..."
rm -f /root/.bash_history || true
find /home -maxdepth 2 -name .bash_history -exec rm -f {} + || true
echo "Clear Package Caches..."
# Debian/Ubuntu
apt-get clean || true;
# RHEL/CentOS/Alma/Rocky
#dnf clean all || yum clean all
echo "Clear any Docker ClientId..."
#Container runtime: if templating with Docker installed:
# Remove the client ID file...
rm -f /etc/docker/key.json
# Remove cached layers.
rm -f /var/lib/docker
echo "Template sealed. Power off, convert to template, and ensure first-boot key regen is enabled."
Save and close the script file.
Now, make sure it's executable, with this:
sudo chmod +x /etc/template/reset.shNow. Each time you shutdown the template VM, you can run the above script, to reset needed info, for cloning.
The script can be executed, with this:
sudo /etc/template/reset.shLinux: Allow User to Skip Sudo Challenge
When scripting command line work, you will come across the need to respond to sudo challenges, to execute commands that require elevation, if not running as root.
You can choose to pass the user's password as stdinput, using the command line gymnastics at the bottom of this: C# Dealing with Sudo
Or, you can allow a specific user, members of a group, or all users (if you really hate sudo), to skip sudo challenges, by adding them to the sudoers group, with a NOPASSWD flag.
If you are looking to remove complexity from your automated scripting, or just really annoyed with having to type your password everytime you use a privileged command, this page will show you how to bypass sudo checks.
You can bypass sudo checks for a single user, a group, or for all.
You can specify what apps can be called without sudo.
Or, make it wide-open.
The intended use case for this page is how to setup a user account that will be used by automated scripting for provisioning and deployment.
NOTE: Changes to visudo are immediate, since the file is read each time sudo is called.
So. You don't have to logout, restart a service, or reboot for changes to take effect.
How To
Open the sudoers file with this:
sudo visudo -f /etc/sudoersNow, you can add your entries, above the @includedir line.
For a Single User
NOTE: This level of sudo bypass is a reasonable choice for automated scripting.
If you want to grant passwordless sudo for a single user, add a line, like this:
username ALL=(ALL) NOPASSWD: ALL-
username: the actual username -
ALL: means from any host (relevant in multi-user systems) -
(ALL): means the user can run commands as any user -
NOPASSWD: ALL: no password will be required for anysudocommand
For Members of a Group
If you want to grant passwordless sudo for a single user, add a line, like this:
%groupname ALL=(ALL) NOPASSWD: ALL-
groupname: the name of the group -
ALL: means from any host (relevant in multi-user systems) -
(ALL): means the user can run commands as any user -
NOPASSWD: ALL: no password will be required for anysudocommand
Limit App Usage
When declaring a sudo bypass entry, you can constrain what apps or commands can be called without sudo, like this:
deploy ALL=(ALL) NOPASSWD: /usr/bin/apt-get, /bin/systemctl restart *, /usr/bin/useraddLinux: Missing .SSH Folder
When creating a new linux user, the system may not create a .ssh folder in the user profile, by default.
This creates a little complexity as the permissions are a bit picky.
Here are steps to do so.
NOTE: Replace 'username' with the target user.
Create the .ssh folder in the user's profile:
sudo mkdir -p /home/username/.sshSet correct permissions for the .ssh folder:
sudo chmod 700 /home/username/.sshsudo touch /home/username/.ssh/authorized_keysSet permissions on authorized_keys file:
sudo chmod 600 /home/username/.ssh/authorized_keysSet ownership of the .ssh folder to the user:
sudo chown -R username:username /home/username/.sshNow, you can add keys to the authorized_keys file as needed, for remote SSH authentication.
Scripted Creation
The above commands can be quickly performed with this bash script:
#!/bin/bash
USERNAME="deploy"
sudo mkdir -p /home/$USERNAME/.ssh
sudo touch /home/$USERNAME/.ssh/authorized_keys
sudo chmod 700 /home/$USERNAME/.ssh
sudo chmod 600 /home/$USERNAME/.ssh/authorized_keys
sudo chown -R $USERNAME:$USERNAME /home/$USERNAME/.sshLinux: Shell Appearance
If you ever log into a linux host, and the command prompt has only a '$', and there is no scrollable command history, then the shell may not be set to bash.
Shell Assignment
You can check what shell is assigned to the user with this:
getent passwd usernameYou will see something like this:
username:x:1001:1001::/home/username:/bin/bashIf the shell is something like /usr/sbin/nologin, /bin/sh, or blank, change it to bash:
sudo chsh -s /bin/bash usernameThen, log out and back in, and you will have a bash shell.
Not Launching Interactively
SSH by default starts a non-login shell, and some files like .bashrc or .bash_profile may be missing.
To correct this, ensure the following files exist in the user's home directory:
# Copy default skeleton files to get a usable shell config
sudo cp /etc/skel/.bashrc /home/username/
sudo cp /etc/skel/.profile /home/username/
sudo chown username:username /home/username/.bashrc /home/username/.profileHome Directory Permissions
If that doesn't fix it, the user's home directory may have weird permissions.
To fix that, run these:
sudo chown -R username:username /home/username
sudo chmod 755 /home/usernameBash History
Bash normally writes to ~/.bash_history.
If Bash history is not being saved on exit, you can fix it with this:
sudo touch /home/username/.bash_history
sudo chown username:username /home/username/.bash_history
chmod 600 /home/username/.bash_historyAlso. Make sure the history file is not disabled, with this:
echo $HISTFILE
# Should output something like /home/username/.bash_historyManaged Host User Setup
For hosts that will be managed by Ansible, or some other automated method, the host will need a user account with proper access.
Follow these steps to setup the account and access.
NOTE: This page assumes that SSH server is setup.
And, that the firewall rules are setup for remote SSH access.
Provisioning User Account
Create User
Create a provisioning user on the host.
NOTE: If not running as root, you will need to prepend these commands with 'sudo'.
NOTE: By default, we use the username 'provisioner'.
Run this to create the user with a password:
useradd -m provisionerNOTE: We included the '-m' switch, to give the user a home directory.
This is done, so that our user can authenticate with SSH keys, which need a .ssh folder under the user's home directory.
Once created, add the provisioner account to the sudo group, so it can run elevated commands:
usermod -aG sudo provisionerNOTE: The -aG option tells usermod to add the user to the listed groups.
User Shell
If you want the provisioner user to have shell access, set the shell with this:
sudo chsh -s /bin/bash provisionerSee this page for details: Linux: Shell Appearance
NOTE: It may not be necessary for an automation account to have a shell.
But, it does help when troubleshooting.
Account Password
You need to choose if you want the provisioner account to have a password or not.
NOTE: You don't really have to create a password for a provisioning user account if:
- You will use SSH keys for authentication,
- You will be bypassing sudo checks for this user
If you want it to have a password, use this to create one:
passwd provisionerIf you don't want the user to have a password, run this:
passwd -l provisionerThe above will lock the password, making login via password impossible.
Sudo Bypass
We will allow the provisioner user to skip any sudo challenge checks.
We do this, so that we don't have to manage passwords in the deployment scripting.
Follow this page for how to do that: Linux: Allow User to Skip Sudo Challenge
Edit the visudo file with this:
visudo -f /etc/sudoersAnd, add this line above the includedir line:
provisioner ALL=(ALL) NOPASSWD: ALLSSH Key Installation
Install an SSH key for the user.
NOTE: If you are just setting up this user, it may not yet have an authorized_keys file, or an .ssh folder in its profile.
If the .ssh folder is missing, follow this: Linux: Missing .SSH Folder
To do so, locate the authorized_keys file for the provisioner user at: /home/provisioner/.ssh/authorized_keys.
And, add the public key of the provisioner account.
Open the authorized_keys file for the provisioner's account, with this:
sudo nano /home/provisioner/.ssh/authorized_keysPaste in the public key string of the provisioner account's SSH public key.
The current provisioner account SSH public key is found here:
- On Build Server:
"/mnt/secshare/oga/keys/provisioner_user/ecdsa-key-provisioner-buildserver01-20250803.pub" - In Secure Share:
"\SecureShare git\oga\keys\provisioner_user"
Save and close when done.
Verify SSH Access
Once the SSH key is loaded, you can verify SSH authentication with this:
ssh -i /path/to/privatekeyfile provisioner@hostnameTo test access with the provisioner's current SSH key file, use something like this:
ssh -i /mnt/secshare/oga/keys/provisioner_user/ecdsa-key-provisioner-buildserver01-20250803.key provisioner@hostnameUpdate Ansible Hosts File
For Ansible to reach the host, you need to give Ansible some information about it.
Live Ansible Hosts File
This is stored in the Ansible hosts file.
The live hosts file is on the Ansible server at: /etc/ansible/hosts
Add the host to it, like this:
[Name of host group]
hostname ansible_host=192.168.120.99 ansible_user=provisioner ansible_ssh_private_key_file=/mnt/secshare/oga/keys/provisioner_user/ecdsa-key-provisioner-buildserver01-20250803.keyThe above is a host entry in the Ansible hosts file.
It has the following parts, in this order:
- Hostname - This is name used by ansible plays to identify the host.
- ansible_user - This is the username that Ansible will login with. Set it to the account name, from above.
- ansible_ssh_private_key_file - This is the path to the current SSH private key used for deployment.
The current provisioning private key file, for Ansible, is in the mapped secure share, here:
/mnt/secshare/oga/keys/provisioner_user/ecdsa-key-provisioner-buildserver01-20250803.keyOrg Hosts File
As well, there's a hosts file in each Org's Infrastructure project, as well.
This reflects what ansible host entries are relevant to that org.
Copy the same host entry into that file, to keep it in sync.
HowTo Configure IIS Reverse Proxy
How to configure reverse proxy on Windows IIS
How to Add Root CAs to Ubuntu
Reference: https://ubuntu.com/server/docs/install-a-root-ca-certificate-in-the-trust-store
Install the CA certificate package:
sudo apt-get install -y ca-certificatesNow, you can install any local intranet root CA, with this:
NOTE: We are copying in the .crt file.
Once the trust bundle is created, with a later step, the file will be converted to PEM format.
sudo cp ogsofttech.lan_ca.crt /usr/local/share/ca-certificatesOnce you have all the certificates loaded, you need to add them to the trust store, with this:
sudo update-ca-certificatesOnce done, you can verify that your certificate is in pem format:
sudo ls /etc/ssl/certs/ | grep ogsofttech.lan_caYou will see something like this, if loaded into the trust bundle:

If you are looking for the local intranet Root CA certificate, see this: Current Intranet Root CA Certificate
Ubuntu Server Setup
Ubuntu Host Setup
Here are the minimal steps to setup a clean Ubuntu VM.
Note: These instructions are tested on on Ubuntu v22 through v24.
They may require updates for other versions.
Spawn VM Clone
The first step is to spawn a clone of the template VM.
Be sure to do the following:
- Give it an inventory name that fits its hostname.
- Update the CPU count.
- Set the memory size.
- Set its disk space for the intended service.
- Assign the VM's NIC to the Provisioning portgroup (VLAN 170).
This will ensure that we can access it via SSH, for faster setup.
Once the VM is started, log into its console session.
Update Packages
From the console, update packages of the VM.
Do this before anything else, to ensure the latest package versions are used.
sudo apt-get update && sudo apt-get upgrade -yUbuntu: SSH Server
See this page for setting up the SSH Server: Ubuntu: SSH Server
Initial Remote Access (VLAN 170)
Once the VM is started up, and in the Provisioning VLAN (VLAN 170), it should have a DHCP address that we can reach.
From the VM's local console, run this to get its IP on the provisioning VLAN:
ifconfigOpen an SSH session to the VM, for remote setup.
Setting the Host Name
See this page for how to set the hostname: Ubuntu: Set Hostname
Other Packages
We will install net-tools on each host, for diagnostic purposes.
sudo apt install net-toolsManaged Host Setup
If the VM will be managed by Ansible and deployment tools, see this page for setup steps: Managed Host User Setup
User Setup
Configure any users and groups that the VM will need.
This may include a deployment user.
SSH Keys
We need to add SSH public keys for users added, above.
See this page for the various method of adding SSH keys to a remote linux host: Linux SSH Key Management
Switch SSH to Key Auth
Once you have installed SSH public keys in the VM, you need update the SSH config to SSH authentication.
To do so, open the sshd config file, with this:
sudo nano /etc/ssh/sshd_configLook for the line with this directive, 'PasswordAuthentication'.
Uncomment the line, and set it to no, like this:
PasswordAuthentication noIn the config file, set Key Auth to yes:
PubkeyAuthentication yesSave and close the SSH config file.
Restart SSH with this:
sudo systemctl restart sshVerify SSH Keys
Now that SSH key authentication is enabled, you need to verify that each added SSH public key works.
Attempt to connect with the VM, using each configured SSH key.
Verify each one works.
See this page for steps on how to connect to a Linux host from Windows: Connecting to SSH Server from Windows
Routing and Firewall
So far, we are accessing the VM on a temporary provisioning network.
We need to set things up for its final location.
Create a proper firewall rule for accessing the VM at its final IP address, in its target VLAN.
Static IP Address
With the above firewall rule in place, we will be able to access the VM, once it's moved to its target VLAN.
But first, we need to set its static IP address: Ubuntu: Setup Static IP Address
Change VLAN PortGroup
Setting the static IP address, above, means that we lost temporary SSH access.
We need to fix that.
In the hypervisor, change the VM's portgroup to the target VLAN.
Remote Access
With the VM at its assigned static IP, in the target VLAN, and with access firewall rule exists, we can remote SSH to it.
Attempt to open a remote SSH session to the VM.
Root CA Certs
If you are looking for the local intranet Root CA certificate, see this: Current Intranet Root CA Certificate
If your institution or company uses has its own certificate authority (CA), you should install its root CA into the following folder:
/usr/local/share/ca-certificates/For example, to add the root CA for the local network, create the file with this:
sudo nano /usr/local/share/ca-certificates/ogsofttech.lan_ca.crtSave and close the file.
Once all root CA certs are added, you need to update the runtime's CA list, with this:
sudo update-ca-certificatesSee this page for how to add Root CA certificates: How to Add Root CAs to Ubuntu
NTP Client Needs
If the VM will be located in an isolated VLAN with restricted internet access, it may need access to the local NTP server.
See this page for how to setup each host/VM to use the local private NTP server: Ubuntu: Use Private NTP Server
Further Setup
With the above things done, we can continue on with other setup.
Ubuntu: Setup SSH Server
Here are steps to setup the SSH server on an Ubuntu host.
Here's a good reference article for how to do what we're doing here: How to Enable SSH on Ubuntu 20.04
Here are the commands to execute:
sudo apt updateInstall the SSH server with this:
sudo apt install openssh-serverStart the SSH server:
sudo systemctl enable --now sshVerify it is running:
sudo systemctl status sshAdd a firewall rule for the SSH server:
sudo ufw allow sshUbuntu: Setup Static IP Address
Here are notes and steps to assign a static IP address for an Ubuntu host.
These steps are known to work with Ubuntu 22 and 24.
NOTE: If you are doing for a Debian host, see this page: Debian: Setup Static IP Address
Net Tools (ipconfig)
Install net tools, so we can use commands like: ipconfig
sudo apt install net-tools
Static IP Address
Static addresses will be defined in a netplan file, configured below.
But, we need to do a few things, first:
- Get the Gateway IP
- Enable Adapters
Get the Gateway IP
You will need to know the gateway address that your host will use.
If the host is not on the desired network, you will need to determine the gateway IP, manually.
Or, you can join the host to the network, and do the following to determine it.
If the host is up, you can run this command to get the current default gateway assigned to it:
ip r | grep default
This command will return the default gateway address, like this:

Enable Adapters
If you added an adapter to the host, it may be in a down state.
To enable it, use this command to find the name:
sudo ip a | grep ^[[:digit:]]The above will give a list, like this:

And, you can enable it with this:
sudo ifconfig eth1 upNOTE: Be sure to use the name of the nic, from the previous call.
NetPlan YML
We will assign our static address, via NetPlan.
Open the netplan file, so you can edit the network config.
It will be located here:
/etc/netplan/
Existing Cloud YML
If this folder contains a cloud yaml, you may have to disable cloud network config.
To do so, create a file at:
/etc/cloud/cloud.cfg.d/99-disable-network-config.cfg
And, give it this content:
network: {config: disabled}
Delete the existing cloud yml file, so it does not interfere with the config you will build, next.
Now, you can write a config yaml file that will be accepted through a reboot.
Editing NetPlan YML
If a non-cloud netplan yml file exists, you may be able to edit it. The file on your host may have a different name, depending on OS version.
Check the filename before running this command.
Here’s the name of a valid netplan file that can be created, if one does not already exist.
sudo nano /etc/netplan/01-network-manager-all.yaml
Edit the file to reflect the following.
Be sure to use your ethernet adapter name (enps3s0), or whatever its name was discovered to be earlier.
Create the netplan file with the above name, 01-network-manager-all.yaml
Set it up with your ether adapter names, static address, DNS, and gateway addresses.
The following are examples you can use:
network:
version: 2
renderer: networkd
ethernets:
enp3s0:
addresses:
- 10.10.10.2/24
nameservers:
search: [mydomain, otherdomain]
addresses: [10.10.10.1, 1.1.1.1]
routes:
- to: default
via: 10.10.10.1Here’s a working netplan file, in use on AWS, that has two NICs (public and private subnets):
# This sample has two network adapters, each in different subnets.
# The first NIC has a configured gateway and DNS.
# The second NIC is in a private subnet.
network:
version: 2
renderer: networkd
ethernets:
eth0:
addresses:
- 10.0.1.10/24
nameservers:
addresses: [127.0.0.53,8.8.8.8,8.8.4.4]
routes:
- to: default
via: 10.0.1.1
eth1:
addresses:
- 10.0.2.10/20Create the Save changes to the file.
Make sure the created netplan file is only accessible by root, by doing this:
sudo chmod 600 ./01-network-manager-all.yamlAnd, apply changes with:
sudo netplan applyCheck that connectivity exists through a reboot, to make sure settings persist.
Ubuntu: Set Hostname
Here are steps to properly set the hostname of an Ubuntu server.
HostnameCtl
Get the current hostname with this:
hostnamectl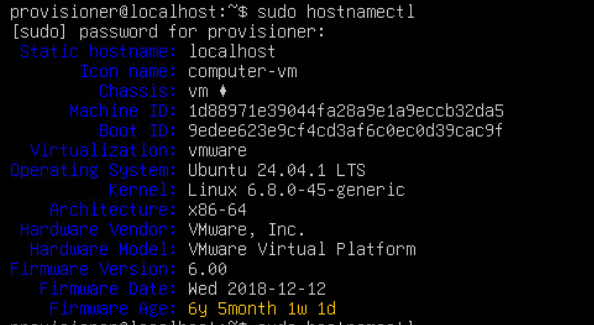
To set it, use this:
sudo hostnamectl set-hostname new-hostname (replace new-hostname)Once set, confirm it with the previous command.
Hosts File
Now, you need to update the hostname in your hosts file, with this:
sudo nano /etc/hostsThe hosts file lists the hostname in the second entry: 127.0.1.1, like this:

Update the 127.0.1.1 entry with the correct hostname.
Save and close the hosts file after update.
Linux: Manually Installing SSH Keys
Here's some steps on how to manually install SSH public keys in a host.
1. SSH Key Folder
cd /home/usernameCheck if the .ssh folder exists (it is hidden, requiring the -a switch):
ls -alIf the .ssh folder does not exist, create it with the following commands (from the user folder):
sudo mkdir ~/.sshsudo chmod 0700 ./.ssh2. SSH Key File
Enter the ssh key folder with:
cd ./.sshAnd, check if any key files are there, with:
ls -l
Make sure the key file has the same name that was defined in the ssh config file, in previous steps.
If no key file, create one with (making sure to use the correct key file name):
sudo touch ./authorized_keysSet permissions on the key file:
sudo chmod 600 ./authorized_keysFrom Windows
This section is for copying the public key string from a Windows, host.
The tricks to successfully pasting in an SSH key to the ssh key file are:
-
Always paste the key string as a single line
-
The key string must being with, “ssh-rsa“
-
Strip out any “Begin SSH2 PUBLIC KEY” and ending
-
The key line should contain the key comment at the end of the line, for easy identification
-
A key string should be of the form: ssh-rsa [really long base64 key string here] [key comment]
-
Single whitespace is needed between each component of the key line
-
The key comment must have no whitespace in it
The easiest way to get this string is to load a key in PuttyGen.
Then, paste the entire key string directly from the text window of the form, like this:

From Linux
If you do not have password-based SSH access to your server available, you will have to complete the above process manually.
We will manually append the content of your id_rsa.pub file to the ~/.ssh/authorized_keys file on your remote machine.
To display the content of your id_rsa.pub key, type this into your local computer:
cat ~/.ssh/id_rsa.pubYou will see the key’s content, which should look something like this:
Outputssh-rsa AAAAB3NzaC1yc2EAAAADAQABAAACAQCqql6MzstZYh1TmWWv11q5O3pISj2ZFl9HgH1JLknLLx44+tXfJ7mIrKNxOOwxIxvcBF8PXSYvobFYEZjGIVCEAjrUzLiIxbyCoxVyle7Q+bqgZ8SeeM8wzytsY+dVGcBxF6N4JS+zVk5eMcV385gG3Y6ON3EG112n6d+SMXY0OEBIcO6x+PnUSGHrSgpBgX7Ks1r7xqFa7heJLLt2wWwkARptX7udSq05paBhcpB0pHtA1Rfz3K2B+ZVIpSDfki9UVKzT8JUmwW6NNzSgxUfQHGwnW7kj4jp4AT0VZk3ADw497M2G/12N0PPB5CnhHf7ovgy6nL1ikrygTKRFmNZISvAcywB9GVqNAVE+ZHDSCuURNsAInVzgYo9xgJDW8wUw2o8U77+xiFxgI5QSZX3Iq7YLMgeksaO4rBJEa54k8m5wEiEE1nUhLuJ0X/vh2xPff6SQ1BL/zkOhvJCACK6Vb15mDOeCSq54Cr7kvS46itMosi/uS66+PujOO+xt/2FWYepz6ZlN70bRly57Q06J+ZJoc9FfBCbCyYH7U/ASsmY095ywPsBo1XQ9PqhnN1/YOorJ068foQDNVpm146mUpILVxmq41Cj55YKHEazXGsdBIbXWhcrRf4G2fJLRcGUr9q8/lERo9oxRm5JFX6TCmj6kmiFqv+Ow9gI0x8GvaQ== demo@test
Access your remote host using whichever method you have available.
Once you have access to your account on the remote server, you should make sure the ~/.ssh directory exists. This command will create the directory if necessary, or do nothing if it already exists:
mkdir -p ~/.sshNow, you can create or modify the authorized_keys file within this directory. You can add the contents of your id_rsa.pub file to the end of the authorized_keys file, creating it if necessary, using this command:
echo public_key_string >> ~/.ssh/authorized_keysIn the above command, substitute the public_key_string with the output from the cat ~/.ssh/id_rsa.pub command that you executed on your local system. It should start with ssh-rsa AAAA....
Finally, we’ll ensure that the ~/.ssh directory and authorized_keys file have the appropriate permissions set:
chmod -R go= ~/.sshThis recursively removes all “group” and “other” permissions for the ~/.ssh/ directory.
If you’re using the root account to set up keys for a user account, it’s also important that the ~/.ssh directory belongs to the user and not to root:
chown -R sammy:sammy ~/.sshNOTE: The above example uses sammy as the username. Change this to the appropriate username for the target account.
Connecting to SSH Server from Windows
See this page for steps on how to connect to a Linux host from Windows: Connecting to SSH Server from Windows
How to Setup SSH Key Authentication to Linux
This how to consolidates several aspects of setting up SSH key access to a Linux server.
NOTE: We currently have two tutorials for this, that need to be consolidated into one. So, maybe this alternate tutorial fills your use-case: Ubuntu SSH Key Access
NOTE: If you are creating ssh keys for recent Ubuntu distributions, do not use RSA, as it is no longer an accepted key type (as of Ubuntu 21, I think). Use ecdsa instead.
SSH Server Setup
Follow this link to setup the SSH server on Ubuntu: Ubuntu: Setup SSH Server
Update SSH Config
The SSH service needs to be configured to disallow passwords, and to require SSH key authentication.
The following is list of actions to perform in the service configuration.
SSH Key File Name
NOTE: Not all ssh configuration files include the naming of the authorizedkeys file for users.
And, different flavors of Ubuntu and linux use different naming conventions for the SSH key file of a user.
So, we have to determine the file name for ssh key files, and make sure it is set in the config file, and we use the same name.
To find the ssh key file name, open the ssh config with the following:
sudo nano /etc/ssh/sshd_configLocate the line in the config file with, AuthorizedKeysFile. Uncomment the line if necessary.

Make a note of the filename used. This will be needed when installing SSH keys.
Prevent Remote Root Login
This is also done in the ssh config file.
Locate the line with PermitRootLogin, and set it to no, like this:

Disable Password Authentication
This requires three changes in the ssh config file.
Locate the line with ChallengeResponseAuthentication, and set it to no, like this:

Locate the UsePAM line and set it to no, like this:

Locate the PasswordAuthentication line and set it to no, like this:

Disable interactive keyboard authentication by setting this:
KbdInteractiveAuthentication noSave changes to the config file.
Restart SSH
With the changes made above, we need to restart the SSH service, with this:
sudo systemctl restart sshSSRS
SSRS: Export Reports Without WebPortal
If you’re trying to export all the RDL, data sources, gif, and other files of a set of reports, but the SSRS web portal is inaccessible, this method will pull them from the report engine database back-end.
Taken from here: Export of SSRS reports datasources and images
<# .SYNOPSIS
Export of SSRS reports datasources and images
.DESCRIPTION
This PowerShell script exports all (or filtered) reports, data sources and images directly from the ReportServer database
to a specified folder. For the file name the complete report path is used; for file name invalid characters are replaced with a -.
Reports are exported with .rdl as extension, data sources with .rds and resources without any additional extension.
Please change the "Configuration data" below to your enviroment.
Works with SQL Server 2005 and higher versions in all editions.
Requires SELECT permission on the ReportServer database.
.NOTES
Author : Olaf Helper
Requires: PowerShell Version 1.0, Ado.Net assembly
.LINK
GetSqlBinary: http://msdn.microsoft.com/en-us/library/system.data.sqlclient.sqldatareader.getsqlbinary.aspx
#>
param(
[Parameter(Mandatory=$true)] [string]$serverName, # server name and instance
[Parameter(Mandatory=$true)] [string]$databaseName, # ReportServer Database.
[Parameter()] [string]$outputDirectory = 'C:\Temp\' # Path to export the reports to.
)
# Select-Statement for file name & blob data with filter.
$sql = "SELECT CT.[Path]
,CT.[Type]
,CONVERT(varbinary(max), CT.[Content]) AS BinaryContent
FROM dbo.[Catalog] AS CT
WHERE CT.[Type] IN (2, 3, 5)";
# Open ADO.NET Connection with Windows authentification.
$con = New-Object Data.SqlClient.SqlConnection;
$con.ConnectionString = "Data Source=$serverName;Initial Catalog=$databaseName;Integrated Security=True;";
$con.Open();
Write-Output ((Get-Date -format yyyy-MM-dd-HH:mm:ss) + ": Started ...");
# New command and reader.
$cmd = New-Object Data.SqlClient.SqlCommand $sql, $con;
$rd = $cmd.ExecuteReader();
$invalids = [System.IO.Path]::GetInvalidFileNameChars();
# Looping through all selected datasets.
While ($rd.Read())
{
Try
{
# Get the name and make it valid.
$name = $rd.GetString(0);
foreach ($invalid in $invalids)
{ $name = $name.Replace($invalid, "-"); }
If ($rd.GetInt32(1) -eq 2)
{ $name = $name + ".rdl"; }
ElseIf ($rd.GetInt32(1) -eq 5)
{ $name = $name + ".rds"; }
Write-Output ((Get-Date -format yyyy-MM-dd-HH:mm:ss) + ": Exporting {0}" -f $name);
$name = [System.IO.Path]::Combine($outputDirectory, $name);
# New BinaryWriter; existing file will be overwritten.
$fs = New-Object System.IO.FileStream ($name), Create, Write;
$bw = New-Object System.IO.BinaryWriter($fs);
# Read of complete Blob with GetSqlBinary
$bt = $rd.GetSqlBinary(2).Value;
$bw.Write($bt, 0, $bt.Length);
$bw.Flush();
$bw.Close();
$fs.Close();
}
Catch
{
Write-Output ($_.Exception.Message)
}
Finally
{
$fs.Dispose();
}
}
# Closing & Disposing all objects
$rd.Close();
$cmd.Dispose();
$con.Close();
$con.Dispose();
Write-Output ((Get-Date -format yyyy-MM-dd-HH:mm:ss) + ": Finished");
SSRS Links
How to Customize the SSRS Report Viewer: https://github.com/MagnusJohansson/CustomSSRSReportViewer
SSRS Server Pages
This is a bunch of rolling notes for SSRS.
Web Portal URL
The standard Web portal UI is here: https://hostname/Reports
Use this link to browse, manage, and view reports with the standard web interface.
Report Server URL
The Report Server is available here: https://hostname/ReportServer
Use this link to access the report server's backend, or in applications like Report Builder for deploying and managing reports.
Reporting Services Configuration Manager
This is a Windows executable, that provides high-level configuration for the report server.
It can be found in the Start menu, as Reporting Services Configuration Manager.
URL Reservations
Once configured in RSCM, URL reservations are stored in the RSReportServer.config file.
It is available here: "c:\Program Files\Microsoft SQL Server Reporting Services\SSRS\ReportServer\RSReportServer.config".
SSRS SSL Certificates
Here's some notes on how to add an SSL certificate to SSRS.
Certificate Conversion
When importing an SSL certificate (cer) with a separate private key (key), it needs to be in PFX format, for Windows to accept it.
Follow this page to convert a key and cer pair to pfx: Create PFX Cert File (for IIS)
The conversion is pasted, here, for clarity:
"C:\Program Files\Git\usr\bin\openssl.exe"
pkcs12 -export
-out myhostname.companyname.com-cert.pfx
-inkey myhostname.companyname.com.key
-in myhostname.companyname.com.cerNOTE: The above is displayed on multiple lines for readability.
To execute, it must be all on one line.
Import to Cert Store
Once the PFX is generated, you can import it to the Windows Certificate Store.
For SSRS, import the pfx file to the Local Machine/Personal folder of the certificate store.

Certificate Binding
Once the certificate is in the store, you can bind it in SSRS.
Open the Report Server Configuration Manager from the Start menu.
From the left tree, click on Web Portal URL.
Click the Advanced button, and locate the lower pane for https bindings.

Remove any existing SSL binding, by selecting it and hitting Remove.
The old binding may not successfully delete.
So you can open an elevated command line, and delete the old cert binding, with this:
netsh http delete sslcert ipport=0.0.0.0:443Return to the Report Server Configuration Manager, and add the new cert binding.
Select the imported certificate (from earlier), and bind it to port 443.
NOTE: Both Web Service URL and Web Portal URL must have the same origin.
So, be sure to do the same addition to the Web Service URL tab.
You should be able to access the report server URL.
Code Signing Token Setup
Adding a HSM Token to a VM
There are a couple of issues when using a SafeNet token from inside a VSphere virtual machine.
USB Controller
First, we must have a v3.0 USB controller configured for the virtual machine. A v2.0 USB controller has been tried, and not worked.
If both v2.0 and v3.0 USB controllers are configured it is not certain that the USB-Passthrough logic will reliably the 3.0 controller for the USB key.
So, be sure to only configure a v3.0 USB controller.
USB Device
The USB token must be attached to the ESX host, and be visible by it.
This can be checked by opening an SSH session to the ESX host and performing the command, lsusb.
The token should appear in the list, like this one:

USB Passthrough Problems
By default, ESXi >= 6.5 will not permit pass through connection of CCID USB devices such as the Aladdin Knowledge Token JC to the guest VM.
This is because smartcard pass through is disabled by default to support DCUI login with smart cards.
So, HSM tokens such as Aladdin Knowledge Token JC, or SafeNet tokens will encounter errors when mapping them into a virtual machine on VSphere.
NOTE: CCID (chip card interface device) is a USB protocol that allows a smartcard to be connected to a computer via a card reader using a standard USB interface.
The problem presents itself as an error on connect attempt:
Failed to reconfigure virtual machine Win10x64. Cannot connect 'vid:0529 pid:0620 path:0/1/7/1' to this virtual machine. The device was not found.
To correct this…
Enable USB CCID Device Connection in VM
1.Shut-down the VM
2.VM > Edit settings > VM Options
3.Advanced > Configuration Parameters > Edit Configuration
4.+ Add Parameter and add following Key and Value
usb.generic.allowCCID TRUE
Connect Aladdin Knowledge Token JC to VM
1.Power-up VM
2.VM > Edit settings > Virtual Hardware
3.Add other device > USB device
4.Select Aladdin Knowledge Token JC > Save
Or, the VMX file can be hand-edited with the following steps to add this line to the VMX file of the virtual machine:
usb.generic.allowCCID = "TRUE"
-
Power down the guest VM where it will connect.
-
Remove the guest VM from inventory.
-
Download the vmx file of the guest VM from the datastore where it resides.
-
Open the VMX file in a text editor, and add the following line:
usb.generic.allowCCID = "TRUE" -
Save the updated file.
-
Upload the vmx file back to the datastore.
-
Register the VM in inventory.
-
Power up the VM, and confirm the token is available in the guest OS.
Code Signing Cert Setup
Each time you receive a new code signing certificate on a USB eToken, there are steps to perform and information to collect, so it can be utilized in an automated build pipeline.
There is little comprehensive documentation available on the web, for how to easily utilize a USB eToken for code signing.
This may simply be that such information needs to be obscured.
Or, that it is just not commonly used enough because it’s not something “mortals” and casual programmers do.
What information is available is scattered and inconsistent.
So, this page attempts to consolidate those steps and list the data required to collect for a build signing tool (to access and use the token).
NOTE: The certificate private key of your code-signing certificate cannot be exported from the USB token.
So, all code-signing operations will require the USB eToken be attached to the build machine, and the SafeNet Authentication Client software be installed and active.
The code-signing certificate does with within a VSphere virtual machine, and additional steps are here: Adding a HSM Token to a VM
Precautions
- The SafeNet Authentication Client software is designed for use by token creators (certificate vendors), not token users (certificate users).
And, there is no functionality available to backup or restore the private key on a USB eToken.
So, plenty of care and caution are necessary as the client software contains many functionalities that can reset and render a token inert, or overwrite a certificate, without any safeguards. - Above all else, do NOT execute a function called, Initialize Token. This will erase the certificate contents from your eToken, and you will have to buy a new certificate.
- The USB eToken is configured to enter a lockdown state after a number of failed password attempts.
And, SafeNet Authentication Client software has no reliable means to verify that a token password is correct.
So, you need to verify that the token password is good using a signing tool.
Recommendations
There are not many actions (in the client software) required to properly use the USB eToken in automated signing.
All necessary interactions are listed below.
And since there is no means to backup/restore a code-signing certificate, it is both unnecessary and NOT recommended to explore the SafeNet Authentication Client software outside of the steps below.
Results
The below steps will create/retrieve all data elements required by an automated build signing tool.
Here’s the list of data elements that will be recovered:
-
Certificate File Path - location of the certificate’s public key file
-
Token Password - required to access the token and use it for signing purposes
-
Cryptographic Service Provider (CSP) - used by the build tool to identify the driver of the USB eToken
-
Reader Name - Used by the build signing tool to identify the token. Not required if only one token is attached
-
Container Name - used by the build signing tool to identify the private key of the code signing certificate
Required Steps
Here’s a compiled list of actions that must be done, to setup a new HSM token:
-
Install SafeNet Authentication Client Software
-
Fix CCID Issue (if signing within a VM)
-
Check Token Presence
-
Create New Token Password
-
Export Signing Certificate
-
Configure Authentication
-
Record Identifying Parameters
-
Verify Signing
Steps to follow
Install SafeNet Authentication Client Software
This will install the SafeNet Authentication Client Software.
Download the latest version of the SafeNet Authentication Client software from the vendor website.
NOTE: The current version, as of 20211228, is V10.8 R6. It has been cached, here.
Fix CCID Issue
Once installed, we need to fix the CCID Issue (when inside a VM).
This is a problem associated with VMWare VSphere, where a USB Safenet token attached to the ESX host does not pass-through correctly to a guest VM.
The workaround for this is, Adding a HSM Token to a VM
Check Token Presence
To check the presence of the eToken, do the following:
-
-
Make sure the eToken is attached to the machine (or connected via USB-Passthrough to the VM).
-
Double-click the SafeNet Authentication Client in the task bar.

-
If present, the token should appear in the left-hand pane of the client window.

-


Create New Token Password
When a token is issued, you are given an initial token password.
This password is used to access your token.
This password should be changed to ensure no one has intercepted it along the way.
This password should be a very complex password. And, it is not required to memorize it, because it will be stored in a build automation tool.
To change the token password, do the following:
-
Formulate a new password to be used.
It must exceed the complexity requirements (at least 8-characters, have upper and lower case letters, numbers, and special characters).
Using a tool, such as LastPass Generator, or an online high-entropy password tool are useful for this. -
Open the SafeNet client.
-
Select Change Token Password, and enter the new password at the dialog:


Export Signing Certificate
A build signing tool requires a copy of the code signing key’s certificate.
So, we need to export it to a location that we can pass to the build signing tool.
Do the following to export the certificate:
-
Open the SafeNet Client.
-
Select the Gear Icon to change to Advanced Mode.

- This will switch the client to its advanced view, and present a tree-view menu, like this.

The Tokens node of this menu, lists all tokens connected to the machine, with the certificate under the CC certificates node. - Expand the CC certificates node, to see the actual code-signing certificate, like this.

- Right-click the certificate, and select the Export Certificate, to save the public certificate to a file.


NOTE: This file is required by an automated build signing tool. So, save it in an accessible path.
Configure Authentication
In order for an automated build tool to use the code signing certificate many times over long duration, we must adjust the authentication configuration for the token and software to allow single-sign on and to not Auto-logoff with inactivity.
NOTE: This step may not be necessary since we provide the token password in command line arguments to the build tool.
Further testing is needed to see if this step can be omitted.
- Open the Advanced View in the SafeNet Authentication Client.
- Click on Client Settings and the Advanced Tab.
- Check the boxes for Enable Single Logon and for Enable Single Logon for PKCS#11.

- Click Save to save settings.
- The documentation says this change requires a session update to take effect.
But, this doesn’t seem to always be the case.
And, we need to also disable auto-logoff in the next step. So, we will continue, and reboot after that. - Make sure the Automatic Logoff duration is set to Never.
This ensure we will remain logged into the token for a long-duration. - Reboot the machine to ensure the changes take effect.

Record Identifying Parameters
An automated build tool requires a few parameters to access and use the private key of the code signing certificate.
These are the “CSP”, “Reader Name”, and the “Container Name”, and are all accessible from the SafeNet Authentication Client.
Here’s a list of steps to retrieve each of these:
- To get the Reader Name, switch to the Advanced view, and click on the token node (under the Tokens list).
NOTE: The Reader Name is only required if you have more than one reader connected. If you have only one token, you can skip this step.
The Reader Name is listed as a parameter in the right-hand pane. It must be copied out, exactly as written.
The best way to retrieve the Reader Name parameter is to use the Copy-To-Clipboard function on the toolbar:
- Then, paste the clipboard contents into notepad and recover the Reader Name, there.
- To get the Container Name, stay in the Advanced view, and click on the individual certificate (under the Certificates node).
The Container Name is a parameter of the private key in the right-hand pane. It must be copied out, exactly as written.
It can be retrieved, same as the Reader Name, by using the Copy-To-Clipboard function on the toolbar:
- Then, paste the clipboard contents into notepad and recover the Container Name, there.
- To get the CSP (Cryptographic Service Provider) name, stay in the Advanced view, and click on the token node in the left-hand pane.
- In the right-hand pane, scroll to the bottom of the token’s parameter list, and locate the CSP parameter. It must be copied out exactly as written.
It can be retrieved, same as the other parameters, by using the Copy-To-Clipboard function on the toolbar:
- Then, paste the clipboard contents into notepad and recover the CSP name, there.
- Once the CSP, Reader Name, and Container Name are retrieved, they need to be added to the build signing tool configuration, along with the token password, and the path to the signing certificate file.


Verify Signing
Warning: A USB eToken will enter a lockdown state if too many failed password attempts have been made (requiring a certificate-vendor support to unlock).
And, the SafeNet Authentication Client software has no reliable means to quickly verify that a token password is correct.
The token must be used, to check the password.
So, any developed logic that orchestrates the build signing tool must include functionality to perform a single-step check of the token password. This will allow you to verify the token password works with a new token, along with verifying that other parameters (Reader and Container) are good to use.
- With all the previous steps executed and data collected, we must perform a single-step signing to verify the token password, Reader Name, and Container Name are all correct.
Connecting to SSH Server from Windows
Here’s a list of steps to connect with an SSH server from a Windows PC using SSH key authentication.
Open the Putty application, Putty.exe.
From the GUI, set the hostname and port of the SSH service, and come up with a memorable name for the session, and save it:

Next, drill down the left-hand tree to the Data page under Connection, and set the Auto-Login username to the username the SSH key belongs to:


Go back to the top of the tree, and click Session. Then, save the session, same as before, to capture the updated configuration.
Now, the connection can be tested.
Load the saved session, and click Open, to attempt a new connection with the SSH server.
If successful, it will login and present a regular terminal prompt, same as would happen during password authentication.

The server will display the name of the used key, to indicate SSH key authentication was used.
HashiCorp Vault
Generate Certificates with Hashicorp Vault
Here are steps to generate SSL certificates using HashiCorp Vault as an Intermediate CA.
NOTE: Be sure that you've setup a vault instance as an Intermediate CA.
See this page for how: Vault as Intermediate CA
Login to the web UI of your intermediate CA, such as: https://vault02.ogsofttech.lan:8200/ui/
If DNS is down, use this: https://192.168.60.6:8200/ui/
For the latest intermediate CA url, see this page: Vault Services
Find the issuing role by navigating to Secrets/PKI/Roles.

Select the role, and click Generate Certificate:

Fill in the Common name as: router.ogsofttech.lan.
Set the TTL to 1 year (365 days).

Click Generate, to create the key and certificate, and you’ll see this:

Download the private key as: router.ogsofttech.lan-key.pem
Download the certiticate as: router.ogsofttech.lan-cert.pem
Download the CA chain as: router.ogsofttech.lan-cabundle.pem
NOTE: We are calling the downloaded CA chain file a “ca bundle”.
CA bundle is the standard naming convention for this file type.
Specifically, a cert is often concatenated with the CA bundle that signed it, to create a chain certificate file.
Now, you can copy the cert, ca bundle, and private key to the host, for usage.
If generating a pair for a linux host, you will need them as .crt and .key files.
Follow this: Converting PEM to crt and key
If generating a pair for an Nginx host, you will need
Hashicorp Vault Setup
Here are steps for setting up a secrets store using Hashicorp Vault, on Ubuntu 24.
References
Lots of steps were taken from here: https://developer.hashicorp.com/vault/tutorials/secrets-management/pki-engine
Server Setup
Before installing Vault, perform steps from this page, to setup the server: Ubuntu Host Setup
Since a typical vault cluster has limited internet visibility, it may be necessary to map in the local NTP server, to keep each node in sync.
See this page for how to setup each host/VM to use the local private NTP server: Ubuntu: Use Private NTP Server
Install Vault
Here are three lines to install vault.
First, we will setup the package source keys…
sudo wget -O- https://apt.releases.hashicorp.com/gpg | sudo gpg --dearmor -o /usr/share/keyrings/hashicorp-archive-keyring.gpgNow, add the package source entry…
echo "deb [signed-by=/usr/share/keyrings/hashicorp-archive-keyring.gpg] https://apt.releases.hashicorp.com $(lsb_release -cs) main" | sudo tee /etc/apt/sources.list.d/hashicorp.listNow, install vault…
sudo apt update && sudo apt install vaultVault User
The installer created a user called, vault, and the service runs under it.
But, the default keys are restricted to root permissions.
So, we need to fix access to certificates.
For this, we will create a group to make it easier to control and test access to certs and keys.
sudo groupadd pkiAnd, we will add the vault user to the group:
sudo usermod -a -G pki vaultClustered Config
NOTE: If you are standing up a single node vault, skip this section.
Work through the steps on this page, for clustering your vault servers: Clustering HashiCorp Vault
Vault Configuration
NOTE: This is for a single vault node. If you are standing up a cluster, skip this section.
Edit the config file at: /etc/vault.d/vault.hcl
Specifically, you want to set the tls cert/key paths to your own domain certs.
As well, you may want to limit the listener to just a single address, since the default is for all adapters on the host.
Once done, save the config update.
Continue Setup
Once installed and configured, we need to enable and start the vault services, with these lines:
sudo systemctl daemon-reload
sudo systemctl enable vault
sudo systemctl start vault
sudo systemctl status vaultYou should be able to verify that the vault service is active by call this:
https://<host-ip>:8200/v1/sys/seal-status
NOTE: Use your VM’s fully-qualified name (or IP address), in the above.
If successful, the above call will return something like this:
{
"type":"shamir",
"initialized":false,
"sealed":true,
"t":0,
"n":0,
"progress":0,
"nonce":"",
"version":"1.17.6",
"build_date":"2024-09-24T19:48:40Z",
"migration":false,
"recovery_seal":false,
"storage_type":"file"
}Cluster Unseal
If you're standing up a cluster, see this page: HashiCorp Vault Cluster Unseal
If you're standing up a single-node vault instance, see this page: Vault Single-Node Unseal
Administrative Setup
Once the vault is unsealed, you need to setup auditing and administrative policies.
See this page for how: Vault Administrative Setup
Creating Users (Access Tokens)
Once the vault cluster is setup, you need to establish some administrative users.
See this page for how to create admin and user tokens: Vault Token Administration
To protect tokens in transit, see this page for Response-Wrapped Tokens: Vault Wrapping Token
Login
Once your vault is unsealed, you can log into its UI.
Log into its UI, here: http://<host-ip>:8200/
You will be prompted to enter your root token, here:

If successful, you will see the root user’s dashboard:

Creating the First Secret Store
Now, you should create a secrets engine, to store things.
The one that makes the most sense, first, is to make a KV store.
You should be able to make a kv secrets store (actually, a kv-v2 store) from the dashboard:

The above will create the secrets store at the path: /kv
You can change this if needed.
Once created, you will see the new empty store:

Using Vault as a CA
Follow steps on this page, to setup a vault instance as a Root CA: Vault as Root CA
NOTE: You never want to directly sign certificates with a Root CA.
If you do, there is no way to revoke the root CA, without collapsing all PKI chains (by revoking the root CA certificate).
However. You can create an Intermediate CA that does signings.
And, that Intermediate CA can be revoked, without losing the root CA certificate.
So, we will create an Intermediate CA, to do actual signings.
And, the Intermediate CA's certificate will be signed by the Root CA, just before offlining the Root CA.
Once a root CA is setup, you can follow this page, to setup an Intermediate CA,
that will do actual signings: Vault as Intermediate CA
See this page for how to generate certificates: Generate Certificates with Hashicorp Vault
Clustering HashiCorp Vault
Here are special instructions for setting up a vault cluster.
NOTE: See the regular setup page for other details: Hashicorp Vault Setup
DNS Resolution
Since the vault services will communicate with eachother over TLS, they will need certificates.
And as such, the certs will include hostnames.
So, open the /etc/hosts file of each vault host, and add entries, at the bottom of the file, for each instance and API host.
Here's an example list of entries for a cluster:
192.168.75.10 vault02api
192.168.75.21 vault0201
192.168.75.22 vault0202
192.168.75.23 vault0203
192.168.75.24 vault0204
192.168.75.25 vault0205
192.168.75.26 vault0206Filesystem Changes
Raft Folder
The Vault service will be running Raft. So, it will need a folder for the Raft backend.
NOTE: This may mean that the folder /opt/vault/data is obsolete.
But, we will not worry about that, for now.
The 'data' folder was created by the installer as the FS location for a storage = 'file' backend.
Create the raft folder with these:
sudo mkdir /opt/vault/raftsudo chmod 700 /opt/vault/raftsudo chown vault:vault /opt/vault/raftTLS Folder
The installer already created the TLS folder, to store certificates.
It is at: /opt/vault/tls
We will leave it as is.
Config Folder
The installer created a config folder at: /etc/vault.d
We need to bolster its permissions, as it may contain seal stanzas.
Update permissions of the config folder with these:
sudo chmod 0750 /etc/vault.dsudo chown root:vault /etc/vault.dFirewall Rules
Update the local firewall rules for each vault host, to allow 8200 and 8201 access.
sudo ufw allow 8200sudo ufw allow 8201Certificates
We will create certificates for each vault instance, and put them in the tls folder at: /opt/vault/tls
Follow instructions, here, to generate certificates for each host: Generate Certificates with Hashicorp Vault
NOTE: Be sure to do the following:
- Set the common name to the fully qualified name: ex: vault0204.ogsofttech.lan.
- Set the expiry to two years (17520 hours).
- Set set the SAN IP to the address of the host: 192.168.75.24
Copy the CA certificate bundle (CA chain of issuer and root CA) into: /opt/vault/tls/ca.crt
NOTE: The ca.crt file should be the certificate bundle of issuer CA cert and root CA certificate.
These should be bundled (root + intermediate) in the ca.crt file, as a concatenated PEM.
Concatenate the vault service certificate with the issuer CA cert as a concatenated PEM.
Paste the certificate file (vault service + issuer CA cert) into: /opt/vault/tls/vault.crt
NOTE: The vault.crt file should include the leaf certificate (of the node) plus the signing intermediate.
Copy the vault service private key into: /opt/vault/tls/vault.key
Once key and certs are stored, we need to set permissions on the files, with these:
# Ownership: keep vault:vault
sudo chown vault:vault /opt/vault/tls/vault.crt /opt/vault/tls/vault.key /opt/vault/tls/ca.crt
# Permissions:
# private key: only vault access
sudo chmod 0600 /opt/vault/tls/vault.key
# server cert usually fine as world-readable
sudo chmod 0644 /opt/vault/tls/vault.crt
# CA cert usually fine as world-readable
sudo chmod 0644 /opt/vault/tls/ca.crtHere's a quick sanity check, to verify the certificates on a host:
# Verify the server chain file against your trust bundle
openssl verify -CAfile /opt/vault/tls/ca.crt /opt/vault/tls/vault.crt
# See what the gateway/clients will see
openssl s_client -connect vault0204:8200 -showcerts -verify_return_error \
-CAfile /opt/vault/tls/ca.crt </dev/nullVault.HCL Changes
Now, we need to create a config file for each vault service (vault.hcl).
There will be some tailoring required for each host.
So, pay attention to the notes.
Open the vault config file at: /etc/vault.d/vault.hcl
sudo nano /etc/vault.d/vault.hclBelow is a config file for a single node in a vault cluster.
NOTE: You will need to change the following lines for each host:
api_addr
cluster_addr
node_id
# Vault Configuration for Clustering.
# Created on 20250901
ui = true
cluster_name = "vaultcluster2"
# recommended with Integrated Storage
disable_mlock = true
# Advertise addresses (MUST be correct & reachable)
# Define the external API address that clients will use to communicate with this Vault node.
# set per node
api_addr = "https://vault0204.ogsofttech.lan:8200"
# Define the internal address used by Vault nodes to communicate with this Vault node.
# Vault ignores the scheme of this URL, so it doesn't matter if http or https.
# set per node (node's intra-cluster IP:8201)
cluster_addr = "https://192.168.75.24:8201"
listener "tcp" {
address = "0.0.0.0:8200"
tls_disable = 0
tls_cert_file = "/opt/vault/tls/vault.crt"
tls_key_file = "/opt/vault/tls/vault.key"
tls_client_ca_file = "/opt/vault/tls/ca.crt"
# optional: require client certs from automation:
# tls_require_and_verify_client_cert = "true"
}
# Updated to use raft backend (Integrated Storage).
storage "raft" {
path = "/opt/vault/raft"
# unique on each node
node_id = "vault0204"
# Auto-join peers (preferred over manual joins)
retry_join {
leader_api_addr = "https://vault0204.ogsofttech.lan:8200"
leader_ca_cert_file = "/opt/vault/tls/ca.crt"
}
retry_join {
leader_api_addr = "https://vault0205.ogsofttech.lan:8200"
leader_ca_cert_file = "/opt/vault/tls/ca.crt"
}
retry_join {
leader_api_addr = "https://vault0206.ogsofttech.lan:8200"
leader_ca_cert_file = "/opt/vault/tls/ca.crt"
}
}
# Recommended health endpoint behavior for LBs
# (defaults are fine; LB should treat 200 as active, 429 as standby, 503 sealed)
# See /v1/sys/health docs for details.
Service File (Systemd Unit)
With folders fixed, certs and config defined, we need to configure the vault service for operation.
To do so, we need to identify the service file that the installer created, with this:
sudo systemctl cat vault.serviceAs of 20250803, the installer puts the systemd unit file, here:
/usr/lib/systemd/system/vault.serviceWe need to open it and update it:
sudo nano /usr/lib/systemd/system/vault.serviceOnce updated, save and close the systemd file.
Return to the generic vault setup page: https://wiki.galaxydump.com/link/434#bkmrk-continue-setup
HashiCorp Vault Cluster Unseal
These steps are for a new vault cluster that has been configured and started up, but is in an unsealed state.
For an existing cluster with unsealed nodes, see this page: Handling Vault Node Restart
Leader Initialization
The following will initialize a new vault cluster and return a set of unseal keys and a root token.
NOTE: The ca.crt file is privileged, You will need to run these commands as the root user.
Run the following to switch to the root user:
sudo -iGo to the first node, and do these (as root):
# From an admin shell that can reach the VLAN:
export VAULT_ADDR="https://vault0204.ogsofttech.lan:8200"
export VAULT_CACERT="/opt/vault/tls/ca.crt" # path on your admin box
# Initialize the cluster (choose your own shares/threshold)
vault operator init -key-shares=5 -key-threshold=3NOTE: Use the fully-qualified hostname above, as it appears in the node's cert.
Once executed, the vault node will reply with 5 unseal keys and an initial root token.
Distribute each of these unseal keys to trusted admins, to store in offline password storage.
NOTE: Three (3) unseal keys are required to unseal the vault.
Use the initial root token to setup policies and auth.
Then, retire it.
Unseal the Leader
With the unseal keys from the initialized node (received above), we need to unseal its vault.
NOTE: We do this, while still as root, and on the same host that we got the keys from.
Now, unseal each node, by calling this command once each, for three of the five unseal keys:
NOTE: It will prompt you for the unseal key, each time you run it.
vault operator unsealInitial Root Login
With the vault unsealed, we need to perform an initial login as root:
# Log in with the root token for initial setup tasks
vault login <root_token>Once logged in, you can check the vault status with this:
vault statusIf successful, you should see Initialized: true, Sealed: false, HA Enabled: true, and this node as leader.
The first node is online, and the cluster is up... sort of.
Each cluster member has auto-discovered a leader and established a RAFT quorum.
But, the other nodes are still not unsealed (since we did not configured auto-unseal).
Unseal Other Nodes
Similar to what you did, to unseal the first node, we will do the same to each member, below.
Switch to root on each node with:
sudo -iSet exports for each node:
NOTE: Make sure that the vault_addr variable is pointing to the local node being unsealed, here.
export VAULT_ADDR="https://vault0205.ogsofttech.lan:8200";
export VAULT_CACERT="/opt/vault/tls/ca.crt"NOTE: Use the fully-qualified hostname above, as it appears in the node's cert.
Now, unseal each node, by calling this command once each, for three of the five unseal keys:
NOTE: It will prompt you for the unseal key, each time you run it.
vault operator unsealCheck Status
Once you have initialized the leader node, and unsealed all nodes, we need to confirm that the cluster is good.
Run this:
NOTE: The vault_addr should be pointing to the leader, here.
# Set this if you are coming back to this page, and the environment value is not set...
export VAULT_ADDR="https://vault0204.ogsofttech.lan:8200";
# Run this to check status...
vault statusConfirm RAFT peers with this:
vault operator raft list-peersNOTE: The above may only work on the current leader, because https.
We need to work through why this is, and solve it, so it can be run on any node.
When run, you will see something like this:

If healthy, you will see one node as leader, and the others as voting followers.
NOTE: Make sure each node you configured, is present.
There is a health check that can be performed, by calling this:
curl -s -H "X-Vault-Token: $VAULT_TOKEN" "$VAULT_ADDR/v1/sys/ha-status" | jq .NOTE: Be sure that the VAULT_TOKEN and VAULT_ADDR environment variables are set.
Or, you can hardcode them with a minimal privilege user account.
When run, you will get a JSON list of nodes and their status.
Vault Wrapping Tokens
When creating access tokens for HashiCorp Vault, you always want to prevent them from falling into the wrong hands, or showing up as clear-text in command line history, logs and audit trains.
To reduce the chance of tokens being passed in the clear, you can create a new user token in a response-wrapped state.
This allows the token to be given to a user, over chat, or text, without much concern.
The response-wrapped token has a very short lifetime, and can only be redeemed once.
Here's how to create a response-wrapped token:
vault token create -role=admin -orphan -wrap-ttl=5m -format=jsonThe command response will include the wrapping token, like this:
{
"request_id": "",
"lease_id": "",
"lease_duration": 0,
"renewable": false,
"data": null,
"warnings": null,
"wrap_info": {
"token": "hvs.tH5Wn8bD3eJxvMq1iP7F",
"accessor": "PNowpcQP0jJ9Jpz06o2oueYW",
"ttl": 300,
"creation_time": "2025-09-04T02:26:49.859843035Z",
"creation_path": "auth/token/create/admin",
"wrapped_accessor": "5KlfcQwbo05Ej37YOqBJnfHM"
}
}The wrap_info/token property is what you give to the user.
The user can then, redeem their access token by submitting the wrapping token, like this:
vault unwrap hvs.tH5Wn8bD3eJxvMq1iP7FVault will respond with the real token, and revoke further usage of the wrapping token.
NOTE: The wrapping token has an expiry. If exceeded, the user will need to request another.
Wrapped Token Benefits
Using wrapped tokens, prevents exposure in shell history or logs.
Delivery is safer, as you can drop the short-lived wrapper into a config management pipeline or paste in a chat.
The Vault audit log records that the wrapping token was created and who unwrapped it.
Vault Token Administration
Here are notes on access token administration.
Be sure that you've already setup an administrative policy in your vault cluster.
See this page for how: Vault Administrative Setup
Creating Admin Tokens
Once the admin policy exists, you can create administrative access tokens.
To do so, log into the leader note, with this:
# Use the root token...
vault login <root_token>You can create a simple admin token that lasts 24 hours:
# Create an admin token that lasts 24 hours...
vault token create -policy=admin -ttl=24hThe above will issue short-lived admin tokens, so that the vault is more protected.
These can be minted by an automated script, that issues token as needed.
Traditional Admin
A more traditional administrative token needs to be longer-lived than a 24 hour token.
So, we will create a token role for admins.
This will create a periodic, orphan role so that admin tokens can be renewed forever (until revoked), and aren't tied to a parent token:
NOTE: You will need to be logged into the vault leader (vault login <token>).
vault write auth/token/roles/admin \
allowed_policies="admin,default" \
orphan=true \
renewable=true \
period=720hThe above token role, can create tokens that last 30 days, and can be renewed, without changing the token.
With the above admin role, you can create admin tokens of a more traditional lifetime, with this:
vault token create -role=admin -orphan -format=jsonThe above command will create admin tokens that can be given to your ops group, for longer-lived administrative access.
NOTE: Be sure to save the client_token field in a secure place, such as a private password manager.
Token Renewal
Before a token expires, you can renew it with this command:
VAULT_TOKEN=<admin_token> vault token renewNOTE: The above can be automated, if the admin token is used by scripts or services.
(Automate with a small systemd timer/cron on a secure host or in your gateway.)
Creating Other Admins
You can use an admin token to create other admins, like this:
# Another admin token (same role)
vault login <admin_token>
vault token create -role=admin -orphan -format=jsonCreating Tokens for other Groups
Once you have other roles established as policies, you can create tokens for users, in those roles/policies, like this:
vault token create -policy=kv-readers -ttl=8hResponse-Wrapped Tokens
See this page for Response Wrapped Tokens: Vault Wrapping Token
Vault Single-Node Unseal
Here are instructions on how to unseal a single-node vault cluster.
Vault CLI Comms
For the vault command to communicate with the running service, we must set an env variable for it:
export VAULT_ADDR=https://your_domain:8200NOTE: You may have to set the above to http, if you haven’t given vault a valid ssl cert, yet.
Initialize the Vault
In order for the vault service to manage secrets, you must initialize its store.
To do this, you need to run the following:
vault operator init -key-shares=3 -key-threshold=2You can change the key shares and threshold based on your risk profile.
The vault CLI will respond with something like this:
Unseal Key 1: eZcJeydRrqeSMZ1zTN+VVll9TFT2KvJy7VlnxUgtvuz5
Unseal Key 2: ntmqCKq8rgNnKT1YSLCjVmCCZBAA3NwUeqxIyRpYD4Wm
Unseal Key 3: 3FK1+Hsorh4p8/L9mki3VskaEU2eQhLqGOI/pJkTHMbx
Initial Root Token: s.hY0ieybfDqCadz7JpL88uO3xSave these values in a secure location, as this is the only time you will receive them.
Now, you can run the vault status command, and see it has changed to Initialized=true.
Run this to get vault status:
vault status
Now, you need to unseal the vault, so it can be used.
Notice the vault status showed an unseal progress of 0/2.
This means, that at least two more unseal tokens must be submitted for it to be available for access.
Enter enough tokens to unlock your vault with this command, and paste in one of the tokens when prompted:
vault operator unsealOnce the unseal threshold has been met, the Sealed state will become ‘false’.

Your vault is available for access.
Vault Administrative Setup
Once you have a vault instance or cluster unsealed, you can setup auditing, and administrative policies, with these instructions.
See this page for how to setup a vault instance or cluster: Hashicorp Vault Setup
Audit Logging
Create a folder for capturing audit logs on each node (leader and followers):
sudo mkdir -p /var/log/vault
sudo chown vault:vault /var/log/vault
sudo chmod 0750 /var/log/vaultTell the leader node to store audit logs in the created folder:
vault audit enable file file_path=/var/log/vault/audit.logAdmin Policy
WARNING: The initial root token has broad privilege, and bypasses all policy checks, being meant for bootstrapping and emergencies.
You need to create an actual admin policy, so that proper security and auditing can occur.
Here, we will setup an admin policy, so that we can stop using the initial root token.
Doing so, gives us many benefits:
- Users created under the admin policy share the same privileges as the root user.
- We can issue short-lived admin tokens.
- We can audit all admin actions (audit logs will show policy=admin and the user, not just root).
- We can later, reduced privileges, instead of everyone having anonymous root access.
NOTE: We only have to create the admin policy once.
We can do it on the current leader.
Create a file called: admin.hcl:
sudo nano /etc/vault.d/admin.hclNOTE: It doesn't matter where we generate the admin.hcl file, as the policy write command will pull it into the vault.
But for simplicity, we will create it on the leader node, so we have easy tracking of what setup steps have been done.
Give the admin policy file, this content:
# --- token management (mint/lookup/renew/revoke/roles) ---
path "auth/token/create" { capabilities = ["update"] }
path "auth/token/create/*" { capabilities = ["update"] }
path "auth/token/lookup" { capabilities = ["read", "update"] }
path "auth/token/lookup-self" { capabilities = ["read"] }
path "auth/token/renew" { capabilities = ["update"] }
path "auth/token/renew-self" { capabilities = ["update"] }
path "auth/token/revoke" { capabilities = ["update"] }
path "auth/token/revoke-self" { capabilities = ["update"] }
path "auth/token/roles" { capabilities = ["list", "read"] }
path "auth/token/roles/*" { capabilities = ["create","read","update","delete","list"] }
# --- policies (so admins can maintain policies without root) ---
path "sys/policies/acl" { capabilities = ["list"] }
path "sys/policies/acl/*" { capabilities = ["create","read","update","delete","list"] }
# --- core admin knobs (optional but typical) ---
path "sys/audit" { capabilities = ["read"] }
path "sys/audit/*" { capabilities = ["create","read","update","delete","sudo"] }
path "sys/auth" { capabilities = ["read"] }
path "sys/auth/*" { capabilities = ["create","read","update","delete","sudo"] }
path "sys/mounts" { capabilities = ["read"] }
path "sys/mounts/*" { capabilities = ["create","read","update","delete","sudo"] }
# --- give admin wide access to secrets during bootstrap (tighten later) ---
path "*" { capabilities = ["create","read","update","delete","list","sudo"] }
Once created, save and close.
Here are some notes about the above policy:
- The top block allows an admin to perform all token management actions.
- The middle block allows admins to manipulate policies.
- The third block allows admins to perform other root actions.
- The bottom block (path "*") allows access to all paths in the vault (like root).
- capabilities = create/read/update/delete/list - These allow full browsing and editing.
- capabilities = sudo - allows doing system-level actions like:
- enabling audit devices,
- enabling auth methods,
- mounting new secrets engines,
- etc.
So, the above admin policy is just like root, but allows us to have named users as admins.
Enable the admin policy with this:
vault policy write admin admin.hclOnce written, the policy is stored in RAFT, and replicated to all nodes.
We can confirm the policy with this:
vault policy read adminNow, any tokens with the admin policy, will function with the above administrative privileges.
Creating Admin Tokens
Once the admin policy exists, you can create administrative access tokens.
See this page for how to create admin and user tokens: Vault Token Administration
To protect tokens in transit, see this page for Response-Wrapped Tokens: Vault Wrapping Token
Vault as Root CA
Here are steps you can follow to setup a vault instance as a Root CA.
NOTE: This page assumes that you have created a single-node vault instance to serve as your Root CA.
See this page for how to do that: Hashicorp Vault Setup
NOTE: These steps will create a root CA with one signing key.
You should create an intermediate CA, as well, that will perform the actual signing of certs.
This will allow you to offline this root CA, once the intermediate CA is up.
Starting the PKI Engine
NOTE: From here down, is steps for creating a Root CA.
If you are setting up an Intermediate CA, skip to ‘Configure Intermediate CA’.
For Vault to serve as a root CA, you have to add the PKI secrets engine.
To do this, enable the pki secrets engine:

For a Root CA, set the Max lease time to as long as possible, as the root CA will be offlined after generation.
Once initialized, it will look like this:

For a root CA, click Configure PKI to begin setup.

Choose the Generate Root option.
Set Type to Internal.
Set your Common name. Usually, this is a domain with a private TLD suffix.
Set the issuer name.
Set a TTL that is maxed out: 87600 hours.

Scroll down and fill in the issuer URLs, matching the origin for your root CA host:

When finished, click Done, to generate the root CA key and certificate.
You will see a page like this:

Copy out the root CA certificate, and save it to a file, named: ogsofttech.lan_ca.crt
Install it on all machines of the local network, so they will recognized the signed SSL certs of hosts.
Current Intranet Root CA Certificate
The current root CA for the local intranet can be found in the secure share at this path:
\SecureShare git\oga\ogsofttech.lan\rootCANOTE: This certificate should be installed on any host that will consume services signed by the root ca.
See this page for how to install it on an Ubuntu host: How to Add Root CAs to Ubuntu
Root CA Rotation
To make things easier, when it comes time to rotate your root CA key, add a role, now.
Click PKI.
Click Roles.
Click Create Role.
Give the new role a name that you will recognize as the root CA rotation role: CA_rotation_role
Leave the rest of the fields empty, and click Create.
Now, you have a working root CA key/cert for your network.
We will use it to sign the certificate of an Intermediate CA, that will do all the actual work.
And, we will offline the root CA.
Vault as Intermediate CA
Here are instructions for setting up a vault instance as an Intermediate CA.
NOTE: This page assumes that you have created a single-node vault instance to serve as your Root CA.
See this page for how to do that: Hashicorp Vault Setup
NOTE: Always create the Intermediate CA as a separate instance from your Root CA.
This allows you to offline the Root CA, to uphold the integrity of your root CA certificate.
To properly sign certificates, you will want to generate an Intermediate CA that will do all the actual issuing.
And, you will offline the root CA, after the Intermediate CA is usable.
See this page if you need to setup a vault instance as a Root CA: Vault as Root CA
Configure Intermediate CA
For Vault to serve as an Intermediate CA, you have to add the PKI secrets engine.
To do this, enable the pki secrets engine:

For an Intermediate CA, set the Max lease time to 43800 hours, and enable the engine.
Once initialized, it will look like this:

For an Intermediate CA, click Configure PKI to begin setup.

Choose the Generate intermediate CSR option, and fill in the blanks.
Set Type to Internal.
Set your Common name to your domain with a suffix that it’s an Intermediate CA, like this:
ogsofttech.lan Int CA 01Click Generate, to make the CSR.

Paste the CSR onto the clipboard, and save it as a file: pki_intermediate.csr.
Open the web UI for your root CA, and navigate to Secrets/PKI/Issuers, and click Sign Intermediate.

Paste the CSR content into the CSR field.
Set the domain name as the common name: ogsofttech.lan
Select pem_bundle from the Format dropdown:

Click Sign, to sign the CSR from the Intermediate CA.
Once signed, you’ll see this:

It contains the signed certificate for the Intermediate CA, the cert of the issuing CA, and the CA chain cert.
NOTE: Save all three in a known place, as this is the only time these will be available.
Download the certificate as: ogsofttech.lan-intca01.cert.pem
Open the UI for the Intermediate CA, and navigate to the Import a CA:
NOTE: You get to this, by clicking on the Issuers tab, and clicking Import.

Upload the certificate that you saved to: ogsofttech.lan-intca01.cert.pem
Click Import Issuer.
The Issuers tab will show two entries, one for the root, and one for the Int CA:

Issuing Role
Before you can issue certificates to hosts and such, you need to create an issuer role.
To do this, we need to identify the issuer’s Guid.
We can get this by clicking the terminal button, and running this:
read -field=default pki/config/issuersNote the Guid that was returned.

Now, go to Secrets/PKI/Roles, and create a new role.
Give the role a name in this format: ogsofttech-dot-lan
Unclick the Use Default Issuer, and select the Guid that matches what we found above.
Set the TTL to 43800 hours.

At the bottom of the form…
In the Allowed Domains field, add our domain: ogsofttech.lan.
Check the “Allow Subdomains” checkbox.

And, click Create, to make our issuing role.

Now, you have a role that can create and sign certificates.
If not already done, you can offline your root CA, as it needs to be kept safe, and only needed to create a new Intermediate CA.
See this page for how to generate certificates: Generate Certificates with Hashicorp Vault
Handling Vault Node Restart
Each time a Vault node restarts, you will have to unseal it, so that it can participate in the cluster.
Here are steps to do that.
Switch to root on the node with:
sudo -iSet exports for the node:
NOTE: Make sure that the vault_addr variable is pointing to the local node being unsealed, here.
export VAULT_ADDR="https://vault0205.ogsofttech.lan:8200";
export VAULT_CACERT="/opt/vault/tls/ca.crt"NOTE: Use the fully-qualified hostname above, as it appears in the node's cert.
Now, unseal each node, by calling this command once each, for three of the five unseal keys:
NOTE: It will prompt you for the unseal key, each time you run it.
vault operator unsealOnce unsealed, you can verify cluster membership with this:
vault operator raft list-peersWhen run, you will see something like this:
If healthy, you will see one node as leader, and the others as voting followers.
NOTE: Make sure each node you configured, is present.
Local GPS NTP Time Server
Accessible at: 192.168.1.12
Project files stored here: “\\192.168.1.11\zfs_mirror3\Projects\Dormant\NTP Raspberry Pi Server”
Build Data
Runs Raspian on a Raspberry PI
Static IP Address was set in: /etc/dhcpcd.conf

Installed ntpstat with this:
sudo apt install ntpstatUsage
Here's some descriptions of the different tools for administrating NTP.
NTPSTAT
Use ntpstat to check if the NTP service is in sync:
ntpstatIt will return something like this:
synchronised to NTP server (149.20.54.20) at stratum 3
time correct to within 42 ms
polling server every 1024 sFor our local NTP server (with GPS receiver), we see this:
pi@raspberrypi:~ $ ntpstat
synchronised to UHF radio at stratum 1
time correct to within 2 ms
polling server every 64 sThe ntpstat utility also returns an exit status, as a quick tell of synchronization.
Use this, following a call to ntpstat:
echo $?The return value will mean one of these:
- If exit status 0 – Clock is synchronised.
- exit status 1 – Clock is not synchronised.
- exit status 2 – If clock state is indeterminant, for example if ntpd is not contactable.
NTPQ
Use ntpq -p to see the following:

PPTSTEST
Use this to test the pps signal:
sudo ppstest /dev/pps0
The output should spit out a new line every second that looks something like this (your output will be a bit farther from x.000000 since it isn’t yet using the GPS PPS):

GPSMON
Use the gps monitor function to check the realtime availability of GPS and satelite count and position, with this:
gpsmonThis will present the following:

CGPS
Or, using the following for a simpler gps status check:
cgpsThis will create the following output:

References
How to troubleshoot an NTP server: https://support.ntp.org/Support/TroubleshootingNTP
The following link is probably not what was used to build the house time server. But, this is an interesting reference on how to build a Raspberry pi GPS time server:
Building a Raspberry Pi Stratum 1 NTP Server
Here’s a good reference on how to tune and configure the NTP setup on a RaspBerry PI: Building a Raspberry-Pi Stratum-1 NTP Server
Another reference: Millisecond accurate Chrony NTP with a USB GPS for $12 USD - Austin's Nerdy Things
Good reference on the Shared Memory Driver, and how the 127.127.28.x address is used: http://doc.ntp.org/archives/drivers/driver28/
Ubuntu: Use Private NTP Server
NOTE: If you are configuring Debian, see this page: Debian 13: Use Private NTP Server
Status
For hosts in isolated VLANS, we provide access to a local NTP server, via firewall rules.
The local NTP server is at: 192.168.1.12.
See this page for the local NTP server: Local GPS NTP Time Server
The main router includes a floating firewall rule that forwards UDP port 123 requests to the local NTP server.
It includes most of the VLANS. But can be updated to include other VLANs.
Configuration
Here are steps to configure an isolated Ubuntu VM to use the local NTP server.
Install NTP on the VM with:
sudo apt update
sudo apt install ntpEdit the ntp config file to listen to the local NTP server.
Open it with:
sudo nano /etc/ntpsec/ntp.confNOTE: NTP is handled by ntpsec in recent Ubuntu versions.
And, its configuration is stored in: /etc/ntpsec.
Locate the NTP pool entries, and comment out each one.
Then, add the local NTP server entry line:
server 192.168.1.12 iburstThe section should look like this:
# Use servers from the NTP Pool Project. Approved by Ubuntu Technical Board
# on 2011-02-08 (LP: #104525). See https://www.pool.ntp.org/join.html for
# more information.
server 192.168.1.12 iburst
#pool 0.ubuntu.pool.ntp.org iburst
#pool 1.ubuntu.pool.ntp.org iburst
#pool 2.ubuntu.pool.ntp.org iburst
#pool 3.ubuntu.pool.ntp.org iburst
# Use Ubuntu's ntp server as a fallback.
#server ntp.ubuntu.comRestart the ntpsec service with:
sudo systemctl restart ntpsecYou can check the service status with this:
sudo systemctl status ntpsecAnd, you can see the NTP status, with this:
ntpq -pDebian 13: Use Private NTP Server
Status
For hosts in isolated VLANS, we provide access to a local NTP server, via firewall rules.
The local NTP server is at: 192.168.1.12.
See this page for the local NTP server: Local GPS NTP Time Server
The main router includes a floating firewall rule that forwards UDP port 123 requests to the local NTP server.
It includes most of the VLANS. But can be updated to include other VLANs.
Configuration
Here are steps to configure an isolated Debian 13 VM to use the local NTP server.
NOTE: Debian 13 uses a service called, timesyncd.
Timesyncd is not as precise as true NTP.
But, it is good enough.
Timesyncd is installed by default.
We will use it.
You can verify timesyncd is running with this:
timedatectl show-timesync --all
Edit the config file to listen to the local NTP server.
Open it with:
sudo nano /etc/systemd/timesyncd.confIt will be mostly commented out, by default.
This is because the service is using config defaults, or compiled defaults.
Update it to point to the local ntp server, like this:
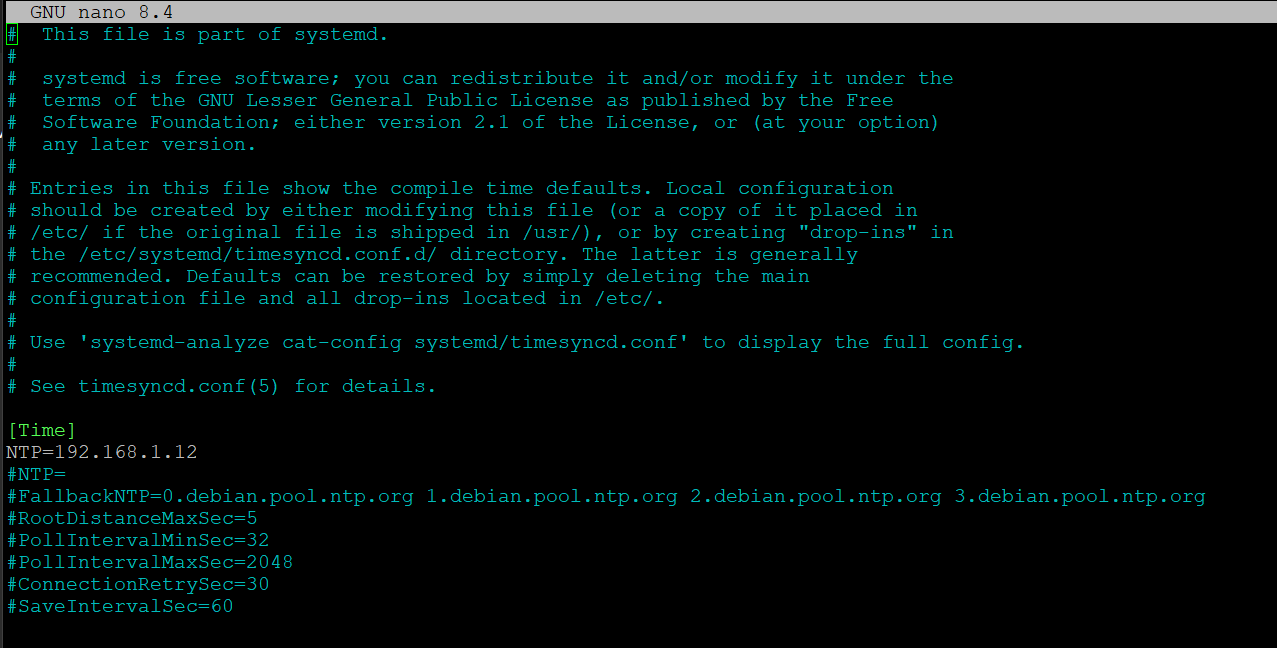
Close and save the config.
Once saved, restart the timesyncd service with:
sudo systemctl restart systemd-timesyncdYou can check the service status with this:
timedatectl show-timesync --allNGINX: Deploy SSL Certificate
Here's quick instructions for deploying an SSL key/cert pair to an NGINX instance.
NOTE: These steps are assumed to be executed as root.
Elevate to Root
Elevate to root with this:
sudo -iCreate SSL Folder
By default, a fresh NGINX install doesn't yet contain a folder for certificates.
Create the ssl folder, with this:
mkdir /etc/nginx/sslSet Folder Permissions
We need to constrain access to the private SSL keys, with the following:
NOTE: NGINX runs as root, so this is fine.
chmod 0600 -R /etc/nginx/ssl
chown root:root -R /etc/nginx/sslCopy SSL Cert
Create files in the SSL folder for the public crt and private key files, like this:

Paste the content of your private key and public cert into the files.
Set File Permissions
Once added, constrain access, with the following:
# All certs readable
chmod 644 *.crt
# All keys locked down
chmod 600 *.key
# Make sure ownership is correct
chown root:root *.crt *.keyRestart NGINX
Once certs are pasted in, you need to restart NGINX for the new certs to take effect, with this:
nginx -s reloadWindows File Explorer - Spawn New Window
Recent versions of Windows OS changed the behavior of how the Start Menu spawns applications.
Specifically: If an app is already open, clicking its Start Menu entry will pull the open app to foreground, instead of opening a new window.
For things like File Explorer, this can be annoying, if you intended to open a new window.
And, this is especially annoying when working in RDP sessions, where you cannot use the Win-E to force a new explorer window.
The Fix for File Explorer
To fix this for File Explorer, requires a registry update.
For Current User
To fix this behavior for the current user, you can perform a registry key update, by downloading and clicking on the following file:
FileExplorer_NewWindow- CurrentUser.reg
Your user will get the updated functionality, once you log out and back in.
For Default User
To make the fix for any new users, you can perform a registry key update, by downloading and clicking on the following file:
FileExplorer_NewWindow- Default.reg
Any new users that logs into the machine will get the updated functionality.
NOTE: This doesn't affect existing users.
For All Users
To fix the issue for all users (current and new), you can run the following powershell.
We've created a wrapper cmd file that opens and runs the powershell for you, to make it easier.
To run it, download both of these files:
Fix-FileExplorer_SeparateWindow.cmd
Set-ExplorerSeparateProcess-AllUsers.ps1
Once downloaded, open a command line window with Administrative privileges.
It will open a powershell window, and update registry keys for the default and all existing users.
NOTE: Any existing users will need to log out and back in, to get the updated functionality.
Royal TS: Using SSH Keys
This is a workaround for using SSH keys in Royal TS.
Background
Royal TS does not provide an easy means to specify the username for an SSH key connection.
So, when connecting to a linux host with an SSH key, the host will prompt you for the username.
This is because, Linux does not have a direct association of a presented key to a user.
And, an SSH key does not contain a username.
So, the username must be presented by the connecting client.
The problem is:
Royal TS seems like it allows you to specify a private key and a username.
And, the documentation says that you can specify it as such.
But, if the username field is populated, Royal TS will attempt to connection with a password, and ignore the SSH key.
To solve this, you must do the following two things:
Set The Username
You have to specify the Computer name in this format:
username@hostnameLike this:
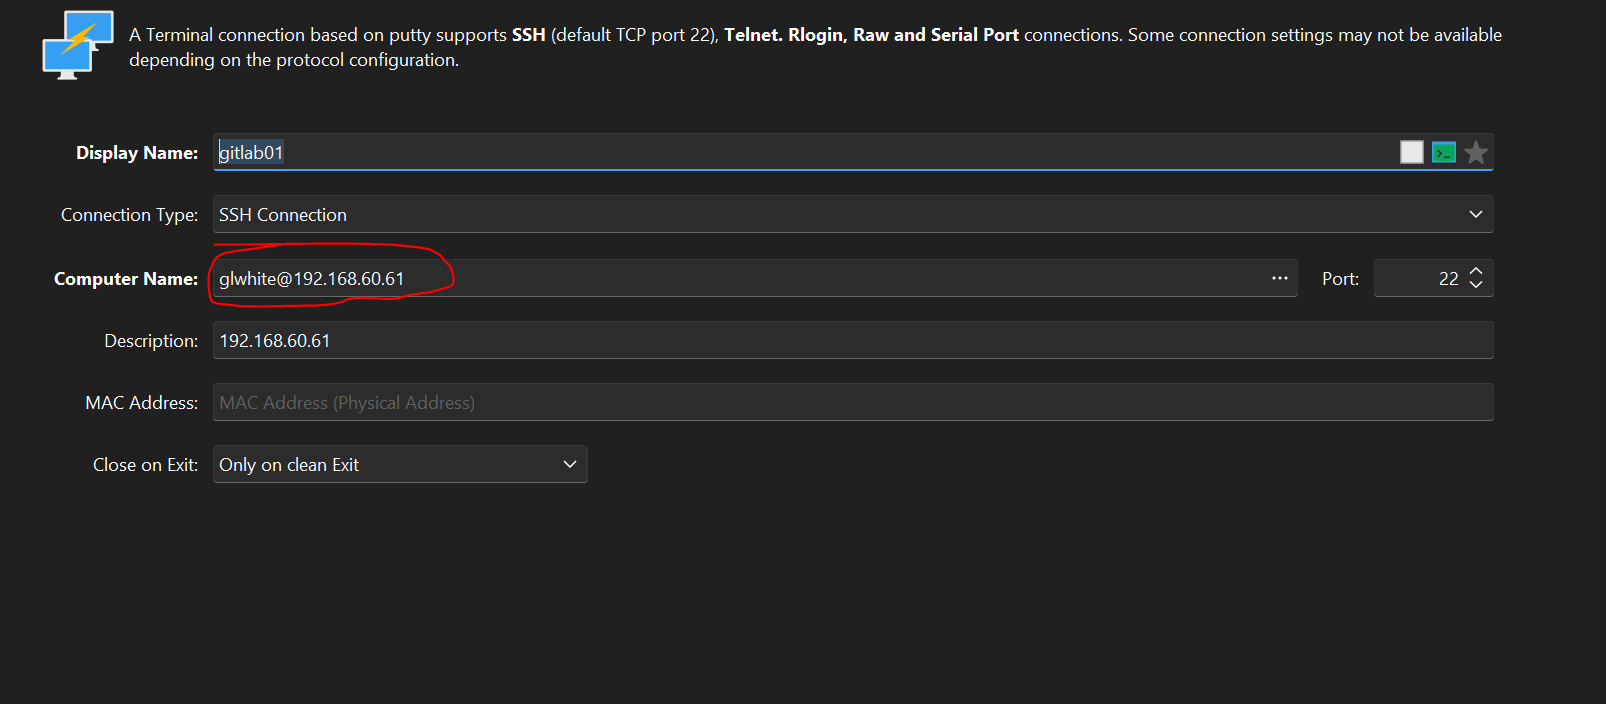
Connection Window Title Changes
But once you do that, Royal TS has another problem.
It will create a connection using your SSH key and the specified username.
BUT. The spawned connection becomes an external Putty window, that Royal TS can't embed.
What's happening is, the spawned Putty window (for your connection) gets a title that is different than what Royal TS expects.
And, it won't embed the window, like other connections.
To fix this secondary problem, you must open the Advanced tab of the connection properties, and find the Features tab.
Then, check the box for: Disable Remote-Controlled Window Title Change.
Like this:
Once you check that box, the spawned Putty connection window will properly embed into the Royal TS UI.
Alternate Method
An alternate method to this, is to migrate the connection to use the built-in SSH client, instead of Putty.
You can do this, by opening the connection properties, and finding the Active Plugin page.
Then, changing the Active Plugin to: Terminal (based on Rebex).
You will have to close and reopen the connection, after.
As well. It may give you an error, if you have included the username in the connection hostname field.
Debian VM Template
Purpose
These instructions are for standing up a Debian 13.4 VM to be used as a template in an isolated manufacturing network.
It will be prepopulated with packages we anticipate needing:
- NGINX
- SubVersion
- net-tools
- Docker
- nano
- python
- sqlite
NOTE: This process creates a template VM that is scrubbed of any machine-ID, host SSH keys, etc.
These values are created each time the template is started. And, must be reset, for the VM to be a viable template, again.
So. If you do make changes to the template VM after creation, you will have to rerun the cleanup and template reset scripts.
To do so, follow the steps near bottom of this page, starting in the Cleanup section.
Setup
Update Host
apt updateInstall sudo:
apt install sudoAdd a user:
usermod -aG sudo yourusernameAdd user to sudoers:
As root, open /etc/sudoers.
Add this entry to the bottom:
yourusername ALL=(ALL:ALL) ALLPackage Install
Update the base image:
sudo apt update
sudo apt upgrade -yInstall core admin and networking tools:
sudo apt install -y \
openssh-server sudo ca-certificates curl wget gnupg lsb-release \
nano vim less bash-completion locales tzdata \
iproute2 net-tools dnsutils iputils-ping traceroute tcpdump nmap netcat-openbsd \
htop iotop lsof psmisc strace procps sysstat \
jq tree file unzip zip tar rsync dos2unix \
apache2-utils openssl \
chrony \
git make build-essential python3 python3-pip python3-venv \
nfs-common cifs-utils \
parted gdisk smartmontools acl \
tmux screen ncdu \
sqlite3Install network tools:
sudo apt install -y mtr-tiny socatInstall certificate debugging tools:
sudo apt install -y ssl-certInstall http API debugging tools:
sudo apt install -y httpieInstall process debugging tools:
sudo apt install -y dstatInstall NGINX
sudo apt install -y nginx
sudo systemctl enable nginx
sudo systemctl start nginxInstall Docker
First remove conflicting packages:
sudo apt remove -y docker.io docker-doc docker-compose podman-docker containerd runc || trueAdd Docker repo and key:
sudo install -m 0755 -d /etc/apt/keyrings
curl -fsSL https://download.docker.com/linux/debian/gpg | \
sudo gpg --dearmor -o /etc/apt/keyrings/docker.gpg
sudo chmod a+r /etc/apt/keyrings/docker.gpg
echo \
"deb [arch=$(dpkg --print-architecture) signed-by=/etc/apt/keyrings/docker.gpg] \
https://download.docker.com/linux/debian \
$(. /etc/os-release && echo $VERSION_CODENAME) stable" | \
sudo tee /etc/apt/sources.list.d/docker.list > /dev/nullInstall Docker:
sudo apt update
sudo apt install -y \
docker-ce docker-ce-cli containerd.io \
docker-buildx-plugin docker-compose-pluginEnable Docker:
sudo systemctl enable docker
sudo systemctl start dockerAllow user to run Docker without sudo:
sudo usermod -aG docker $USERAdd offline package management for Docker:
sudo apt install -y dpkg-devSubVersion Client
Installing the SVN client is straightforward.
NOTE: It was actually installed as offline packages, after the VM was moved to the target network.
The instructions, here, are to describe how it would have been installed, before the move.
See this page for details of how it was installed as an offline package: Debian: Offline Package Installation
To install the subversion client, use this:
sudo apt update
sudo apt install subversionOnce installed, you can confirm it with this:
svn --versionIf successful it will display the help file with client version data.
.NET Runtime
This requires a couple steps.
Do this, first:
wget https://packages.microsoft.com/config/debian/13/packages-microsoft-prod.deb -O packages-microsoft-prod.deb
sudo dpkg -i packages-microsoft-prod.deb
rm packages-microsoft-prod.deb
sudo apt updateInstall the runtime:
sudo apt install -y dotnet-runtime-8.0Install the aspnet runtime:
sudo apt install -y aspnetcore-runtime-8.0Install the .NET sdk:
sudo apt install -y dotnet-sdk-8.0Verify the installed version:
dotnet --infoHave it list the runtimes, as well:
dotnet --list-runtimesDo a quick hello world, to test the runtime.
mkdir ./dotnet-test && cd ./dotnet-test
dotnet new console
dotnet runValidation Checks
systemctl status nginx
systemctl status docker
docker run hello-worldVM Templating Setup
Follow the instructions on this page, to modify the VM for templating:
Doing so, allows the VM to deploy, without any chance of colliding machine-Id, host SSH keys, and such.
Cleanup
Once the above is done, and you've followed the VM templating setup steps, you can do any final cleanup, with this:
NOTE: This step is included as a means to reduce the VM size for copying it across networks.
You may not have to accomplish this each time you update the template VM.
You can probably skip this step, if just updating the template VM, where it sits.
sudo apt autoremove --purge -y
sudo apt clean
sudo rm -rf /var/lib/apt/lists/*
sudo journalctl --vacuum-time=1d
sudo rm -rf /tmp/* /var/tmp/*Template Reset Script
Once the VM image size is reduced, you are ready to scrub it as a template.
Previous steps installed a template reset script, here:
/etc/template/reset.shRun it each time you shutdown the template VM, to reset needed info, for cloning.
NOTE: This is what you will execute, each time you had to start up the template VM, to make modifications to it.
Follow this command with a PowerOff command. See PowerOff section.
It can be executed with this:
sudo /etc/template/reset.shThe script contents are here: Template VM Reset Script
Zero Out Free Space
To make the VM smaller, this needs to be done.
NOTE: This step is included as a means to reduce the VM size for copying it across networks.
You may not have to accomplish this each time you update the template VM.
You can probably skip this step, if just updating the template VM, where it sits.
sudo dd if=/dev/zero of=/EMPTY bs=1M status=progress || true
sudo rm /EMPTY
syncPower Off
Instead of a shutdown, you should execute a power off with this:
sudo poweroffVM Export
The easiest way to move the VM to another datacenter, is by turning it into an OVA.
Follow the instructions on this page, to convert it to an OVA: VMWare Export OVA
Further Packages
You will inevitably need to install packages, after the VM has been deployed inside the isolated network.
See this page for details of how we installed the SubVersion client as an offline package: Debian: Offline Package Installation
NOTE: Each time you make changes to the template VM, that requires starting it up, which creates fresh machine-id host SSH keys, etc.
So, you have to clear those out, before the VM is a viable template, again.
Start in the Cleanup section, above, and follow steps, to make the VM a viable template, again.
VMWare Export OVA
Here are instructions for how to export an OVA from a VSphere host.
Locate your credentials for the ESXi host.
Identify the inventory name of the VM that you want to export.
Download the VMWare-ovftool.
A copy is here: "\\192.168.1.211\Programs\VMWare\OVF Tool\VMware-ovftool-4.4.3-18663434-win.x86_64"
Open a command line window, and use the following:
ovftool.exe --noSSLVerify vi://<esxhostname>/<vmname> "D:\<vmname>.ova"Replace the <esxhostname> with the name or IP address of your ESXi host.
Replace the <vmname> with the inventory name of the vm to be exported as OVA.
It will ask you for login credentials, and execute the export to the target folder.

Once done, the OVA will be created in the target folder you specified.
It can be moved to the new environment and imported.
Debian: Offline Package Installation
If you need to add services or packages to a VM that has no internet access to pull down packages, here's an offline method.
NOTE: These steps were performed and vetted when updating a template that was already deployed inside an isolated network (without internet access). See this page: Debian VM Template
Needed Elements
For this method, we need a few pieces to get the job done.
- Sudo access on the target VM (the one without internet access).
- Access to a surrogate VM that has internet visibility
NOTE: In order to correctly retrieve packages that an offline VM requires, the surrogate VM needs to be the same Distro and very close to the same OS version as the target VM.
This ensures that you fetch the correct secondary dependencies (of the target package) that are needed (by the same Distro/version).
- The ability to ferry a set of package files across the network boundary to the isolated, target VM.
Process Steps
For demonstrations purposes, we will attempt to perform an offline install of SubVersion on a Debian 13.4 VM, using a surrogate Debian 13.5 VM with internet access.
Surrogate VM
Log into the surrogate VM.
From an SSH session, create a download folder where you will download packages, and navigate to it.
mkdir -p ~/Desktop/temppkg/subversion
cd ~/Desktop/temppkg/subversionOnce inside the download folder, we will download the desired package and secondary dependencies.\
Apt-RDepends
NOTE: Since any package that you want to install, has dependencies of its own, we will be downloading these secondary dependencies, as well.
NOTE: Downloading dependency sets, requires apt-rdepends, which is not part of a normal OS build.
This next step will install it.
If you skip it, you will get an error message, like this:
Command 'apt-rdepends' not found, but can be installed with: sudo apt install apt-rdepends
Before downloading the offline dependency set, you will need to ensure that apt-rdepends is installed on the surrogate VM.
Install apt-rdepends, with this:
sudo apt update
sudo apt install -y apt-rdependsWith apt-rdepends installed, we can safely download the target package and its secondary dependencies.
Package Download
The following command will download the subversion package and all of its dependencies needed for a Debian 13.4 OS.
apt-get download $(apt-rdepends subversion | grep -v "^ ")NOTE: You can change the package name, in the above command, to get the dependency set for any package.
Here's what the downloaded dependency set (for subversion) looks like, today:

Target VM
Next, you need to move the dependency set over to the target VM, by whatever means you have.
For me, I copied them out of the surrogate, via SCP.
Then, they were ferried across the network boundary as committed changes to an SVN repository (visible on both sides).
Next, log into the target VM, and create a download folder, where you will push the dependency set.
Then, another SCP push to a temporary folder on the target VM.

Once the packages are on the target VM, open an SSH session to it, and navigate to the download folder.
Confirm the dependency set is there:
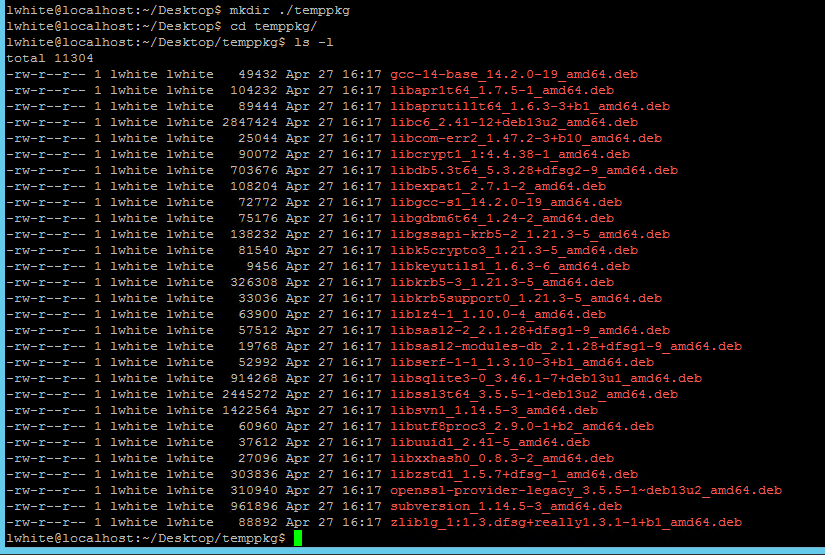
Warning: To prevent an apt elevation warning, read ahead on how to set permissions on the dependency folder, first.
From inside the folder with the dependencies, run this, to install all of them:
sudo apt install ./*.debThe installation ran for a good bit, and finished.
But, it did have, what appears to be, an error.

At the tail of the installation scroll, you may see an _apt notice that looks like an error. See above.
That final notice is not a failure.
It just means APT could not read the local .deb files as the low-privilege _apt user, so it read them as root instead.
That notice can be prevented by making the folder/files world-readable before installing.
Run this to make the downloaded packages and folder world-readable:
chmod -R a+rX ~/Desktop/temppkgValidation
Since we were installing SubVersion, we can confirm its installation, with this:
svn --version
Cleanup
Once installed, you can remove the packages and download folder, with this:
cd ~/Desktop
rm -rf ~/Desktop/temppkgDebian: Setup Static IP Address
NOTE: This works on Debian 13.4.
Here are notes and steps to assign a static IP address for a Debian host.
NOTE: If you are doing this for an Ubuntu host, see this page: Ubuntu: Setup Static IP Address
Net Tools (ipconfig)
Install net tools, so we can use commands like: ipconfig
sudo apt install net-tools
Static IP Address
Static addresses will be defined in a netplan file, configured below.
But, we need to do a few things, first:
- Get the Gateway IP
- Enable Adapters
Get the Gateway IP
You will need to know the gateway address that your host will use.
If the host is not on the desired network, you will need to determine the gateway IP, manually.
Or, you can join the host to the network, and do the following to determine it.
If the host is up, you can run this command to get the current default gateway assigned to it:
ip r | grep default
This command will return the default gateway address, like this:
Enable Adapters
If you added an adapter to the host, it may be in a down state.
To enable it, use this command to find the name:
sudo ip a | grep ^[[:digit:]]The above will give a list, like this:
And, you can enable it with this:
sudo ifconfig eth1 upNOTE: Be sure to use the name of the nic, from the previous call.
Network Interfaces
Open the interfaces file at: /etc/network/interfaces
sudo nano /etc/network/interfacesauto ens192
iface ens192 inet static
address 192.168.1.50/24
gateway 192.168.1.1
dns-nameservers 192.168.1.2 8.8.8.8Replace:
ens192with your actual interface name (found above)192.168.1.50with your desired static IP192.168.1.1with your gateway/router- Set the dns-nameservers you need with a space between each.
Save and close the interfaces file.
Restart Networking
With the config updated, we need to restart networking.
Do this:
sudo systemctl restart networkingNow, check the IP address with this:
sudo ifconfigYou'll see something like this:
Windows 10 Moving Recovery Partition
If you've tried to expand a disk, but the Recovery Volume is in the way, here's how to move it.
Cached from here: https://thedxt.ca/2023/06/moving-windows-recovery-partition-correctly/
Moving Windows Recovery Partition Correctly
Recently I needed to expand a disk on a Windows 10 VM and a Windows Server 2022 VM, but I couldn’t because the Recovery Partition was in the way.
When searching for a way to do this I discovered that the internet is full of posts about simply deleting the Windows Recovery Partition. I am not a fan of simply deleting a recovery tool. On numerous occasions the recovery partition has been instrumental in helping me to fix a system.
If you search for how to move the Windows Recovery Partition the internet has many posts of fake ways to do it or ways to do it with third-party tools like GParted. I have nothing against third-party tools or GParted and I don’t doubt some of those methods do work. The issue I have with those methods is that you have to take the system offline in order to do them or the tools cost money.
Now yes you could just delete the Windows Recovery partition, but before you do that make sure you understand that you will lose a bunch of recovery options. You can read more about the recovery options you’ll lose in an earlier post I made about the Windows Recovery Partition.
Here’s how to correctly move the Windows Recovery Partition on a Windows server or a normal Windows system.
This is what my partitions look like in Disk Management.

We will move the 1 GB recovery partition to the end of the disk allowing us to add the 50 GB of unallocated space to the C drive.
The Process
- Make sure you have a backup of the system you are going to edit the partitions on.
- Open Command Prompt as admin
Disabling The Windows Recovery Partition
- We need to disable the existing Windows Recovery Partition to do that run the command
reagentc /disable

The reagentc /disable command will disable the recovery partition and will move the recovery partition into a file named Winre.wim and will be located in C:\Windows\System32\Recovery (you have to enable showing hidden system files if you want to see it)

DiskPart
- Run the command
diskpartto launch DiskPart
- List the disks in your system. You can do this by using the command
list disk
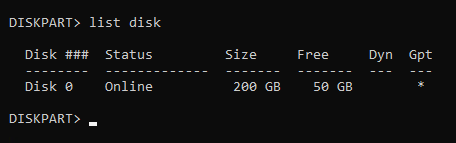
Pro tip from Matt in the comments, if there’s a * in the column for Gpt that means the disk is likely a GPT disk and if there isn’t a * in the Gpt column the disk is likely MBR. Make a note of this as it will be important further down.
- Select the disk you need to move the recovery partition on. You can do this by using the command
select diskand the disk number. In my setup disk 0 was the correct disk and the command I entered wasselect disk 0.
- List the partitions on that disk. You can do this by using the command
list partition
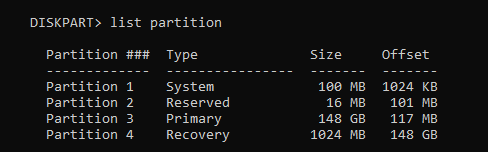
- Select the recovery partition. You can do this by using the command
select partitionand the partition number. In my setup partition 4 is my recovery partition and the command I entered wasselect partition 4

The recovery partition is a protected partition so we need to use a bit more force to delete it.
- Force the deletion of the recovery partition. You can do this by using the command
delete partition override

Disk Management
Now if you look in Disk Management you should no longer have the Recovery Partition and it should show up as unallocated.
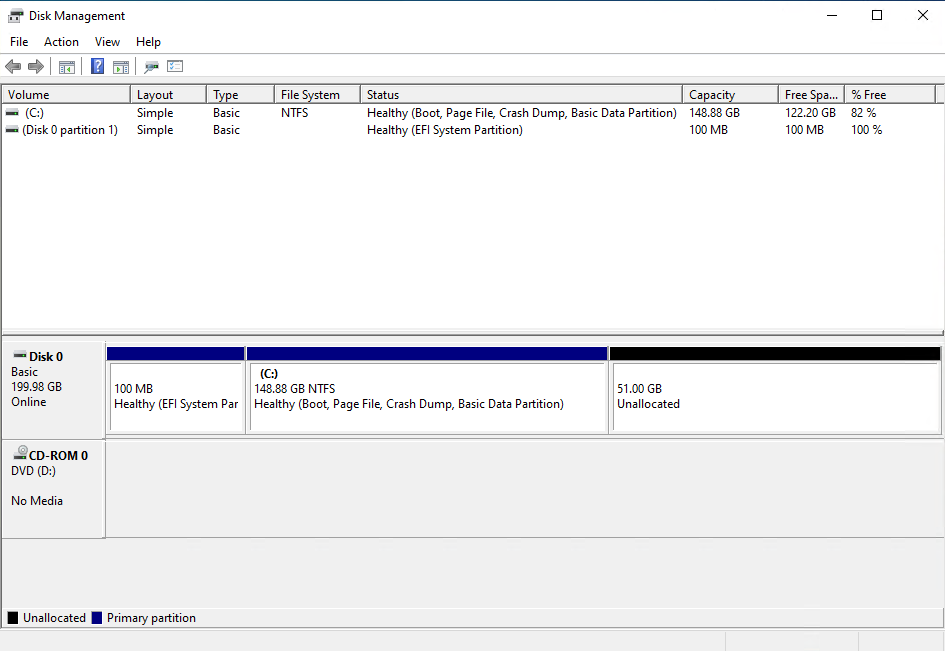
- Expand your disk and leave about 1024 MB off your resized size to leave room for the re-enabling the Recovery Partition.
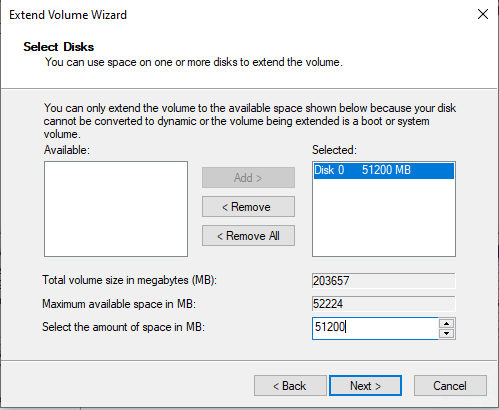
Disk Management should now look something like this.
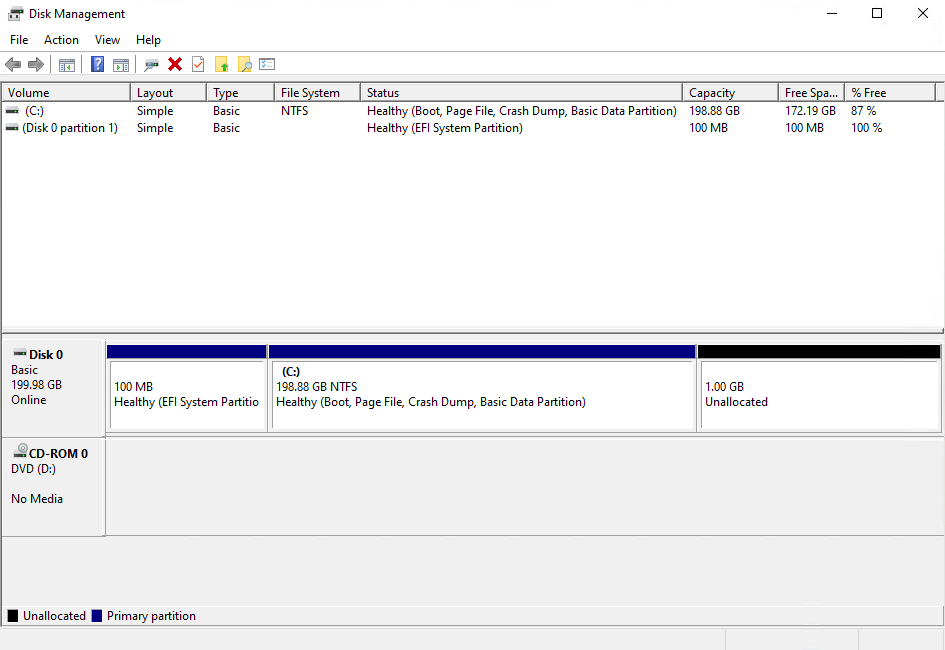
Once the disk is expanded we need to rebuild everything that is needed for Windows to know that the extra space that we left unallocated can be used to for the recovery partition.
- Create a New Simple Volume with the unallocated space.
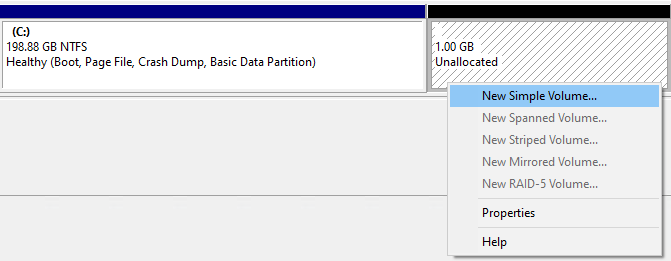
- Don’t give it a drive letter.
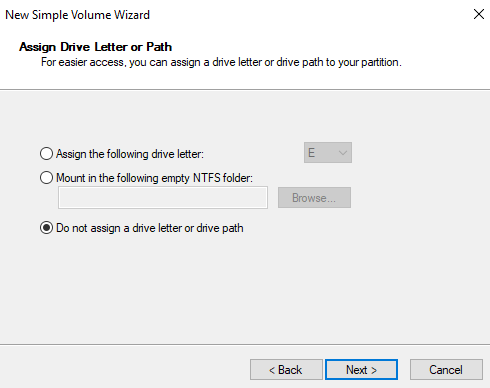
- You can give the new partition a name if you want it does not mater. I’m going to call mine New Recovery.
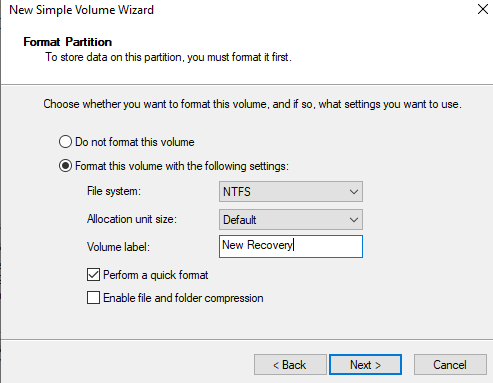
Disk Management should now look something like this.
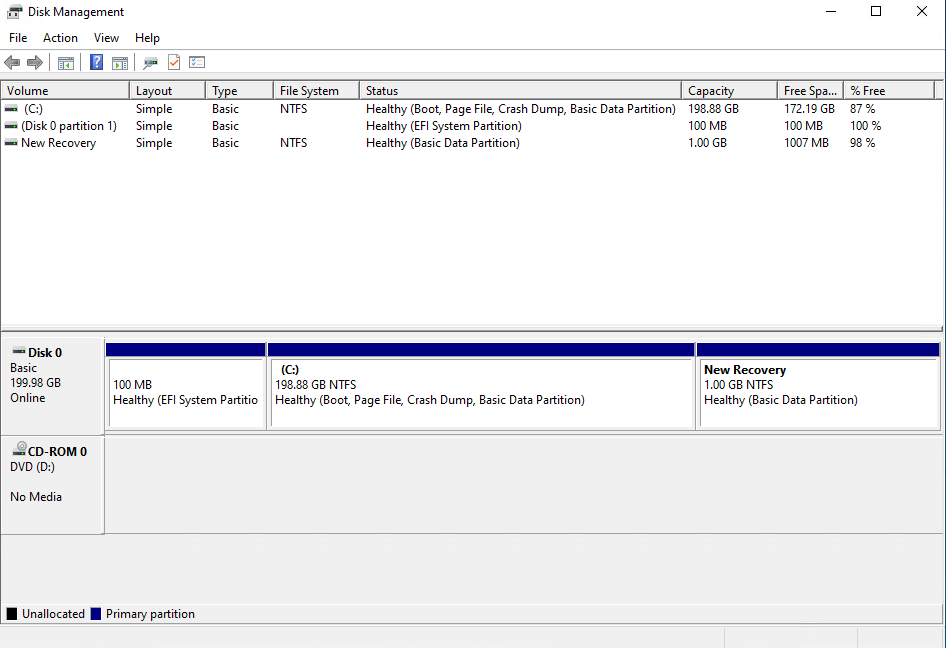
Back to DiskPart
- In DiskPart list your partitions again by running the command
list partition
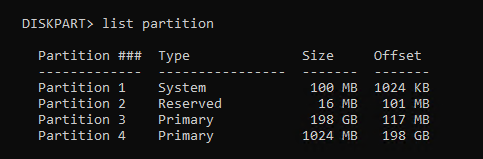
- Select the 1024 MB partition with the command
select partitionand the partition number. In my setup it was partition 4 and the command I ran wasselect partition 4
If you have a GPT disk you need to run some very specific command and if you have an MBR disk you need to run different very specific commands.
GPT disk
On GPT disks we need to change the partition ID to de94bba4-06d1-4d40-a16a-bfd50179d6ac which tells Windows that this is a recovery partition
- Run the following command to set the partition as a recovery partition
set id=de94bba4-06d1-4d40-a16a-bfd50179d6ac

We also need to hide the drive and flag it as a required partition to do that we have to set a GPT attribute to 0x8000000000000001
- Run the following command to set the GPT attribute to hide the drive and flag it as required
gpt attributes=0x8000000000000001

- Now we can exist DiskPart.
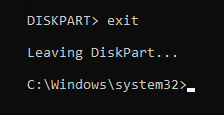
MBR disk
On MBR disks we need to change partition ID to 27 which will tell Windows that this is a recovery partition.
- Run the following command to set the partition as a recovery partition
set id=27

- Now we can exist DiskPart.
Enabling The Windows Recovery Partition
- Now we can re-enable the recovery partition by running the command
reagentc /enable

The reagentc /enable command will copy the Winre.wim file from C:\Windows\System32\Recovery into our new recovery partition.
If you look at Disk Management again everything shows up correctly.
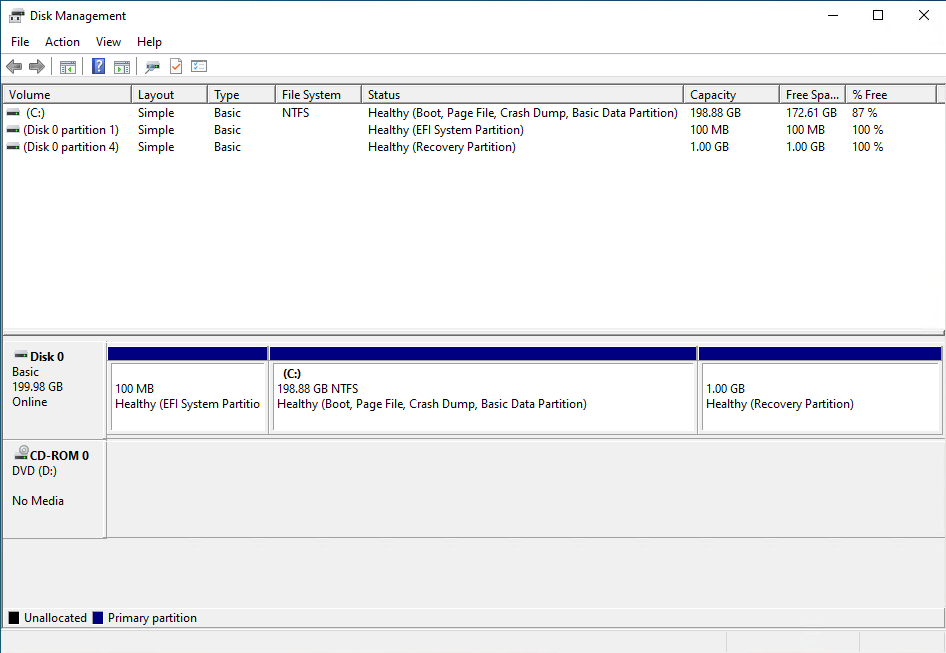
That’s all there is to it.
Technically speaking we did just delete the Windows Recovery Partition but we did so in a way to keep our existing recovery partition safely intact and then we rebuild the recovery partition and re-enabled it.
I prefer doing it this way as it leaves your recovery options intact and you can do it all live without any reboots.
If you want to read more about deploying the Windows Recovery Partition you can do so by reading Microsoft’s documentation about it.
If you want to read more about reagentc command you do so by reading Microsoft’s documentation about it.