
NVM - Node.js Version Manager
When maintaining Angular apps and other Javascript-based libraries, you will come across the need to have a specific version of Node.js running on your development host.
Node Version Manager, is a Windows based package, that will swap in desired versions of Node.js as needed.
NOTE: If you are installing NVM and Node on a Jenkins server, you will need to run all of the following under the jenkins user context.
See this page for how to impersonate the Jenkins user: Linux: Impersonating Users
As a quick answer, run this to become the Jenkins user, for the purpose of the steps in this article, you can use:sudo su jenkins
Or:sudo -u jenkins bash
And, be sure to exit from the jenkins user context, when finished.
Installing NVM
For Windows
Download and install the latest version of nvm for Windows.
For Ubuntu
Run the following:
curl -fsSL https://raw.githubusercontent.com/nvm-sh/nvm/v0.39.5/install.sh | bashIf the above gives you any warning that it had trouble editing your shell profile file, try running it as sudo.
NOTE: If you are installing NVM for a system account, such as Jenkins, follow the steps in the Jenkins section, first.
If the above, failed to edit your profile file, you can always edit your profile file manually, like this:
Your shell profile file will be one of the following: ~/.bashrc, ~/.profile, or ~/.bash_profile
export NVM_DIR="$HOME/.nvm"
[ -s "$NVM_DIR/nvm.sh" ] && \. "$NVM_DIR/nvm.sh"  # This loads nvm
[ -s "$NVM_DIR/bash_completion" ] && \. "$NVM_DIR/bash_completion"  # This loads nvm bash_completion
Once appended, save and close.
If you have an open shell session as the system account user, execute this to apply the changes you just made:
source ~/.bashrcJenkins-Specific Problems
For a Jenkins install on an Ubuntu build server, the above curl command gives this warning:
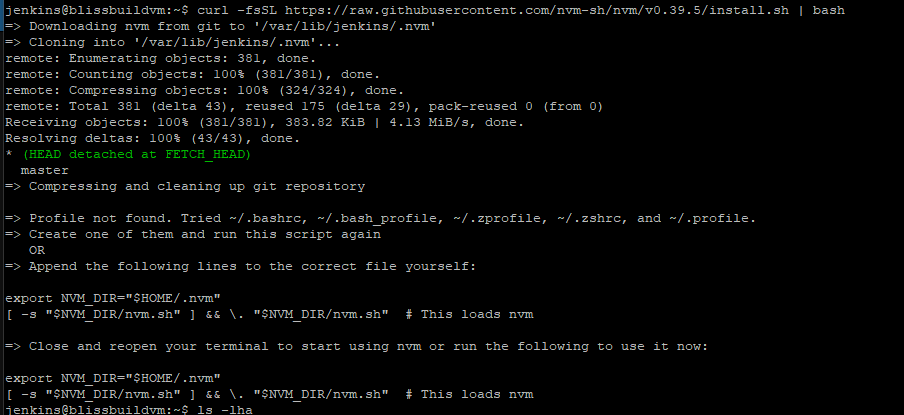
This is because the Jenkins user is a system account, and the NVM installer cannot determine a profile file to update.
Follow the steps on this page, to add a shell and profile file for the Jenkins user: Ubuntu: Converting a System Account to Interactive
Once complete, you can rerun the NVM installer, and it should complete without issue.
NOTE: If you are installing NVM on a Jenkins build server, the nvm.sh script that gets installed does not have execute permission by default. This will cause an error during a Jenkins build job, when using NVM to change or install a version of Node.js.
To fix this, allow execute permission for the script with this:sudo chmod 774 ~/.nvm/nvm.sh
Verify NVM Install
Run the following to confirm that NVM is installed.
NOTE: NVM is installed on a per-user basis. So, you will need to be in a shell session of the specific user.
nvm --versionOnce confirmed installed, you can install the desired Node.js versions that NVM will manage for you.
Usage
Installing Versions
Once installed, you need to tell NVM to install the desired Node.js versions that it will manage for you:
nvm install 16
nvm install 20
nvm install 22
Switching Versions
With the desired versions of Node.js installed, you can use these commands to switch between them:
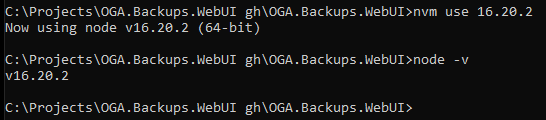
To run Node.js v16 (for Angular v14):
nvm use 16.20.2
To run Node.js v20 (for Angular v17):
nvm use 20.18.3
To run Node.js v22 (for Angular v19):
nvm use 22.14.0
NOTE: Each time you tell NVM to switch versions, it may require answering a UAC popup.
Verifying Active Version
And once NVM has switched in the desired Node.js version, you can call this, to verify:
node -v
Listing Installed Versions
Use this command to see what versions of Node.js are installed and managed by NVM:
nvm list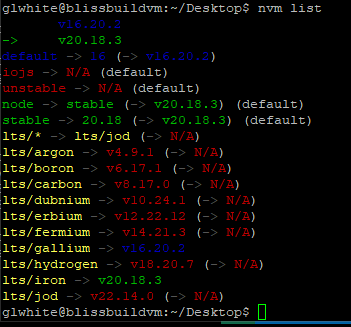
No Comments