
Backup Service UI
Here's some notes on how to develop Angular in a Monorepo, with a specific (non-global) Angular version.
What this means is, we will install the desired version of Angular, specifically for the application, so that multiple versions can exist on our development machine, without interference.
1. See this page for Angular version compatibility, before choosing the version you will use: Developing in Multiple Angular Versions
2. Once you decide on the version of Angular, you need to ensure your development host includes NVM, to manage your Node.js version.
Follow the instructions, here, to setup NVM: Node.js Version Support
The above link includes instructions for how to setup and swap in the desired version of Node.js.
3. Once NVM is installed and you've had it install the Angular-compatible Node.js version, you can continue.
4. Tell NVM to swap in the compatible version of Node.js.
For example, Angular 17 works with Node.js v20.18.3:
nvm use 20.18.3
5. Before creating your project, make sure your development host is using the correct NPM repository.
Currently, we have a NPM repository running on the house build server, that holds all build packages.
As well, it proxies all package requests to the public NPM repository.
So, be sure that your dev host is configured to use it.
NOTE: See this page for details: Private NPM Repository
If needed, use this command to point all projects to it:
npm set registry http://192.168.1.200:4873
To confirm that the house NPM repository is configured, use this:
npm config get registry
If setup, it will respond with this:

6. Create a baseline GitHub project, and note its url
For example, we have a GH project at: LeeWhite187/OGA.Backups.WebUI
7. Create a folder in your dev host and checkout the GH project to it.
8. Create a subfolder inside the checkout root with the same name as the GH project.
NOTE: This folder will be adjacent to the checked out LICENS and README.md, like this:
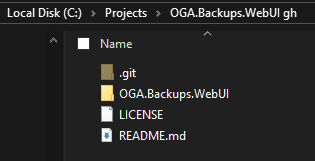
The created folder will hold the dev workspace, assets folder, library projects, etc.
9. Open a command window, and navigate to the created subfolder.
10. Execute this command in the folder, to create monorepo workspace, with an Angular 17 intent:
NOTE: If the above hangs, you may need to update your NPM version, with this:npm install -g npm
The above creates a root monorepo workspace named, 'dev-workspace', without an application, and ready for Angular 17.
NOTE: Specify a different angular cli version if needed.
See this article for what a monorepo is and provides: Angular: MonoRepo Tutorial
NPX will churn for a bit, downloading packages and populating the workspace.
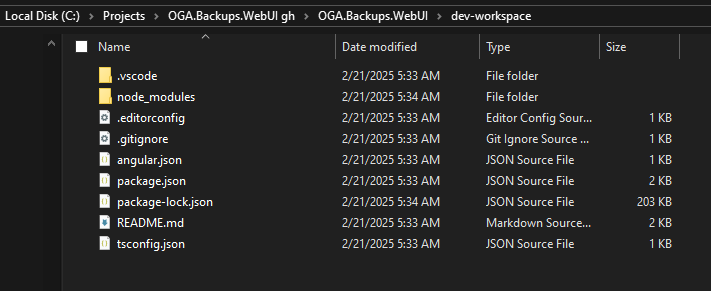
11. Once finished, change to the workspace folder (with a cd command).
The workspace will look something like this:
12. Once your command prompt is changed to the workspace folder, you can install the desired Angular version for the monorepo, with this:
npm install --save-dev @angular/cli@17.0.7
You can open the workspace folder in VSCode, and continue.
With the workspace is open in a command line, you can verify the local Angular version of the monorepo, with this:
npx ng version
13. Open the README.md file in the workspace root, and add these lines to it, as a reminder of things you must do each time it is checked out:
On checkout, you will need to do the following things:
    Tell NVM to swap in the needed Node.js version for the project:
        nvm use 20.18.3
    Pull down any packages needed for building, with this:
        npm install
The above includes the command to swap in the Node.js version, compatible with the project's Angular version.
And, the other downloads packages for building.
14. Update the README.md to list usage of npx ng, instead of ng.
This is required, since we are using a local Angular version.
Doing so, means the following changes to ng command usage:
- 'ng serve' becomes 'npx ng serve'
- 'ng generate' becomes 'npx ng generate'
- 'ng build' becomes 'npx ng build'
- 'ng test' becomes 'npx ng test'
- 'ng e2e' becomes 'npx ng e2e'
- 'ng help' becomes 'npx ng help'
15. Enforce local CLI usage, by adding a file to the workspace root, called: .npmrc.
Give it this content:
engine-strict=trueThis will force npm to use the locally installed Angular CLI.
16. Open package.json, and update the scripts to use 'npx ng', instead of 'ng'.
Like this:
  "scripts": {
    "ng": "ng",
    "start": "npx ng serve",
    "build": "npx ng build",
    "watch": "npx ng build --watch --configuration development",
    "test": "npx ng test"
  },
17. In order for the projects of your workspace to reference any shared assets or libraries, you must set the baseUrl in the tsconfig.json file, like this:
/* To learn more about this file see: https://angular.io/config/tsconfig. */
{
  "compileOnSave": false,
  "compilerOptions": {
    "baseUrl": "./",
    "outDir": "./dist/out-tsc",
    "forceConsistentCasingInFileNames": true,
  ...
NOTE: We set the 'baseUrl' property to "./".
18. Read this page to create a shared asset folder in your workspace: Angular Shared Asset Library
Adding Projects
Now, you can generate applications in the monorepo with this:
npx ng generate application admin-appNOTE: We are using 'npx' instead of 'ng'. This is required
NOTE: If you are working in Angular 17 or later, and don’t want standalone components, add this: '--no-standalone'
Creating a library project in your monrepo is slightly different, with this command:
npx ng generate library sharedFor each app created in a monorepo, there are several things that have to be done, so it plays nicely with other apps, across the shared workspace.
-
We have to increase the app’s build budget values in the angular.json file.
-
We need to promote the app’s tsconfig file to be a “tsconfig.json” file.
-
We need to update the paths in the app’s tsconfig.json, because the root tsconfig doesn’t list them.
-
We need to update the application’s assets property in the angular.json file.
-
We need to copy over in app files and app config from another app project.
-
Each app needs its own app library folder, which contains commonly named components that are used by the Common-Library.
Refer to this page for how to do these things: Current Angular App Development
Additional Considerations
Here are some special things done to projects in a monorepo so that all apps share components and libraries: Current Angular App Development
Initial Checkout
NOTE: Each time you checkout this project from GH, you will need to run the following to set the Node.js version and download packages needed for build and testing:
nvm use 20.18.3
npm install
The above command swaps in the Node.js version, and reads the package.json and package-lock.json files and installs everything needed, including the locally-specified Angular CLI version.
NOTE: If you follows the above setup instructions, these are also in the workspace README.md.