
Windows .SSH Config File Syntax
Here are use cases that require editing the SSH config file in your Windows user profile.
References
Syntax reference for the SSH config file is here: https://www.ssh.com/academy/ssh/config
Tutorial for creating them: https://betterprogramming.pub/a-step-by-step-walkthrough-to-create-your-first-ssh-config-file-f01267b4eacb
General
In Windows, the SSH config file is located, here: c:\<user>\.ssh\config.
In Linux, it would be here: ~/.ssh/config
An SSH config file will look something like this:
# Read more about SSH config files: https://linux.die.net/man/5/ssh_config
Host 192.168.1.89
    HostName 192.168.1.89
    User glwhite

Host updateserver
    HostName 192.168.1.160
    User glwhite
    IdentityFile K:\keys\ecdsa-key-glwhite-desktop-20221115\ecdsa-key-glwhite-desktop-20221115.key

# Added this block to allow git to use the correct ssh key when authenticating to github.com
Host github.com
    HostName github.com
    User git
    IdentityFile ~/.ssh/ecdsa-glwhite-DesktopJ60PCHC-github-20230118

# linux debug test vm
Host 192.168.1.90
    HostName 192.168.1.90
    User glwhite
The above example shows several host entries.
Some of the entries are added automatically, when accepting the public SSH key of a host on new connection.
Others, can be manually added by following the above as examples.
Note that some entries specify an SSH key, via 'IdentityFile'.
This is how you can assign a non-default SSH key pair to a particular connection.
If an IdentityFile entry is not specified, SSH will use the default key at:
The default for protocol version 1 is ~/.ssh/identity.
For protocol version 2, it is ~/.ssh/id_rsa or ~/.ssh/id_dsa.
VSCode Remote Explorer via SSH
When using the Remote Explorer plugin in VSCode, you will likely need to setup an SSH key for access.
Follow the normal methods to setup the key pair.
NOTE: Modern Ubuntu hosts will disallow RSA keys. So, create keys with ECDSA.
Be sure to add the public key to the Authorized_keys file on the target host.
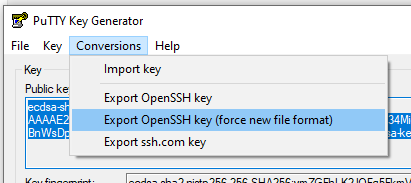
If you created the private key with PuttyGen, make sure to save a key in the OpenSSH key format, by using this:
Now, open your SSH config file at: C:\<user>\.ssh\config.
Create a host entry in the config file, that has this form:
Host updateserver
    HostName 192.168.1.160
    User <username>
    IdentityFile <Filepath to key file>
    Port 22
Here’s what each field means:
-
Host - is the friendly name of the target
-
HostName - is the IP address or FQDN
-
User - is the username that your session will login as. This is also the user, who’s Authorized_keys file contains the matching public key to the private key at the IdentityFile path
-
IdentityFile - This is the Windows-formatted filepath to the private key.
-
Port - optional parameter, if the SSH server doesn’t listen on 22.
Here’s an example of what a host entry would look like for accessing an Ubuntu VM with a private key:
Host updateserver
    HostName 192.168.1.160
    User glwhite
    IdentityFile K:\keys\ecdsa-key-glwhite-desktop-20221115.key
Committing to Github from Visual Studio
By default, Visual Studio will only use the ssh keys in your ssh folder that have the recognized default names.
So, if your existing key has a non-default name, you’ll need to create a host entry to pair the key with the target host (github.com in our case).
Open your ssh config file, located here: C:\Users\<username>\.ssh\config
The following example is what a host entry would look like that assigns a particular key to a host:
# Added this block to allow git to use the correct ssh key when authenticating to github.com
Host github.com
	HostName github.com
	User git
	IdentityFile ~/.ssh/LeeWhite187-github-usl084805-20220815
It may be necessary to restart the openssh service, after making changes to the config file.
Once updated, you can now test if Visual Studio lets you push and pull from a Github repository.
No Comments