
Create Nuget for Multiple Targets or Architectures
Creating nuget packages that contain libraries for multiple frameworks or runtimes, requires some non-trivial effort.
So, this page explains the steps required.
Some of this was taken from here: Non-Trivial Multi-Targeting with .NET
Project Setup
For multiple runtimes, add a Configurations line to the csproj file, like this:
  <PropertyGroup>
    <TargetFramework>net6.0</TargetFramework>
    <Configurations>DebugWin;ReleaseWin;DebugLinux;ReleaseLinux</Configurations>
The above are simple names for the build configurations for Debug and Release of both Windows and Linux runtimes.
Then, add these property groups, like this:
  <PropertyGroup Condition="$(Configuration.EndsWith('Win'))">
    <DefineConstants>$(DefineConstants);Windows</DefineConstants>
  </PropertyGroup>

  <PropertyGroup Condition="$(Configuration.EndsWith('Linux'))">
    <DefineConstants>$(DefineConstants);Linux</DefineConstants>
  </PropertyGroup>

  <PropertyGroup Condition="$(Configuration.EndsWith('OSX'))">
    <DefineConstants>$(DefineConstants);OSX</DefineConstants>
  </PropertyGroup>
The above conditions map a configuration name to constants that can be used as a pre-processor directive, to conditionally build code.
You can use these constants (Windows, Linux, OSX) to selectively build code and classes, like the following:
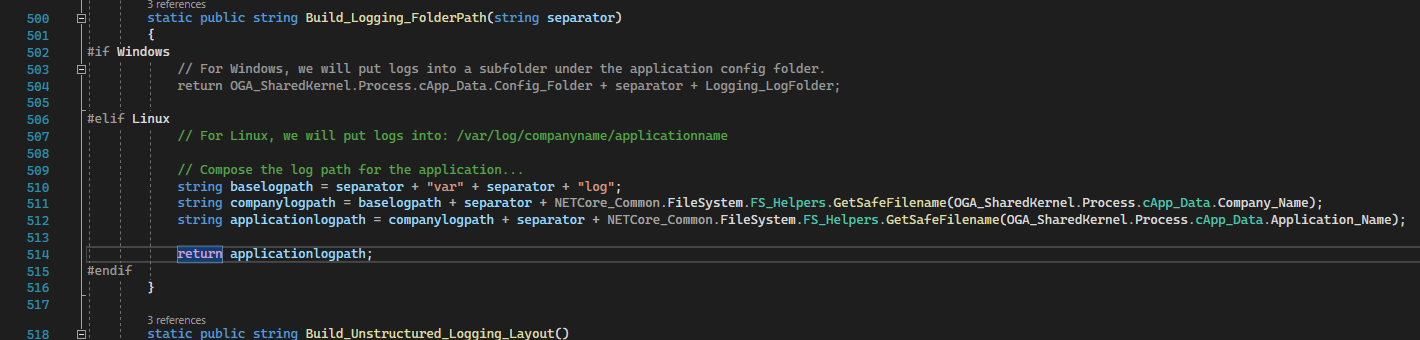
NOTE: The Windows section is grayed out, indicating that the Linux section is the configured build:
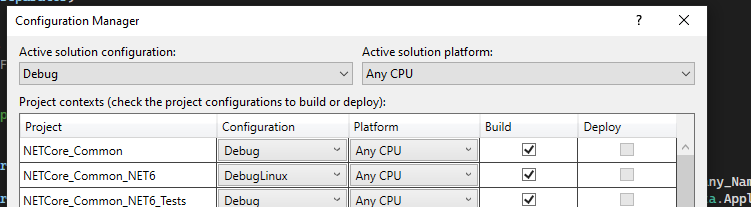
These elements allow you to now use configuration names (DebugLinux, DebugWin, etc.) to selectively compile blocks of code for a particular runtime target.
NOTE: These configuration names will be specified during command line builds, along with matching runtime selections, so the library can be compiled for a particular OS.
Nuspec Generation
Here’s some additional instruction on how to create a library nuget package with multiple framework targets or multiple architectures (linux, windows, osx).
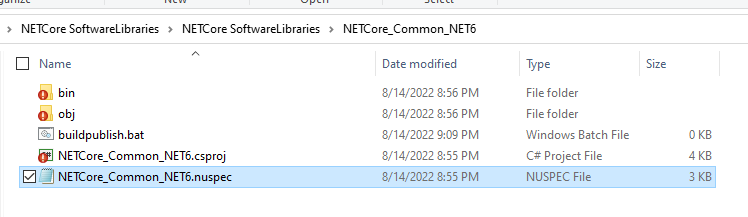
In the project folder of the solution (where the csproj) lives, create a nuspec file with the same name as the project, like this:
In the nuspec file, there are three major sections to fill out:
-
Metadata
-
Dependencies
-
Files
Metadata
Fill out this section with the Package ID, Title, Version, Authors, Description, etc… like the following:
<?xml version="1.0" encoding="utf-8"?>
<package >
  <metadata>
    <id>NETCore_Common_NET6</id>
    <title>NETCore Common Libraries</title>
    <version>1.4.6</version>
    <authors>Lee White</authors>
    <owners>Lee White</owners>
    <requireLicenseAcceptance>false</requireLicenseAcceptance>
    <description>Common functional elements, such as logging, config, process interrogation, etc...</description>
    <releaseNotes>(Please write the package release notes in "NETCore_Common-RELEASE_NOTES.txt".)</releaseNotes>
    <copyright>$copyright$</copyright>
Make sure the ID is unique, for the nuget repository, as this identifies the package for all.
Make sure the version follows the semantic conventions, and always increments on each push to the nuget repository.
Dependencies
Set the dependencies of the project based on the target framework, assembly references, and package references it has. Like this:
    <dependencies>
      <group targetFramework="net6.0">
        <dependency id="Microsoft.Extensions.Configuration" version="6.0.1" exclude="Build,Analyzers" />
        <dependency id="Microsoft.Extensions.Hosting.WindowsServices" version="6.0.0" exclude="Build,Analyzers" />
        <dependency id="Mono.Posix.NETStandard" version="1.0.0" exclude="Build,Analyzers" />
        <dependency id="NLog.Web.AspNetCore" version="5.0.0" exclude="Build,Analyzers" />
        <dependency id="Newtonsoft.Json" version="13.0.1" exclude="Build,Analyzers" />
        <dependency id="OGA_SharedKernel_NET6" version="1.1.1" exclude="Build,Analyzers" />
        <dependency id="System.IO.FileSystem" version="4.3.0" exclude="Build,Analyzers" />
        <dependency id="System.IO.FileSystem.AccessControl" version="5.0.0" exclude="Build,Analyzers" />
        <dependency id="System.Management" version="6.0.0" exclude="Build,Analyzers" />
        <dependency id="System.Net.NetworkInformation" version="4.3.0" exclude="Build,Analyzers" />
        <dependency id="System.Security.Principal.Windows" version="5.0.0" exclude="Build,Analyzers" />
      </group>
    </dependencies>
  </metadata>
Quick and Dirty Dependency Collection
To ensure, your nuspec file has the correct dependency listing needed, you can run the dotnet pack statement to generate a nupkg, and check its nuspec contents.
To do this, open a command line, and run the dotnet build for the library.
dotnet build "./NETCore_Common_NET6.csproj" -c DebugWin --runtime win-x64 --no-self-contained
Then, run the dotnet pack command for the library, to generate a nuget package file that you can extract the file set from. Like this:dotnet pack "./NETCore_Common_NET6.csproj" -c DebugWin
Locate the nupkg file that was generated, and open it with 7zip. Open the nuspec file inside the package, and copy out the dependency list from the bottom of it. Then, paste that into your nuspec file.
Files
The file section is in three pieces. And, filling it out requires knowing of any target framework or runtime needs.
The big catch here is that the documentation for this is rather sparse and doesn’t really describe a couple of key aspects about how it works.
The trick is to understand three important folders in the NuGet package and how they’re used when the package is installed under .NET Framework vs .NET Core.
Here is the basic structure of the file target section:
-
/lib/{tfm}
-
/ref/{tfm}
-
/runtimes/{rid}/lib/{tfm}
In these paths:
-
{tfm} stands for TargetFramework and should match the names in the csproj file eg: net461 and netcoreapp2.0
-
{rid} is the runtime identifier and can be any identifier from the runtime graph. See this blog post by Nate McMaster for a good explanation of this. For our purposes we just need win and osx for our two target operating systems.
Here’s how these folders should be used:
-
The /lib folder should be used for assemblies that for a particular framework, are the same on all run-times.
-
The /ref and /runtimes folder should be used when a particular .NET Core framework has different implementations for different run-times.
-
The /ref folder should contain any assemblies that define the API for the package and will be added as references to the target project.
Think of these as compile time references. -
The assemblies in the /ref folder don’t need to contain implementations of the API (they could all just throw not-implemented exceptions).
You normally populate entries in this folder by grabbing one of the run-time implementations and declare that as the API. -
The /runtimes folder should contain the implementation assemblies for each .NET Core run-time. These files will be used when running or deploying the project.
-
The /runtimes folder can also contain additional assemblies that are required at runtime but don’t need to be visible to the client project at compile time.
-
Adding assemblies to the /runtimes folder won’t cause them to be added as a reference to the target project.
You must have an associated assembly in the /ref folder.
For example, here’s a simple file section for a library with a single target framework (net6.0) and runtime (any):
<file src=".\bin\DebugWin\net6.0\win-x64\NETCore_Common_NET6.dll" target="lib/net6.0" />
<file src=".\bin\DebugWin\net6.0\win-x64\NETCore_Common_NET6.pdb" target="lib/net6.0" />
If your library has multiple target runtimes (like linux, windows, osx, etc, x86, x64, etc…), use the /ref and /reference folders, like this:
    <file src=".\bin\DebugWin\net6.0\win-x64\NETCore_Common_NET6.dll" target="ref\net6.0" />
    <file src=".\bin\DebugWin\net6.0\win-x64\NETCore_Common_NET6.dll" target="runtimes\win-x64\lib\net6.0" />
    <file src=".\bin\DebugWin\net6.0\win-x64\NETCore_Common_NET6.pdb" target="runtimes\win-x64\lib\net6.0" />
    <file src=".\bin\DebugLinux\net6.0\linux-x64\NETCore_Common_NET6.dll" target="runtimes\linux-x64\lib\net6.0" />
    <file src=".\bin\DebugLinux\net6.0\linux-x64\NETCore_Common_NET6.pdb" target="runtimes\linux-x64\lib\net6.0" />
Couple things to note on the above example:
The library (Net Core Common) is targeting x64 on Windows and Linux, and is for the same target framework (net6.0).
The library dll gets listed in the /ref folder, as a compile time reference.
The library pdb gets listed alongside its dll, so the symbol packages can be generated.
And, separate runtime folders are under /runtimes, for each of the target runtimes (windows and linux).
All libraries are from the project’s /bin/Debug folder, so they can include PDB files for debugging. This can be changed by referencing files from the ReleaseWin and ReleaseLinux folders.
But doing so, will prevent access to symbols and debugging. As well, file names and line numbering will not be directly accessible in logging.
Build, Package, Publish
With the above project settings and nuspec file created, you can now perform a series of command line builds (for each runtime and target).
Then, those can be packaged into a single nupkg file that can be pushed to a repository and consumed by others.
Here’s a local article with template scripts that can be used: Nuget Build and Publish Scripts for Multiple Targets
For example…
The NetCore Common Software Library can be built, packaged, and published with the following commands.
Open the command line to the project folder, and do the following:
Build the Linux and Windows libraries in Debug mode:
dotnet build "./NETCore_Common_NET6.csproj" -c DebugLinux --runtime linux-x64 --no-self-contained
dotnet build "./NETCore_Common_NET6.csproj" -c DebugWin --runtime win-x64 --no-self-contained
If successful, the output of the above builds can be packaged with either of the following:
Separate Symbol File
The following will create a nupkg with the dll and xml files in it.
And, a separate symbol pacakge (snupkg) with the pdb files in it.
What makes that happen is the switches '-symbols -SymbolPackageFormat snupkg'.
nuget.exe pack ./<nuspecfilename>.nuspec -IncludeReferencedProjects -symbols -SymbolPackageFormat snupkg -OutputDirectory bin -Verbosity detailedNuPkg with Pdb Files
If you are wanting a nupkg file that includes both pdb and dll files, use this variation.
The following will create a nupkg with both dll and pdb files in it.
It will NOT generate a separate symbol package file.
nuget.exe pack ./<nuspecfilename>.nuspec -IncludeReferencedProjects -OutputDirectory bin -Verbosity detailedPublishing to Nuget Repo
The above command should have generated a nupkg file, as well as a symbol file.
The nupkg can be published to the nuget server with:
dotnet nuget push -s https://buildtools.ogsofttech.com:8079/v3/index.json "P:\Projects\NETCore SoftwareLibraries\NETCore SoftwareLibraries\NETCore_Common_NET6\bin\NETCore_Common_NET6.1.4.6.nupkg"And, the snupkg file can be published to the nuget repo with this (just changing the file extension):
dotnet nuget push -s https://buildtools.ogsofttech.com:8079/v3/index.json "P:\Projects\NETCore SoftwareLibraries\NETCore SoftwareLibraries\NETCore_Common_NET6\bin\NETCore_Common_NET6.1.4.6.snupkg"If that completed, you can confirm the version is available for consumption at this link:
https://buildtools.ogsofttech.com:8079/packages/netcore_common_net6/1.4.6
No Comments