
HowTo: Create a New Cloud Service or Library
Current as of: 20250126
This list will be revised as more steps get automated.
This is a working list of manual steps that cover the genesis to deployment of a new cloud service, library, or app.
It includes steps to define, document, create, configure, automatically build and version, and deployment of a new cloud service.
Lots of the grunt work for this process is already automated. But, this list covers the remaining manual steps, that span documentation, service tracking, build config, GitHub, repositories for binaries and containers, and deployment.
General
Services are built from source using an automated build process on a dedicated build server. Because of this, some regularity in naming and library consumption is necessary. As well, the automated build process leverages some conventions for proper binary storage and containerization.
Deployment scripting is a bit more flexible in its internal naming, but still requires that upstream binaries and containers are regularly named.
The following is a list of required elements for a service, and include embedded tasks that must be performed to satisfy each one.
Service Naming
Each service requires a unique name. This name will exist in the source code, check out folder name, github repo path, binary name, artifact storage, docker container name, folder paths in deployment, API calls, etc.
And, each of these pieces has subtly different restrictions, to be discussed below.
So, it is critical that we follow a regular convention of service naming, for both easy identification and for low-friction deployment.
Task #1: Give the service a name that fits the convention of: <app>.<servicename>.<category>
For example:
The Email Notification Service (of the Bliss Cloud architecture) would be named:
Bliss.EmailNotification.Service
The User Presence Service would be similarly named:
Bliss.UserPresence.Service
See below for a description of each component of a service name.
App Name
Currently, the app is named: “Bliss”
Service Name
The service name should be a non-hyphenated, title-case, string.
Underscores are acceptable. But, all services to date, are named with title-case and no underscores.
Category
This string can be “Lib” for libraries that may be used across services and client applications.
Or, for services that function as
-
Service - for services that provide a definite function to a connecting client
-
API - for endpoints hosts that are really ingress brokers for other services.
-
Host - for services that provide web content without an API, such as a static content host.
-
Lib - for libraries that may be used across services and client applications
Service Name Casing
Since Windows is case-agnostic, we won’t encounter any casing problems during development testing.
However, linux is case sensitive.
And as well, Docker is case sensitive for its container names (requiring all lower-case).
So, there will be some casing differences to adhere to, depending on where the service name is applied.
For example:
The linux filesystem path for the config folder, log folder, and binary folder, will be all lower-case.
As well, the service name in a docker container will be all lower-case, because Docker requires this.
Currently, the build server scripting and deployment scripting all handle the casing nuances for us, as long as we adhere to the above naming convention.
Service Endpoint
Public facing services have their own base api endpoint for public access.
The service endpoint is the base string, after the url origin, that defines what service should handle the url.
For example, the email notification service has a service endpoint of:
/api/apiv1/EmailService_v1Base Endpoint
Every service endpoint begins with a base endpoint string like this:
/api/apiv<version>/Base String
This base string (for all service endpoints) starts with “api”. Starting with “api” ensures that a top-level load-balancer and reverse proxy can easily differentiate web page requests from service requests, while providing a single origin for all client traffic.
And, being able to use a single top-level load balancer and reverse proxy for all client traffic prevents us from having any CORS requirements on web pages and services. This is a good thing.
API Version
Second, the base endpoint includes a “version” identifier. This version is in place for future needs, in case we must at some point, fork an entire section of API surface area to a different reverse proxy.
This may be necessary for handling legacy API calls with a dedicated set of legacy services and proxies, that can be easily distinguished.
Until this functionality is required, all APIs will use version “1”.
Meaning, all base endpoints will be: “/api/apiv1/”
Service Base Endpoint
The endpoint for each service includes a short-hand name of the service and a version of the service’s API.
This ensure we can quickly distinguish traffic to a particular version of a service, by its string name.
For example, the Email Notification Service has a short-hand name of, “EmailService”.
And, it is at version 1. So, it’s composite service base endpoint (including the base string) becomes:
/api/apiv1/EmailService_v1
NOTE: We prepended the endpoint with the base endpoint from earlier.
NOTE: Unless specifically needed, set the External Route to be the same as the Local Route. This simplifies the proxy middleware functionality by not requiring header modifications and redirect handling for API calls. And, this also ensures that API testing can be done with simple origin changes.
Proxy Routing WorkSheet
The Proxy Routing sheet in the Bliss API workbook contains the master list of routes and private-side ports.
Task #2: Create a new record in the Proxy Routing worksheet of Bliss API workbook. Include the composed service base endpoint from earlier.
Include the required data for the new service:
-
External Route - defined as the Service Base Endpoint
-
Service Name - service name
-
Local Route - defined as the Service Base Endpoint
-
Local Port - assign a unique port for the service binary to listen on.
Services Worksheet
Task #3: Update the services page with entries for where the service will run in each environment.
An entry will be needed in dev and prod. Add an entry for cloud dev in case we need to deploy it.
Service Configuration
Task #4: Update the Secure Share project in VSC.
-
First, add a folder for the new service.
-
Inside the service folder, create or copy the configuration files of each deployment type into the service folder.
-
Edit the appsettings.json file of each deployment to reflect the service name in the config and log folder strings.
-
Edit the config.json file of each deployment to reflect the needed connection config and other elements the service requires.
Task #5: Check in the changes to GitHub.
Task #6: Update Config Data on BuildServer
Update the secure share working copy on the build server in either of the following ways:
a. Open a Putty session to the build server, and navigate to the /mnt/secshare folder. Pull in the latest changes, so the build server has configuration for the new server.
NOTE: The secure share working folder is permission protected. So, you must use:
sudo git pullb. Execute the RunDeck job: Refresh Secure Share Checkout
GitHub Project
The source code for all services is stored in Github.
Each service gets its own repository, so that versioning and change tracking is simplified.
Task #7: Create a new github repository for the service. Make sure to use the service name from earlier.
Make the repository private, and include a readme.md file.
Working Folder
Task #8: Create a folder on the development machine. Give it a folder name of the service, appended with “gh” so we know its versioned in GitHub.
Task #9: Clone the services GitHub repository to the working folder.
This will create a location where the visual studio solution and service files can be stored.
VS Solution
Task #10: Create a VS solution for the service, in the working folder.
This solution needs the following:
-
Project Type to be a ASP Net Core Web API
-
Solution name to be the service name
-
Folder set to the github working folder created earlier
-
NET version to Net 5 - this will be changed to 6 after generation
-
Uncheck Configure for Https (most services are behind a proxy that terminates SSL for us)
-
Check Enable OpenAPI support (used for dev, but disabled in software)
Task #11: Copy the Jenkinsfile file from another service, into the solution folder (where the .sln is). No changes are required to this file. It is used by Jenkins and the automated build server.
NOTE: We no longer include a nuget.config file in the solution folder of the service. We, instead, use the nuget.config file in the user’s profile.
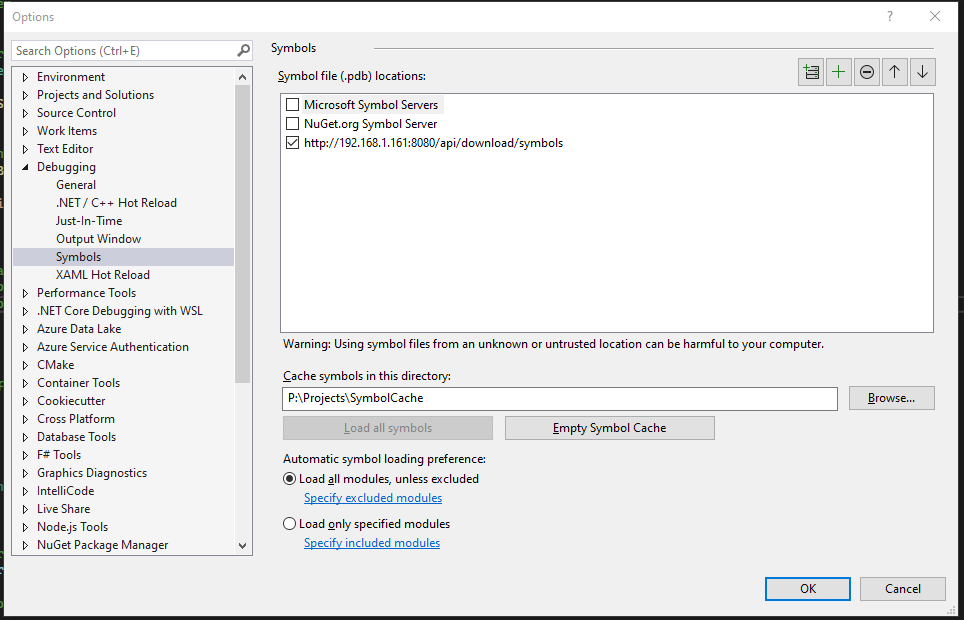
Task #12: Check that the Symbols server is used in the solution. This is confirmed by opening Tools/Settings/Debugging/Symbols, and confirming that the local symbol server is checked, like this:
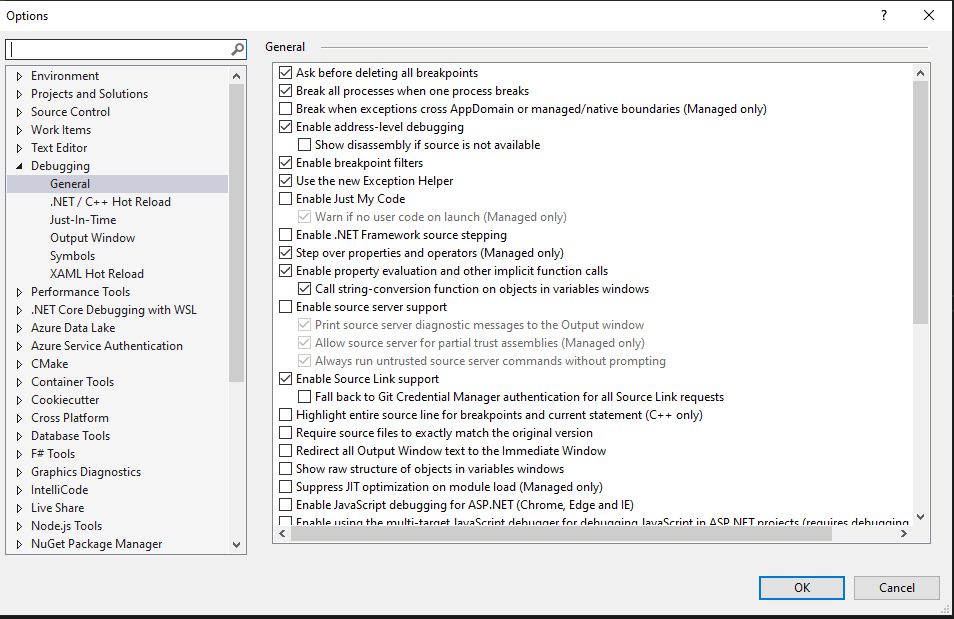
Also, check that debugging is configured to traverse source of 3rd-party code and that Source Link Support is enabled. This is done by unchecking “Enable Just My Code” and checking “Enable Source Link Support“, like below:
Service BoilerPlate
There are several standardized things for a service.
Task #13: After creation, update the project to be a Net 6 target.
Task #14: Edit the project.cs file, and copy over the property data from another service, so it includes the specific runtime targets and conditional compilation needs.
Task #14A: Add build properties to pull in pdb and xml files into the build output.
CopyDebugSymbolFilesFromPackages will tell the compiler to include any debug symbol (pdb) files from nuget packages.
CopyDocumentationFilesFromPackages tells the compiler to include any documentation (xml) files from nuget packages.
Below is the stanza to include in the base PropertyGroup of the csproj file.
<PropertyGroup>
    ...
    <CopyDebugSymbolFilesFromPackages>true</CopyDebugSymbolFilesFromPackages>
    <CopyDocumentationFilesFromPackages>true</CopyDocumentationFilesFromPackages>
</PropertyGroup>
Task #15: Update the Program.cs and Startup.cs files to include the flow from an existing service.
Task #16: Add standard library dependencies to the project, via nuget.
This can quickly be done by copying the package references directly from an existing project.cs file.
NOTE: If copying the package references, directly, you may need to delete the bin and obj folders, and do a Clean and Rebuild, so that Roslyn will update its database and clear most of the errors.
Task #17: Add boilerplate functionality for:
NOTE: The following controllers and functionality have been incorporate into the OGA.WebAPI_Base project.
Referencing this nuget package will automatically include the following elements.
-
Default controllers
-
Directory access
-
Helpers
-
RabbitMQ implementation
Task #18: Create a config.json file that reflect the connections the service requires.
Task #19: Update appsettings.json to reflect the config path and log folder.
Task #20: Create a folder path on the dev machine that mimics the config and log folder in appsettings.json.
This is needed for the service to run on the dev machine without throwing any errors because it cannot create logs.
NOTE: Be sure that the “Users” group has write access to the application config folder and subfolders. The service will generate an error if it cannot write to this.
Task #21: Remove the weather controller and weather class that come with the base API project.
Task #22: Update application data in Program.cs. Specifically, set the application name and process name to reflect the service name. And create a new Guid for the application_id.
These properties are located in Program.cs, here:
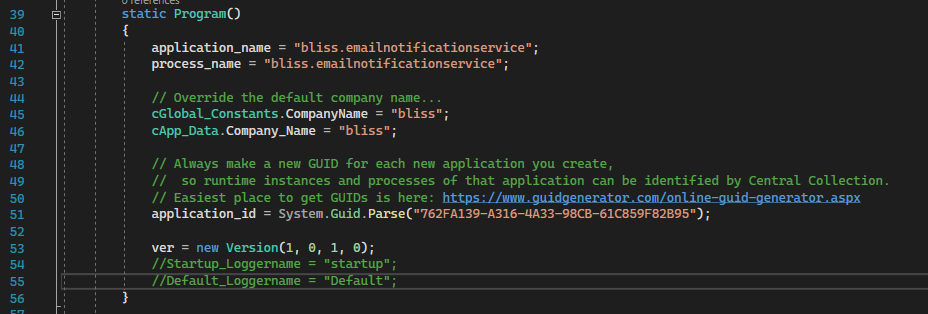
NOTE: It is not necessary to update the ver property.
This is edited by automated build scripting.
Task #23: Make it a habit of creating a folder within the project that is named for the service. And, place all service-specific elements inside that. This would include classes for controllers, models, service, queue, etc.
Doing this allows us to easily distinguish boilerplate from service-specific elements.
Task #24: Since we have no desire to use IIS for hosting services, change the debug dropdown from IIS Express to the service’s name. This will let us develop and troubleshoot the service as it runs under localhost.
Besides, IIS Express requires that VS be started with admin rights, to properly work. And doing so, would change the permissions on folders and files the service may touch during development. So, we bypass IIS Express to keep dev tasking simplified.
Task #25: Clear any errors, and run the empty service, to ensure it compiles and executes.
NOTE: Add a breakpoint in the catch block of Program.Main, so that we can check if any errors occur.
If it successfully compiles and runs, the Swagger OpenAPI page will display, and include the boilerplate API calls.
Initial Source Checkin
Task #26: Tell TortoiseGIT to ignore any .vs, obj, and bin folders.
To do this, open File Explorer, and navigate to the project’s folder.
Right-click on the .vs folder and add it to the ignore list.
Do the same for all obj and bin folders within project folders.
As well, add any Publish or Testing folders (in the solution folde) to the ignore list.
Task #27: Check the baseline source code into the github repository.
Task #28: Once checked in, open the repo in a browser and create the first repository tag with a version as: “1.0.0”. This will set the baseline for automated versioning of the service.
This action sets the baseline version of the service. But, this baseline version tag does not trigger any automated builds in Jenkins. So, we must make a change and tag that with semver and conventional checkins.
Task #29: Perform some non-functional change to the checked out service code. This can be as simple as editing the readme.md file.
Task #30: Check in the working folder to GitHub, being sure to include a check-in comment with a semver statement that will trigger automatic versioning. Like this:
Non-functional change made to service source, to trigger an initial automatic versioning during intial service build.

+semver: minor
This action will give the downstream Jenkins scripting the github comment marker it needs to see, to determine the next version of the service that will be built. In our case, the first version.
Service Building
Task #31: Open Jenkins, and navigate to the Services list. Create a new service build job.
It is probably best to copy an existing job, and edit all properties for the new service.
Be sure to update any service specific fields in the job.
Task #32: Trigger a service build to see if everything works as expected.
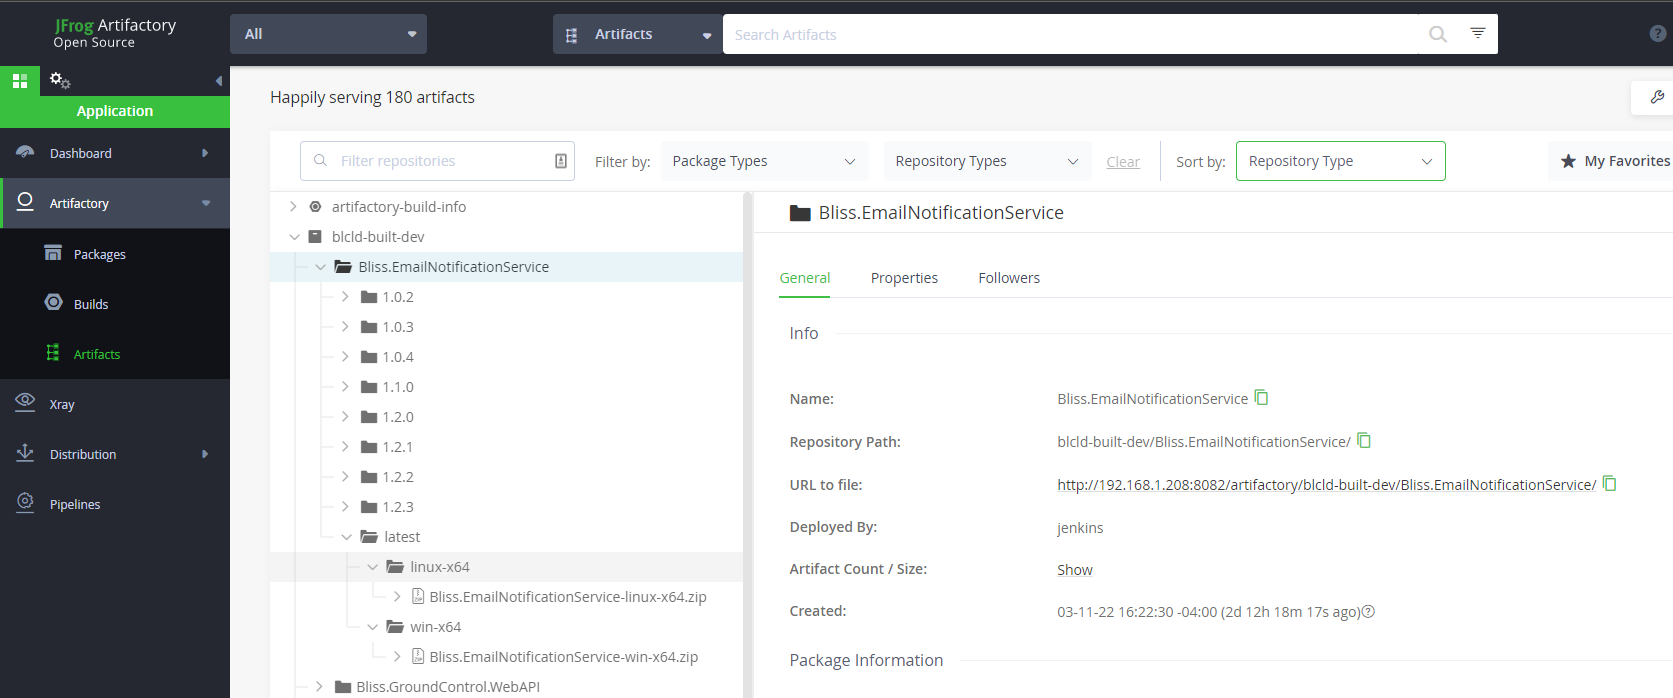
If the Jenkins pipeline is successful, the service has been compiled for Windows and Linux, and the binaries are stored in Artifactory.
This can be checked by opening Artifactory, and checking for the service binaries, here:
http://192.168.1.208:8082/ui/packages
Service Containerization
Task #33: Open Jenkins, and navigate to the Containers list. Create new service containerization jobs for each environment.
It is probably best to copy existing jobs, and edit all properties for the new service.
Be sure to update any service specific fields in the job.
If the Jenkins pipelines are successful, docker containers for the service should be created and stored in the container registry.
This can be checked by opening the docker registry, and checking for the containers, here:
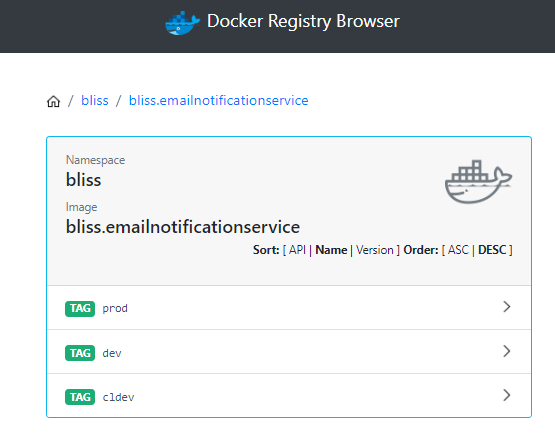
Deployment Configuration
For the service to get deployed to a cluster, it must have an Ansible role, and that role assigned to hosts.
Task #34: Open the Bliss.Infrastructure project in VSC, and add a role for the new service. This can be done by copying an existing service, renaming the folder, and editing its content.
In the vars/main.yml file, set the service’s proper name and local port.
The rest of the role’s files can remain the same.
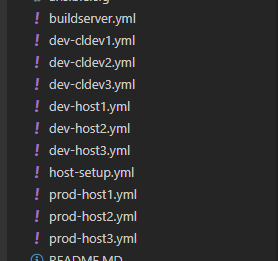
Task #35: Determine on what hosts the service will run, and update the Services worksheet of the Bliss API workbook. Once this is determined, edit the corresponding the host yml files, here:
Using the same example service, we’ve configured the email notification service to be deployed to dev-host3, like this:
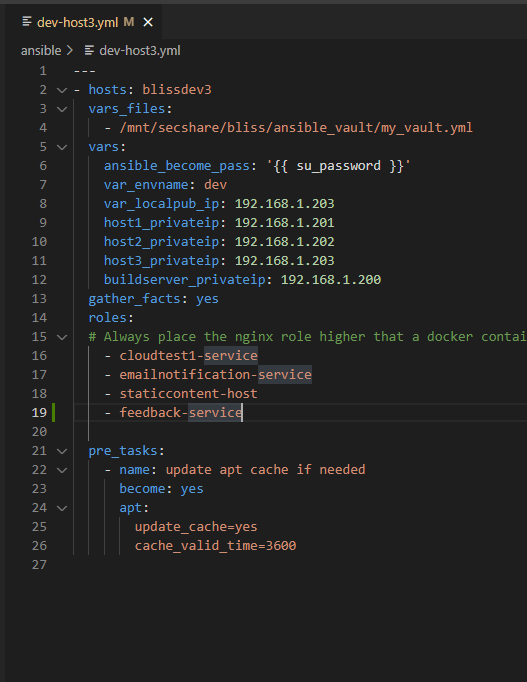
NOTE: The service name in the host file must match the folder name of the role that deploys the service.
Task #36: Open the nginx config file for each cluster, where the service will be hosted (likely dev and prod).
And, edit the yml file to insert an entry for the new service. This can be done by copying an existing service entry.
NOTE: Be sure to set the correct host address variable for which host will run the service. This variable may have a different name between clusters.
NOTE: Be sure to set the location and proxy path to match the endpoints defined in the External Route and Local Route fields of the Proxy Routing worksheet.
NOTE: Be sure to set the correct listening port for the service. This was also defined in the Proxy Routing worksheet.
Task #37: Once the new service role, host yml files, and nginx configurations are updated, check in the Bliss.Infrastructure to Github.
Task #38: Open a Putty session to the build server, and update its ansible files with a git pull on this folder:
/mnt/bliss_infrastructure/bliss_infrastructureThis will allow the ansible scripting on the build server to now, deploy our server to the appropriate hosts.
Deployment
Since the service does not really do anything yet, it will cause no harm to deploy it to the dev cluster.
Task #39: To do so, open a Putty session to the build server, and navigate to the ansible folder inside the Bliss.Infrastructure check out folder.
Then, run the appropriate ansible script to deploy changes to the dev host, like this:
ansible-playbook dev-host1.yml --ask-vault-passNOTE: If the service has public-facing API calls, it will be necessary to as well, run the ansible script for the host that runs the reverse proxy.
Automation Setup
Once the service can be successfully deployed, we can enable webhook on its repository. This allows other automation to track changes and automate builds and testing.
Task #40: Enable a webhook for the repository, so that build services will know when changes are made.
NOTE: This is done at the repository level if under a personal account. And, done at the organization level if the repo is under an organization.
NOTE: If you’re adding the project to an existing org-level github account, then the webhook is likely already setup.
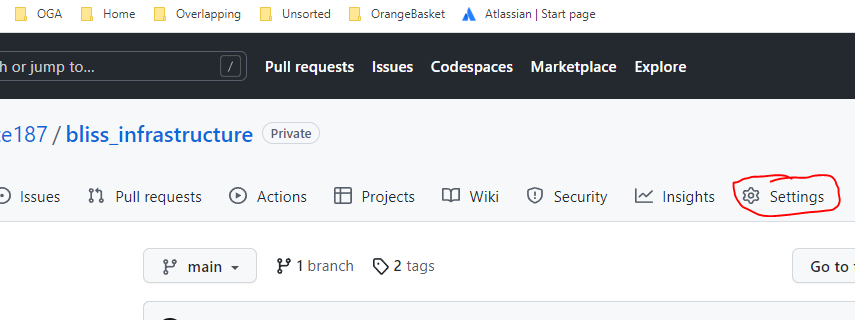
For a personal repository, open the Github page for the repository, and clich the gear (Settings).
On the Settings left menu, click Webhooks…
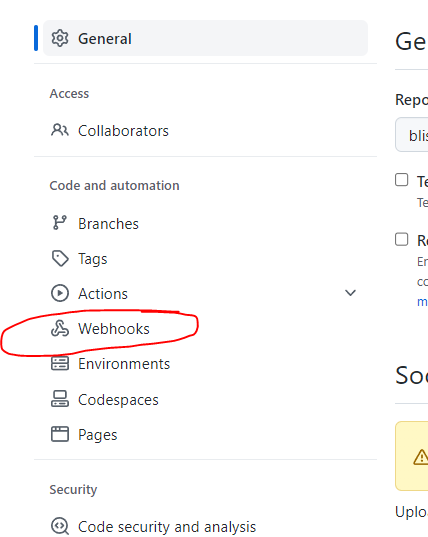
Click the Add Webhook button.

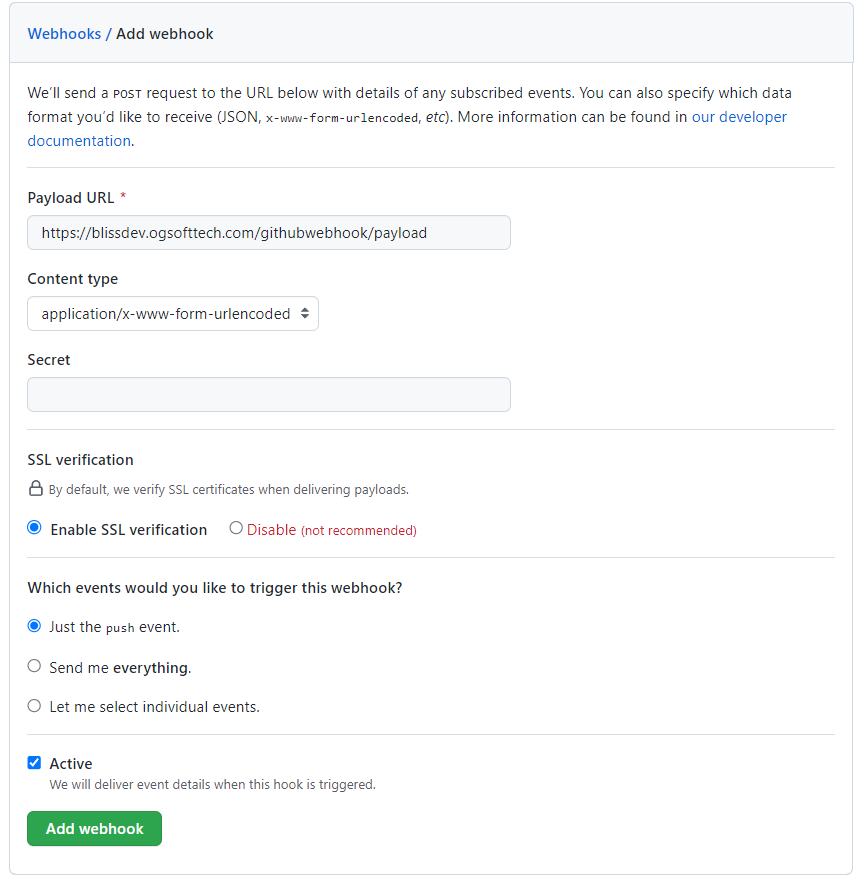
Set the Payload URL to our common GitHub Callback URL: https://blissdev.ogsofttech.com/githubwebhook/payload
Set the Content Type to JSON and assign a secret key.
It should look like this:
Click Add Webhook to start sending callbacks for changes to the repository.
You can verify the callback is working by clicking on the newly created webhook, clicking the Recent Deliveries tab, and clicking the ping event (looks like this)…
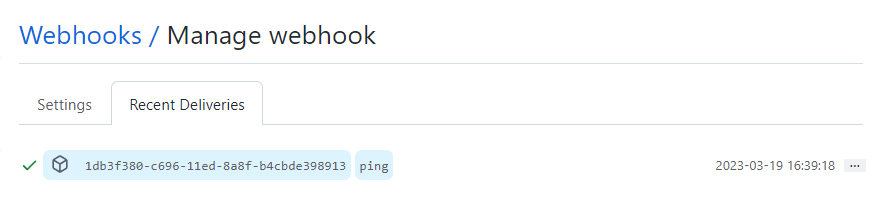
Clicking the event (in blue), will show the raw request and response, allowing you to confirm that a 200 was returned from the build service callback handler.
And, the raw request is available for troubleshooting if a 200 was not returned.
Repository Monitoring Entry
In order for Jenkins to build the project based on webhook feedback, we need to register the service/library/app with the Repository Monitoring Service.
Details of this are here: Repository Monitoring Service (RMS) Notes
But, the gist is, that we make a POST call to the RMS, that creates a new package record.
It lists the package name and type, Github repository url, Jenkins job, etc.
Task #41: Register the package with the RMS, so it can be tracked and automated builds can occur. We duplicate the instructions from the above link, below.
Compose a json should look like this:
{
  "eventTimeUTC": "2023-11-20T22:16:30.651Z",
  "eventId": "3fa85f64-5717-4562-b3fc-2c963f66afa6",
  "source": "",
  "eventType": "",
  "softwarePackage_Name": "OGA.WebUI.SharedKernel",
  "softwareType": "software.library",
  "jenkins_Job_Name": "Build-OGA.WebUI.SharedKernel",
  "jenkins_Job_FullPath": "oga-jobs/Libraries/Build-OGA.WebUI.SharedKernel",
  "repository_EventRepoName": "ogauto/OGA.WebUI.Dev"
}
Populate the above json payload with specifics for the package. And, be sure to set a unique eventId and time.
Send a POST to the RMS URL, here:
http://192.168.1.201:4181/api/apiv1/SoftwareProject_v1/Project
Give it the json payload composed from the above example.
Documentation
Task #42: Update the Cloud Architecture design spec with the new service.
Task #43: Update the Cloud Architecture drawing in Lucid Chart for the new service, any message queues, and other interactions it has.
Testing
Once built, containerized, and deployed, you should be able to hit one of the default endpoints of the new service, in the dev cluster. Try this one:
http:<dev host IP>:<port>/NOTE: This is just a composed URL of the base route for the service, we created earlier. The boilerplate controllers in each service includes a controller action that listens on the index (base route), and will reply with some info about the service, like this:

If you can read this, the service is running.
It will report its host and listening port, as well as, the service name and version.
REST Calls
Every service REST call should be listed in the REST Calls worksheet of the Bliss API workbook.
RabbitMQ Message Queues
Any RabbitMQ queues that a service consumes or produces, needs to be listed in the Queues sheet of the Bliss API workbook.
No Comments